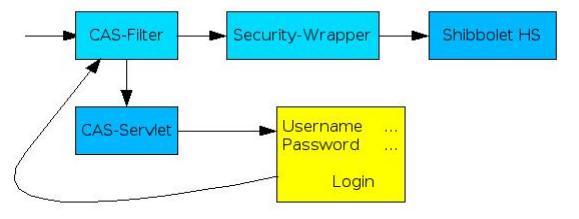
This means:
. If somebody wants to access a resource through Shibboleth, he is
redirected to the Shibboleth Handle Servlet.
. Before somebody can access the Handle Servlet two filters need to be
passed:
- CAS-Filter: Has the user already authenticated himself?
- No The request is redirected to the CAS-Servlet
where a login
page is presented to the user.
- Yes The user is allowed to access the second
filter.
- Security-Wrapper: this filter implements the security features
needed by the Shibboleth Handle Servlet. Shibboleth expects a different
authentication system (using the so called "user principal") as opposed
to the system offered by CAS (authentication through session cookie).
This filter provides the security information requested by Shibboleth
in a transparent way.
The
web.xml file of Shibboleth should then look like this:
<?xml version="1.0" encoding="ISO-8859-1"?>
<!DOCTYPE web-app
    PUBLIC "-//Sun Microsystems, Inc.//DTD Web Application 2.3//EN"
    "http://java.sun.com/dtd/web-app_2_3.dtd">
<web-app>
    <description>SWITCH Shibboleth Web-Application</description>

    <filter>
        <filter-name>CASFilter</filter-name>
        <filter-class>edu.yale.its.tp.cas.client.filter.CASFilter</filter-class>
        <init-param>
            <param-name>edu.yale.its.tp.cas.client.filter.loginUrl</param-name>
            <param-value>https://call-ho.switch.ch/cas/login</param-value>
        </init-param>
        <init-param>
            <param-name>edu.yale.its.tp.cas.client.filter.validateUrl</param-name>
            <param-value>https://call-ho.switch.ch/cas/proxyValidate</param-value>
        </init-param>
        <init-param>
            <param-name>edu.yale.its.tp.cas.client.filter.serverName</param-name>
            <param-value>call-ho.switch.ch</param-value>
        </init-param>
    </filter>

    <filter>
        <filter-name>ShibFilter</filter-name>
        <filter-class>ch.SWITCH.aai.shibcasfilter.ShibCasFilter</filter-class>
    </filter>

    <filter-mapping>
        <filter-name>CASFilter</filter-name>
        <url-pattern>/HS/*</url-pattern>
    </filter-mapping>

    <filter-mapping>
        <filter-name>ShibFilter</filter-name>
        <url-pattern>/HS/*</url-pattern>
    </filter-mapping>

    <servlet>
        <servlet-name>HS</servlet-name>
        <display-name>Shibboleth Handle Service</display-name>
        <servlet-class>edu.internet2.middleware.shibboleth.hs.HandleServlet</servlet-class>
        <init-param>
            <param-name>OriginPropertiesFile</param-name>
            <param-value>file:///etc/opt/jakarta-tomcat-4.1.29/shibboleth-origin-1.1/origin.properties</param-value>
        </init-param>
    </servlet>

    <servlet>
        <servlet-name>AA</servlet-name>
        <display-name>Shibboleth Attribute Authority</display-name>
        <servlet-class>edu.internet2.middleware.shibboleth.aa.AAServlet</servlet-class>
        <init-param>
            <param-name>OriginPropertiesFile</param-name>
            <param-value>file:///etc/opt/jakarta-tomcat-4.1.29/shibboleth-origin-1.1/origin.properties</param-value>
        </init-param>
    </servlet>

    <servlet-mapping>
        <servlet-name>HS</servlet-name>
        <url-pattern>/HS</url-pattern>
    </servlet-mapping>

    <servlet-mapping>
        <servlet-name>AA</servlet-name>
        <url-pattern>/AA</url-pattern>
    </servlet-mapping>

    <mime-mapping>
        <extension>css</extension>
        <mime-type>text/css</mime-type>
    </mime-mapping>
</web-app>
|
The security wrapper filter is composed by following two files:
ShibCasFilter.java
LoginRequestWrapper.java
The user authentication in CAS can be solved in different ways. One of
the most standard ways is to authenticate users against a LDAP server.
In our special case we used an IMAP server. For CAS exists,
however, different kind of plugins, like LDAP, NIS, ...
If you are interested you can see the authentication code in the
following two files:
LdapAuthentication
ImapAuthentication
The CAS Servlet need to be informed of the authentication method used.
Please adapt the file
WEB-INF/web.xml as
follows:
<?xml version="1.0" encoding="ISO-8859-1"?>
<!DOCTYPE web-app
    PUBLIC "-//Sun Microsystems, Inc.//DTD Web Application 2.3//EN"
    "http://java.sun.com/j2ee/dtds/web-app_2_3.dtd">

<web-app>

  <description>
    Central Authentication Service (CAS)
  </description>

  <!-- Initialization -->

    <!-- Authentication handler -->
    <context-param>
        <param-name>edu.yale.its.tp.cas.authHandler</param-name>
        <param-value>ch.SWITCH.aai.imappasswordhandler.ImapPasswordHandler</param-value>
    </context-param>

    ...
|
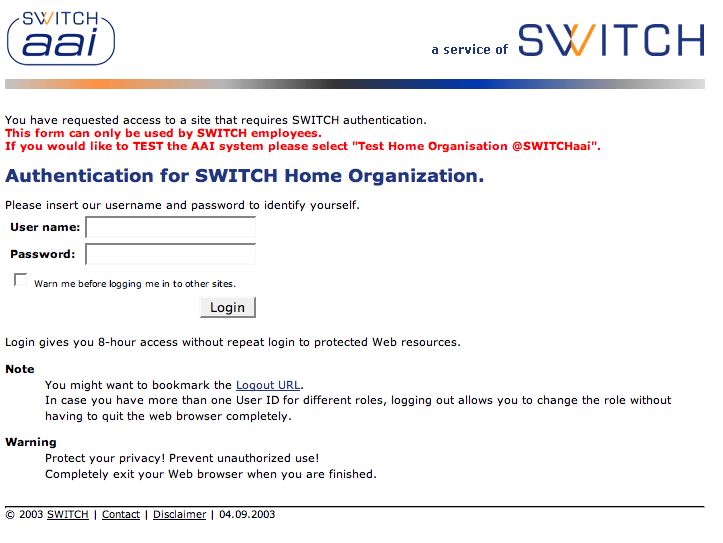
Finally we cam personalize our login page in
cas/login.jsp
to look like
something so: