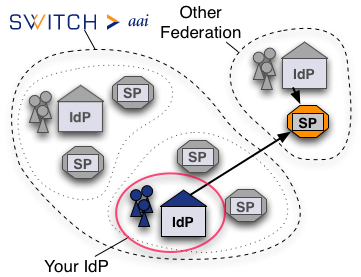
The following page describes the technical steps that are required when an Identity Provider (IdP) shall be configured to allow its users access to a non-Switch edu-ID Service Provider (SP). This allows bilateral (inter-federation) cooperations with non-Switch edu-ID federation members even before European or global solutions like eduGAIN are used in production. Any legal or policy-related issues are up to the administrator of the service to deal with and are subsequently not covered here.
It is assumed that the IdP is a Shibboleth Service Provider 2.x which is fully configured and working according to our deployment guides.
The Service Provider (SP) as well as the Identity Provider (IdP) need to know each other in order to communicate. Knowing each other means having the other component's metadata. Therefore, the IdP must be configured to load the SP's metadata. There are two ways of loading the IdP's metadata
In the following the bold values surrounded by ## stand for:
In order to configure an IdP to load additonal metadata, proceed with the following steps:
<MetadataProvider
  id="OtherFederationURLMD"
  xsi:type="FileBackedHTTPMetadataProvider"
  xmlns="urn:mace:shibboleth:2.0:metadata"
  metadataURL="##METADATA-URL##"
  backingFile="##METADATA-BACKUP-FILE##"
  maintainExpiredMetadata="false"
  cacheDuration="3600">
    <MetadataFilter xsi:type="SignatureValidation"
      xmlns="urn:mace:shibboleth:2.0:metadata"
      trustEngineRef="shibboleth.OtherFederationMetadataTrustEngine"
      requireSignedMetadata="true" />
</MetadataProvider>
Next, in the same file look for the element TrustEngine. After this element add:
<security:TrustEngine
  id="shibboleth.OtherFederationMetadataTrustEngine"
  xsi:type="security:StaticExplicitKeySignature">
    <security:Credential
      id="OtherFederationCredentials"
      xsi:type="security:X509Filesystem">
        <security:Certificate>##METADATA-SIGNING-CERT-FILE##</security:Certificate>
    </security:Credential>
</security:TrustEngine>
The following listing contains links to federation metadata and other relevant files of some federations that Switch edu-ID Federation Members may cooperate with. Fingerprints of signing certificates can be compared with the command:
openssl x509 -fingerprint -sha1 ##METADATA-SIGNING-CERT-FILE##
Service Providers from other federations sometimes use and require different attribute names and values than the ones defined in the Switch edu-ID attribute specification. Therefore, it may be necessary to make the IdP generate these attributes and release them to the SP. In order to do so, it may be necessary to edit the two files attribute-resolver.xml and attribute-filter.xml or better add a file local-attribute-filter.xml.
The attribute resolver defines from wich data sources attributes are fetched from. Usually the data sources will be LDAP/AD directories and relationcal databases like MySQL or similar. In addition the Identity Provider can create new or modify existing attributes from these sources by using scripted attributes.
Very often it is required to release to the SP the attribute eduPersonPrincipalName, which is not available in the Switch edu-ID federation. However, we have the swissEduPersonUniqueID attribute that has almost the same format and thus could be used instead. Alternatively, the mail attribute could be used as well in cases where the eduPersonPrincipalName is used as displayName. In order to encode and use the swissEduPersonUniqueID as eduPersonPrincipalName, add the followign AttributeDefinition to attribute-resolver.xml:
<resolver:AttributeDefinition
 id="eduPersonPrincipalName"
 xsi:type="Simple"
 xmlns="urn:mace:shibboleth:2.0:resolver:ad"
 sourceAttributeID="swissEduPersonUniqueID">
  <resolver:Dependency ref="myLDAP" />
  <resolver:AttributeEncoder
   xsi:type="SAML1ScopedString"
   xmlns="urn:mace:shibboleth:2.0:attribute:encoder"
   name="urn:mace:dir:attribute-def:eduPersonPrincipalName" />
  <resolver:AttributeEncoder
   xsi:type="SAML2ScopedString"
   xmlns="urn:mace:shibboleth:2.0:attribute:encoder"
   name="urn:oid:1.3.6.1.4.1.5923.1.1.1.6"
   friendlyName="eduPersonPrincipalName" />
</resolver:AttributeDefinition>
To make sure that the Service Provider receives the attributes it needs, an attribute filter rule that permits the release must be added as well. Because the Identity Provider according to the Switch edu-ID deployment guideline is already configured to load the attribute-filter.xml from the Resource Registry, it's best to add an additional local file that can be managed by hand. This can be accomplished by editing the service.xml and another ConfigurationResource element within the Service element that has id="shibboleth.AttributeFilterEngine":
  <ConfigurationResource
   xsi:type="resource:FilesystemResource"
   file="/opt/shibboleth-idp/conf/local-attribute-filter.xml"/>
The additional attribute filter file /opt/shibboleth-idp/conf/local-attribute-filter.xml containing one single rule for the SP then could look like this:
<?xml version="1.0" encoding="UTF-8"?>
<!--
   Locally managed attribute filter file
-->

<AttributeFilterPolicyGroup
 id="LocalShibbolethFilterPolicy"
 xmlns="urn:mace:shibboleth:2.0:afp"
 xmlns:basic="urn:mace:shibboleth:2.0:afp:mf:basic"
 xmlns:saml="urn:mace:shibboleth:2.0:afp:mf:saml"
 xmlns:xsi="http://www.w3.org/2001/XMLSchema-instance"
 xsi:schemaLocation="urn:mace:shibboleth:2.0:afp classpath:/schema/shibboleth-2.0-afp.xsd
  urn:mace:shibboleth:2.0:afp:mf:basic classpath:/schema/shibboleth-2.0-afp-mf-basic.xsd
  urn:mace:shibboleth:2.0:afp:mf:saml classpath:/schema/shibboleth-2.0-afp-mf-saml.xsd">

<!--
   Example attribute filter rule
   More information about rules can be found here:
   https://wiki.shibboleth.net/confluence/display/SHIB2/IdPAddAttribute
-->
  <AttributeFilterPolicy id="afp_##SP-ENTITYID##">
    <PolicyRequirementRule xsi:type="basic:AttributeRequesterString" value="##SP-ENTITYID##" />
    <AttributeRule attributeID="email">
      <PermitValueRule xsi:type="basic:ANY" />
    </AttributeRule>
    <AttributeRule attributeID="eduPersonAffiliation">
      <PermitValueRule xsi:type="basic:ANY" />
    </AttributeRule>
    <AttributeRule attributeID="eduPersonPrincipalName">
      <PermitValueRule xsi:type="basic:ANY" />
    </AttributeRule>
    <AttributeRule attributeID="surname">
      <PermitValueRule xsi:type="basic:ANY" />
    </AttributeRule>
    <AttributeRule attributeID="givenName">
      <PermitValueRule xsi:type="basic:ANY" />
    </AttributeRule>
  </AttributeFilterPolicy>

</AttributeFilterPolicyGroup>
In order to test whether a user from the IdP can access the remote SP, it's best to log in on the service the SP protects:
Please feel free to contact us for assistance and recommendations in case of difficulties or problems.