FAQ
For producers and students:

KMS means Kaltura Mediaspace Video portal and is the platform for all producers and students. You will find many tutorial videos here: Kaltura Mediaspace Video Portal
Each institution has its own mediaspace portal. You can reach this portal by using the following URL:
https://[name of institution].mediaspace.cast.switch.ch
e.g. https://switch.mediaspace.cast.switch.ch or https://uzh.mediaspace.cast.switch.ch
(Exception: EPFL: https://mediaspace.epfl.ch)
For administrators:

KMC means Kaltura managemnt console and is only accessible for administrators. Kaltura offers many tutorial videos on how to do something in KMC: Kaltura Management Console
For SWITCH customers, you can open your KMC with https://api.cast.switch.ch and login with your credentials
Your intention: A video should be made accessible to other people who do not have a login.
There are several ways to do this:
a) Publish the video with the selection 'Unlisted'
The video is publicly available and can be viewed by all people who have this link. This link cannot be found by serach engines.

b) Set a passcode to the video
The video can be viewed only with the help of the passcode. See this Tutorial if you want to know how to set the passcode.

c) Create public link which bypasses entitlements, but has an expiration time
The video can be viewed only during the defined time frame. See this Tutorial if you want to know how to set a expiry link

ZHAW has written a Moodle plugin that allows to easily present the process described below to the end user. If you are interested, please write to elearning@zhaw.ch.
If you want to use videos from Kaltura in edX or h5p, do the following:
1. find the event ID of the video:
a) edit the video and you will find the ID at Media Entry ID.

b) or look at the URL in the browser:

2. Create URL with event ID.
What you need:
- partner ID (ask SWITCH (cast-support@switch.ch) for your partner ID)
- event ID
The URL is assembled as follows:
|
https://api.cast.switch.ch/p/{partnerID}/sp/{partnerID}00/playManifest/entryId/{eventID}/format/url/ \ |
For the above example, the URL will looks like: (Do not take following URL, this is just an example)
https://api.cast.switch.ch/p/105/sp/10500/playManifest/entryId/0_wm99rpp8/format/url/ \
protocol/https/flavorParamIds/6,7/video.mp4
3. use the assebled URL in edX or h5p
Note:
The access rights of the channel or the video do not affect the access as described above, i.e. regardless of whether your videos are private or public, accessing the video as described above works
If you wish more infromation, please visit:
https://developer.kaltura.com/api-docs/Deliver-and-Distribute-Media/playManifest-streaming-api.html
1. upload 360 video
2. add '360' to the Tag list:

Get more infromation about Kaltura and 360:
https://knowledge.kaltura.com/help/kaltura-360-and-vr-video-player-support
To stream videos with OBS, please follow the steps described below or watch the following video:
1. Create a Live Entry in MediaSpace:
a) go to your Mediaspace, e.g. https://switch.mediaspace.cast.switch.ch
b) click on 'Add NEW' and select 'Live Event'
(This function requires certain permissions)
 .
.
2. Go to created Media and edit it. Go to 'Live Stream Details'

You should see the Broadcast Details of this live event:
3. Copy URL and stream name:
Now open the preference page of OBS, go to 'Stream' and select 'custom':

copy now from your media
'RTMP Primary URL' to the 'Server' field and
'Stream Name' to 'Stream key'
Close the OBS preferences, setp your OBS studio, share the URL to the media page and start streaming.
Please note that it it will take about 30 seconds to show the stream in medispace
Please see following article for use assignment for groups in Moodle:
https://www.umass.edu/it/support/moodle/configure-grade-group-assignments-moodle
To download or change a video from a muldi video (aka dual video), please follow following video:
Kaltura has a well documented API: https://developer.kaltura.com/api-docs/Overview
For normal use cases, we created a little example script (zip file) to start with the API of Kaltura.
Before usage, you need id and token infromation, where you get from cast-support@switch.ch
The following instructions are for LMS administrators only:
If you select a Kaltura resource in moodle, a dialog for selecting the video will appear. With the gear wheel you can additionally adjust various settings:

In the dialog above you see the possibility to select different players. To make these players available, go to the configuration page, e.g. https://{partnerID}.kaf.cast.switch.ch/admin/ (where {partnerID} is your partnerID)
Scroll down until you see 'Browseandembed' and select it:

on the bottom of the new page, you are able to add 'embedSettings'. Press 'embedSettings and fill out the necessary infos:

A channel ID is a nummerical value of 5 digits, e.g. 23478
To get the ID of your channel go to the channel and look at the URL in your browser, e.g.

A playlist ID is a value with numbers and letters, e.g. 0_ip9yotyk
To get the ID of your playlist go to the playlist.
The playlist should open in your browser and should show the first video in this playlist.
Copy the URL from your browser. It looks like

Ther are several ways to find the ID of your video:
a) edit the video and you will find the ID at Media Entry ID.
b) or look at the URL in the browser:
About
The Automation Manager helps you automatically manage and process your media based on rules you define. You can use it to organize media, apply updates at scale, trigger agents for complex workflows, and monitor activity over time.
Automation Manager runs on a schedule, scans your media against defined criteria, and applies actions based on your rule settings.
This article provides a quick guide to the Automation Manager workflow. For step-by-step instructions, see the detailed articles linked in each section.
How Automation Manager works at a glance
Here is what you do:
- Create a rule.
- Define criteria to select media.
- Configure actions to apply.
- Review selected media (if required).
- Track activity using notifications and reports.
Access the Automation Manager
- Log into your Kaltura Management Console.
- In the top navigation menu, click the settings (gear) icon at the far right.
- Click the Automation Manager tab at the far right
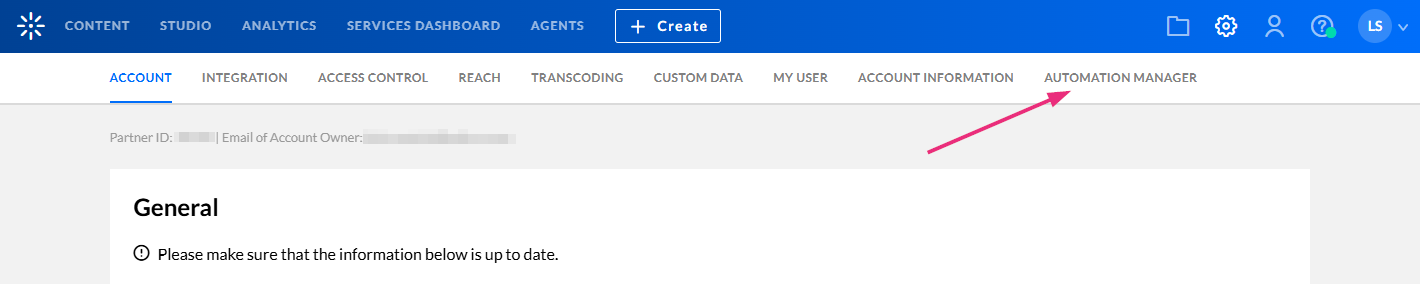
If you don't see the automation manager tab in your KMC, you need to enable it on your account. In addition, only users with certain roles can access the automation manager.
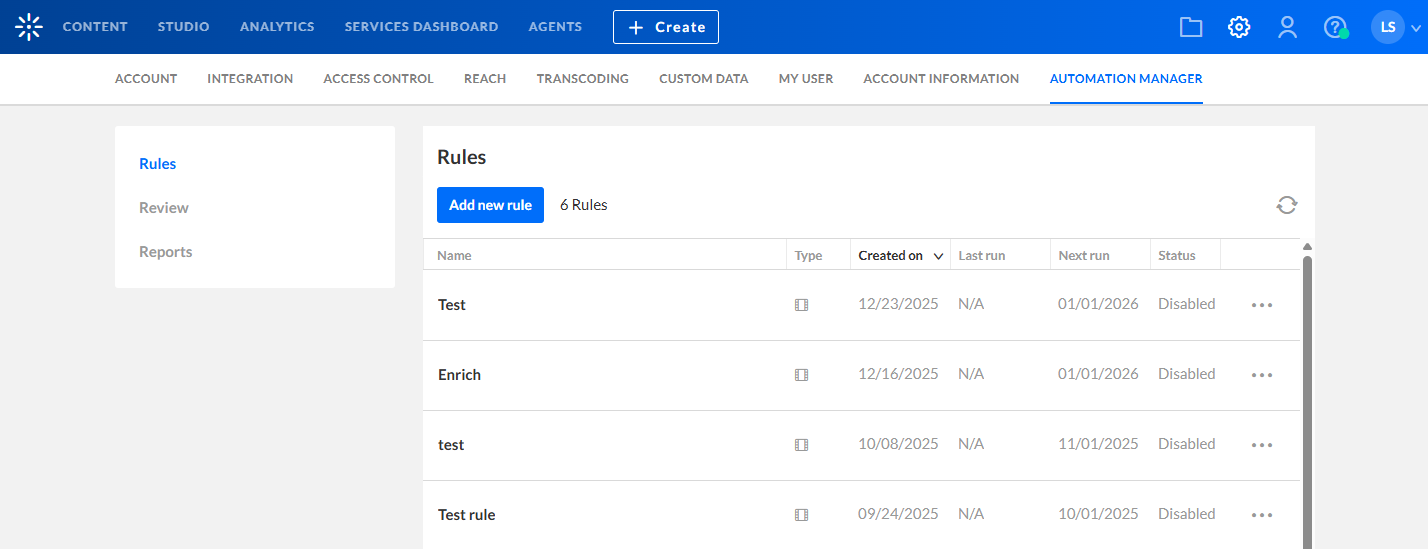
The Rules page displays. Here you can view any rules that have already been set up on your account.
Create and manage rules
Rules control when Automation Manager runs and how your media is handled. From the Rules page, you can create new rules or manage existing ones.
When creating or editing a rule, you configure:
- General settings – Rule name, owner, schedule, and review options
- Criteria – Which media the rule applies to
- Actions – What happens to selected media
- Notifications – When email notifications are sent
For the full guide, see Create and manage rules in Automation Manager.
Define criteria
In the Criteria tab, you select the conditions media must meet to be included in the rule. You can add multiple criteria. All criteria must be met.
For the full guide, see Define rule criteria for Automation Manager.
Configure actions
In the Actions tab, you define what happens to the selected media. Actions can include standard Automation Manager operations or triggering a preconfigured agent to run on the selected media.
For the full guide, see Configure rule actions for Automation Manager.
Set notifications
In the Notifications tab, you can configure email notifications for:
- After media is scanned
- Before actions run
- After actions are completed
For the full guide, see Automation Manager reports and notifications.
Manage rules
The Rules page is the main workspace in Automation Manager. It lists all rules on your account and lets you monitor their status and manage their settings.
Each rule appears as a row in a table with the following information:
- Name - name of rule
- Description - description of rule
- Created on - the date that the rule was created on
- Last run - the last time MR ran this rule
- Next run - the next scheduled date that MR will run this rule
- Status (enabled / disabled)
The columns are sortable by Name, Creation on, Last run, Next run and Status.
Each rule has a three-dot menu at the end of the row with the following options:
- Enable / Disable - Click to enable / disable the rule state.
If you try to enable a rule that has no criteria, an error message displays: No criteria found for this rule. To enable, please define at least one criteria.
- Edit - This directs you to the edit page of the rule profile.
- Delete - Click to delete an existing rule.
Review selected media
When a rule runs, selected media appears in the Review tab if approval is required.
From here, you can:
- Approve or reject actions
- Run actions immediately
- Search and filter selected media
For the full guide, see Review and manage media selected by Automation Manager.
Monitor activity with reports
Automation Manager generates reports each time it scans media or performs actions.
Reports help you:
- Track rule activity
- Review outcomes
- Export data for auditing or reporting
For the full guide, see Automation Manager reports and notifications.
What is Automation Manager?
Automation Manager is a tool within Kaltura that automatically manages and processes media based on rules you define. It allows you to organize content, apply bulk updates, trigger workflows, and monitor activity over time.
How does Automation Manager work?
Automation Manager runs on a schedule. It scans your media library using defined criteria and applies actions according to the rule configuration.
Who can access Automation Manager?
Access is limited to users with the appropriate permissions in the Kaltura Management Console (KMC). Typically, only administrators or power users can create and manage rules.
What is a rule in Automation Manager?
A rule defines when Automation Manager runs and what it does. Each rule consists of general settings, criteria, actions, and notifications.
Can I create multiple rules?
Yes. You can create multiple rules, each with different schedules, criteria, and actions, depending on your automation needs.
What are criteria?
Criteria define which media items are selected by a rule. You can add multiple criteria, and all criteria must be met for media to be included.
What happens if a rule has no criteria?
A rule without criteria cannot be enabled. If you try to enable it, an error message will appear asking you to define at least one criterion.
What types of actions can be configured?
Actions can include standard Automation Manager operations such as updating metadata, managing categories or tags, changing ownership, deleting entries, or triggering preconfigured agents for advanced workflows.
Can actions require manual approval?
Yes. Rules can be configured to require approval. In this case, selected media will appear in the Review tab before actions are executed.
What is the Review tab used for?
The Review tab allows you to approve or reject actions, run actions immediately, and search or filter the selected media before changes are applied.
Can I schedule when rules run?
Yes. Each rule can be scheduled to run at specific times or intervals based on your configuration.
What notifications are available?
You can configure email notifications to be sent after media is scanned, before actions run, and after actions are completed.
How can I monitor rule activity?
Automation Manager generates reports every time it scans media or performs actions. These reports help you track activity and review outcomes.
Can reports be exported?
Yes. Reports can be exported for auditing, reporting, or record-keeping purposes.
How do I manage existing rules?
All rules are managed from the Rules page, where you can view their status, enable or disable them, edit settings, or delete rules.
What happens if a rule is disabled?
A disabled rule will not run on its schedule and will not scan or process any media until it is enabled again.
Is Automation Manager suitable for large media libraries?
Yes. Automation Manager is designed to handle bulk operations efficiently, making it ideal for managing large volumes of media.
What are agents in Automation Manager?
Agents are preconfigured workflows that can be triggered by rules to perform more complex or specialized processing on selected media.
Why should I use Automation Manager?
Automation Manager saves time, reduces manual work, ensures consistent content handling, and helps maintain structured and well-governed media libraries.