Instead of sharing your data to a number of switchdrive users, you can also create a group of switchdrive users and then share your data with this group.
Creating such a custom group has several advantages:
If you often share your data with the same group of people you only need to create a custom group once and then share your data with the custom group and not with each user separately.
When you share your data with a custom group, the data is immediately shared with all custom group members (or not shared any more when you remove the share to the custom group).
You can also control who gets your shared data by adding or removing members to the custom group. You do not need to go to each shared folder to add or remove individual switchdrive users.
Members of a custom group can control themselves if they still want to receive the shared data. If not they can open their custom group setting and remove themselves from the custom group.
Members of a custom group can also share their data to the same group. Custom group names are only visible to the group members and not to other switchdrive users.
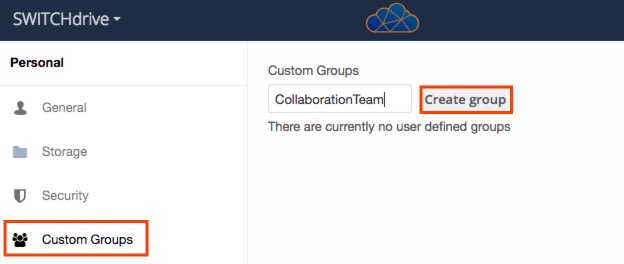
In order to create a new Custom Group, open the SWITCHdrive web client and go to your personal settings. Click on the section "Custom Groups" on the left. On the right an overview of all the custom groups that you own or that you are a member of are displayed. To create a new custom group enter a unique group name in the text box and click on the "Create group" button.

Note:
- A custom group is only visible to you and to the members of the custom group. The custom group name will not become visible to other users when they search for a group or for a specific SWITCHdrive user.
- As a group owner, you can add new members, change their roles or remove them. You can also leave the group as long as there is at least one custom group owner remaining.
- A member of a custom group can always leave the group at any time.
A project folder is a dedicated storage for workgroups that are usually working with larger amounts of data (up to 1TB). A project folder is particularly suitable for long-term projects with changing project management.
Project folders behave like normal SWITCHdrive folders, but are impersonal, i.e. they are not bound to individual persons. Project folders are always owned by the issuing institution.
Although there is only one dedicated project owner for each project folder, this role is transferable. The owner can manage the project folder in his/her personal switchdrive account the same way as any other shared folder that comes with full edit / delete and resharing permission.
Usually the owner just reshares the entire project folder or some subfolders with the project participants. These participants will notice that the owner of the folder is not a person, but the project itself at an institution.
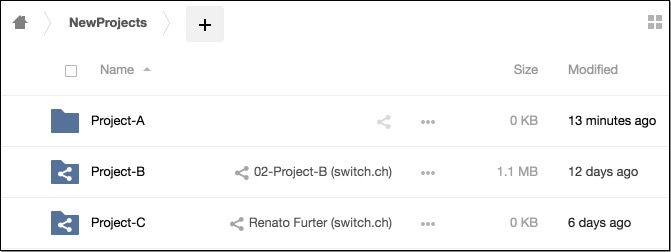
For example: Project-A is a folder you own (and which you have created yourself). Project-B is a project folder owned by the institution "SWITCH" and Project-C is a standard switchdrive folder shared to you by the owner Renato Furter.

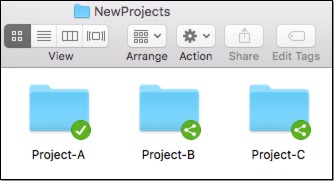
When you work with the dektop client, then the two shared folders Project-B and Project-C show up with the standard switchdrive share icons. In the desktop client you can not distinguish which folder is a project folder or a standard shared folder. 
Because Project-Folders come with their own quota of SWITCHdrive storage, you have to apply for such a project at your institution and maybe provide additional information (eg. size of project-folder , purpose of project, list of project members, etc).
If you want to get a new Project-Folder please get in touch with your local SWITCHdrive administrator. Refer to this page how to proceed.
This is very easy: Just drag your data into a project folder - that's it! Please keep in mind that when you create files or move files into a project folder, they will then belong to the "Project" and not to you any more.
For example:
The folder "Toolbox" is a project folder which was shared by the institution which is displayed in brackets behind the project name.

To add files to this project folder, open it in the web-client or in the desktop-client, then move or copy your project data into this folder.

Note:
Project-folders are always shared with project members. If some project members cannot see your data, make sure that you have the permission to add data to the Project-folder and that other project members have the permission to see the Project-folder.
If the project owner has given the resharing permission of the project-folder to you, then you can just reshare the project folder to the new project member.
However if the project owner controls the access to the project-folder through a custom-group, you should ask the project owner to add the new project member to the custom-goup (or you can add the member yourself if you have the permission to do so). The advantage of using a custom group in combination with a project folder is the ability to see all the project members and to share other data to the same group by just entering the custom group name.
In oder to see who has access to the project-folder, go to your custom-group setting and open the corresponding custom group. If you have the role of group-owner, just add the new project-member to the custom group and immediately, the project-folder is shared with this new project member.