A mobile client is a dedicated app for mobile devices, for example for iPads, iPhones, Android-tablets and Android-phones. You can download the mobile client from the app-stores of Apple or Google by opening the Settings in your Switch Drive web client:
- click on your name in the top right corner of the Browser window.
- click on "General" on the left and scroll down until you can see these buttons.
- click one of the (black) buttons to download the app

It is easy to access your data in your Switch Drive account with a mobile device (for eample an iPad, an iPhone or an Android device). Download the ownCloud-App from the corresponding App-Store or from the Play-Store.
If you don't need to modify the shares of your data, you can also install a 3rd party app like "Documents" from OnlyOffice or from Readdle which have additional features. For example, the Documents-app of Readdle lets you configure several cloud services side by side and allows you to full synchronise any folder in your Switch Drive account to the mobile device, besides many other nice features.
The Documents-app of OnlyOffice lets you also modify office documents right on your mobile device and store the changes back to your Switch Drive account.
Follow these instructions to configure the WebDAV connection in such 3rd party applications:
1. Open a web browser and login to your Switch Drive account. Then click on the Settings icon to display your Switch Drive stettings.
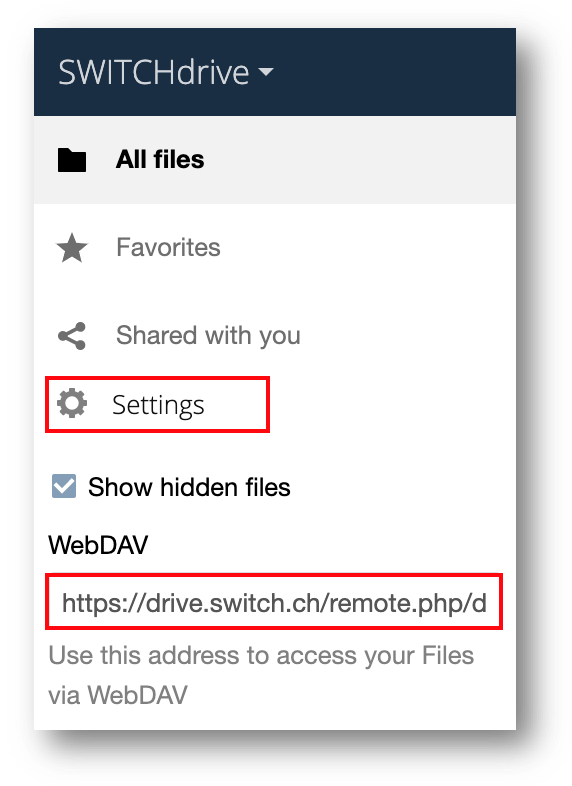
2. Locate the WebDAV's address box and copy the entire content of this text box to your clipboard.
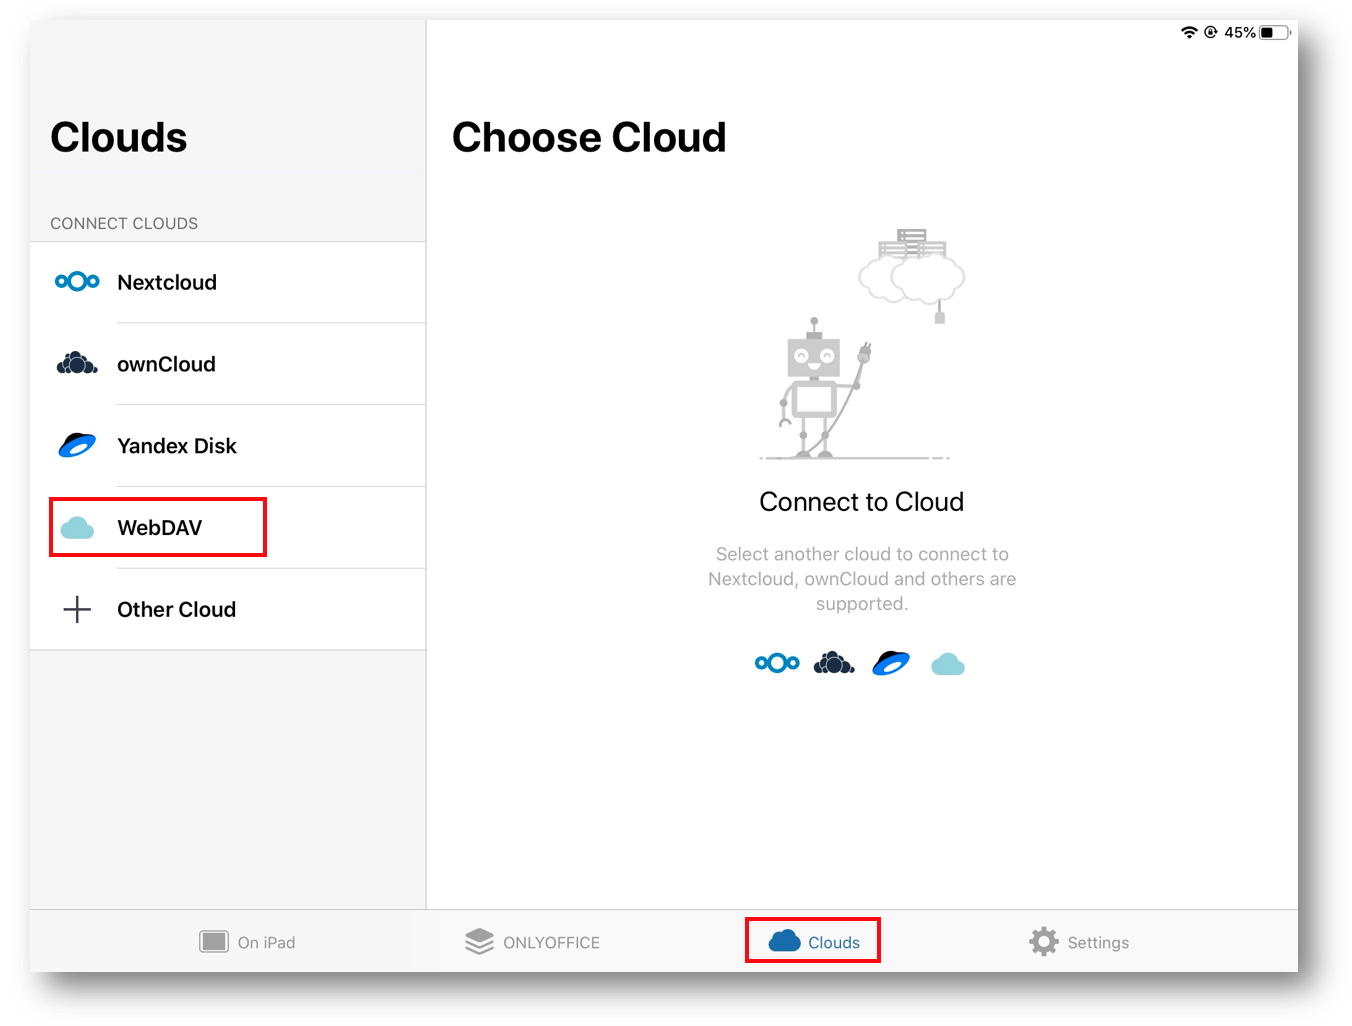
3. Go to your 3rd party app and locate the WebDAV configuration. For example, in the Documents-App of OnlyOffice, you have to click on the small "Clouds" icon at the bottom and then to click on the WebDAV entry on the left.
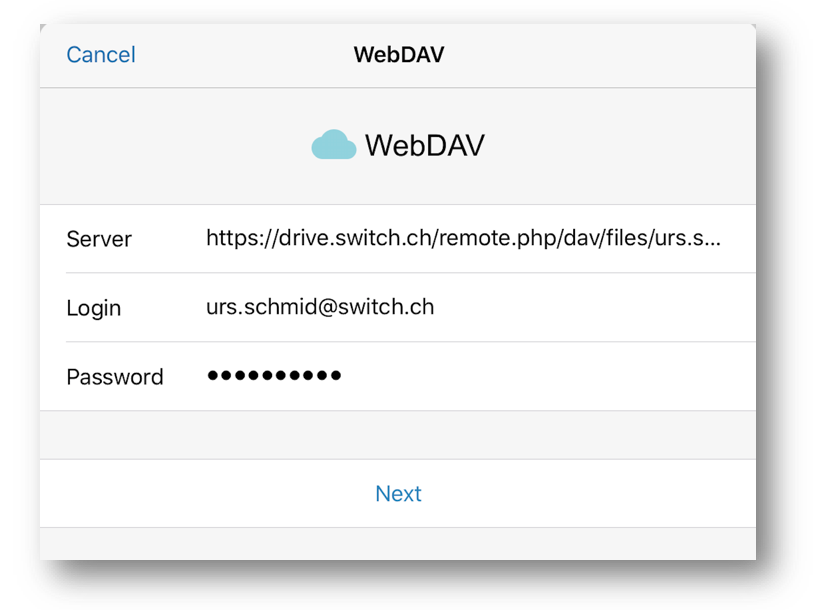
 4. In the WebDAV configuration box, paste the just copied WebDAV address to the Server entry. Under Password, you need to insert the App-Passcode. See here how to create an App-Passcode
You can now access all your files in your Switch Drive account also on your mobile device.
The WebDAV address looks like this:
https://drive.switch.ch/remote.php/dav/files/USERNAME/
You can find your personalised path if you login to https://drive.switch.ch and click on settings in the lower left corner.
Please note that in general, the @ symbol in your username (which is your email address) needs to be replaced with %40 to make it URL-compatible. For example, example@switch.ch becomes example%40switch.ch. However, depending on the client you are using, this replacement may not always be necessary, as some clients handle the @ symbol correctly without encoding it.
Under Windows make sure that the service "WebClient" is started otherwise WebDAV does not work properly.
Make also sure you use https: and not just http: when connecting via WebDAV.
To access your SWITCHdrive data on a mobile device, you can also create a dedicated app password that is only used by your mobile devices.
The great advantage of using such app passcodes is that you can create them easily, but also delete them quickly. If for example you loose your mobile device you could login to your Switch Drive account and delete the app passcode. From this moment on your mobile device won't be able to access your data in your Switch Drive account any more.
When creating app passcodes for your mobile devices, you can also keep your Switch edu-ID password unexposed to these mobile devices.
To create a new app passcoce, use the Switch Drive Web-Client and open the Security section in your personal settings. Scroll down until you see the App passcode section. In the example below, only one passcode with the name "iPad" exists.
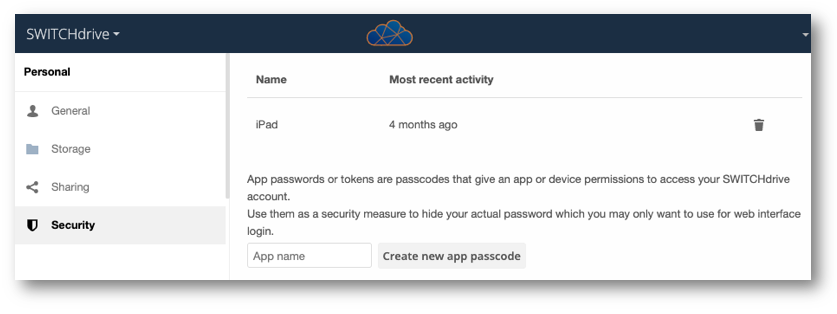
To create a new app passcode, enter a new app name and click on the button "Create new app passcode".

On your mobile device enter the Username and the Password to access your data with your mobile device. Once the mobile device is connected, click the Done button. The Username and Password will disappear and there is no way to show this password again. If you have lost your password or have made a typing error, recreate a new passcode from scratch.
There is an easy way to check if the WebDAV configuration is working fine:
1. On a Mac, open the Finder application (just click somewhere on the Desktop to activate the Finder application)
2. Open the menu Go and select "Connect to Server..."
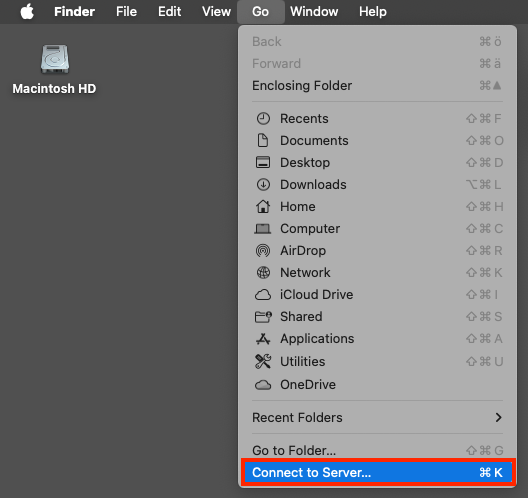
3. Open the Web-Client of your Switch Drive account (see https://drive.switch.ch) and copy your WebDAV address to the "Connect to Server" window 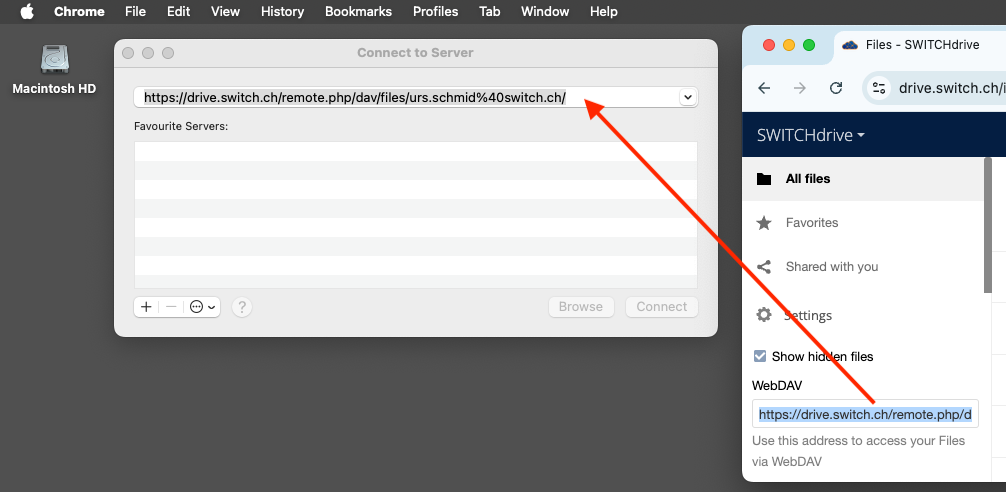
4. After clicking on the Connect button, you are required to enter the Name and the Password in order to connect via WebDAV to the Switch Drive server. Copy these two items from the Security section of your Switch Drive account.

5. Click again on the Connect button. You should now see your Switch Drive account under "Locations":
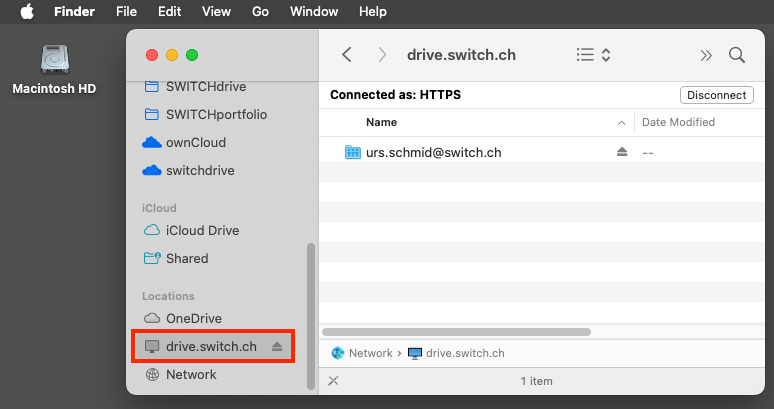
Note that this is just an easy way to check the WebDAV configuration. We strongly recommend to use the Switch Drive Sync Client to synchronise all your data in the background to your local switchdrive folder instead of the WebDAV server, because synchronisation via Sync Client is much faster and more reliable.
For Android devices, click here for the mobile user manual of ownCloud (and click here for the latest Release Notes).
For iOS devices, there are two versions of mobile clients and of user manuals available:
For the new iOSX client click here. (This new iOS client is recommended for new mobile devices running iOSX V11 or later and was completely redesigned in spring 2019)
For the legacy iOSX client, click here (and click here for the latest Release Notes).
On Android devices you click on a file and check the box 'Keep file up to date'.
On iOS devices you have to tap on the to keep it synchronized.
You can prevent Switch Drive to use mobile data. This is useful if you are on a data plan that does not allow unlimited data tranfer.
On Android devices go to Settings->Data usage and then choose ownCloud and check 'Restrict background data'
On iOS devices go to Settings->Cellular and scroll down to ownCloud and swipe the slider off. If ownCloud is missing in that list, you have to use the ownCloud mobile app first while on a mobile data network. As soon as some data has been transfered over a mobile data network, ownCloud will be shown on that list.
To edit office documents on your iPad (Word, Excel and Powerpoint), we recommend to use the Documents app of OnlyOffice.
Follow these steps to edit your files on an iPad:
1. Open the app store and search for the ONLYOFFICE Documents app. Click it to install it to your device

2. Connect to your switchdrive account via WebDAV (see here for more details)
3. Click on the switchdrive entry under MY CLOUDS and navigate (1) to the file you want to edit. Let's assume you want to edit the file Agenda.docx in the folder "Project C". When you have found the file, briefly touch it with your finger to open the file.

4. Start editing your file (3). Some editing options can be found above the keyboard and when you click the icons in the top right corner (4). When you are done editing your file, close it by clicking on the folder icon (5).
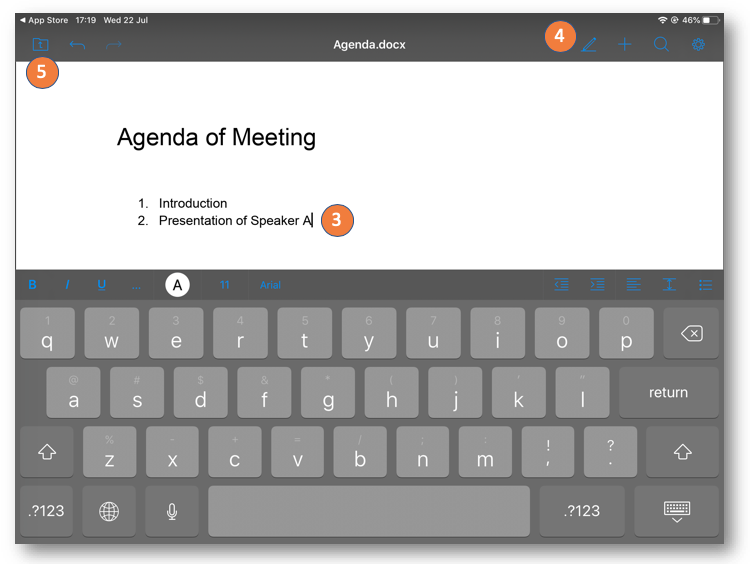 5. Depending on the speed of your web-connection, it can take some moments until the updated file is available in your switchdrive web-client. Please reload the web-page until the edited file shows the correct data and time (6). Any previous existing file versions are available under "Versions" (7).

Yes, this is possible with the OnlyOffice app "Documents", however only with a little "detour". Because you want to work offline with your file, you need to store a copy of your file to the local folder of the OnlyOffice app first and then do the offline editing.
Follow these steps
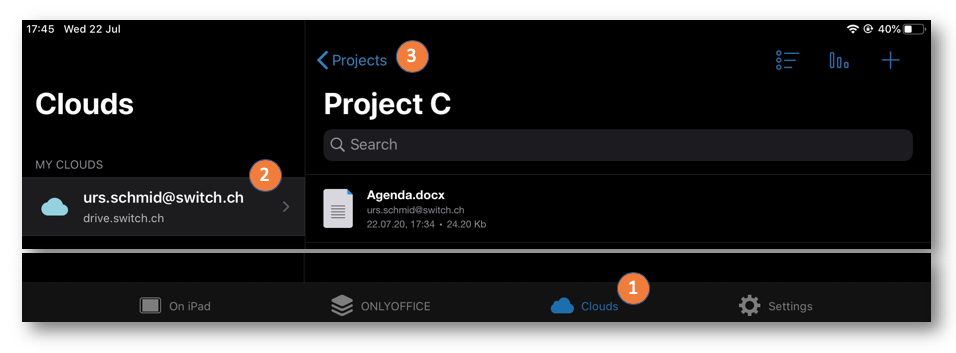
1. Open the Documents.app of OnlyOffice and click on the "Clouds" icon (1). Under MY CLOUDS click on your switchdrive account (2). Navigate to the file you want to edit offline (in this example, let's edit the file "Agenda.docx" in folder "Project C")
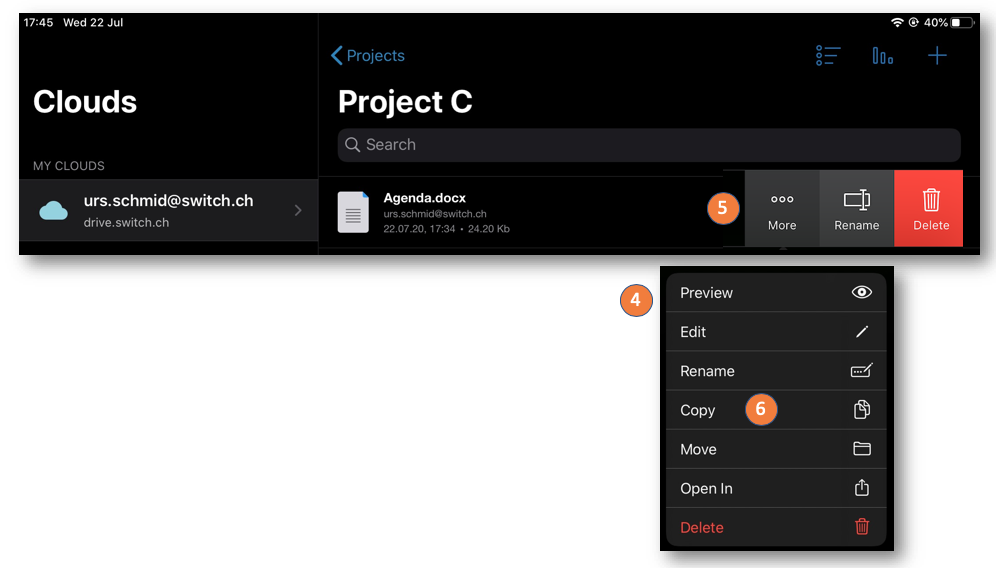
2. Touch the file "Agenda.docs" with your finger and keep your finger on the spot for a moment until the pop up menu appears (4). Don't just briefly touch the file, which will open it. You can also slide with your finger to the left to open a quick menu (5) with options"More", "Rename" and "Delete"). Click on "More" to open the popup menu and select the Copy command (6).
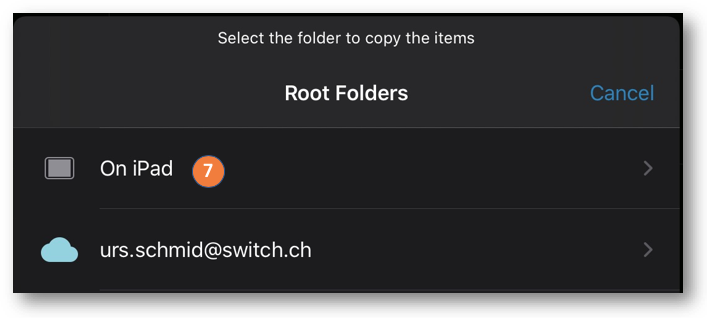
3. Choose the destination folder to which you want to copy the file. In our example you need to select "On iPad" (7), because then the file is also available when you are offline.
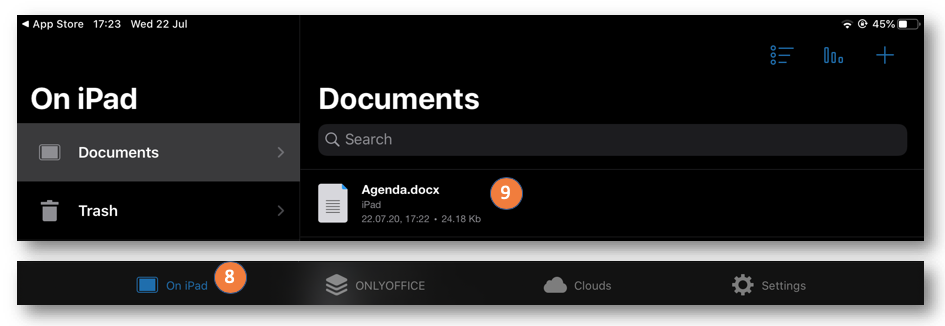
4. Click on the "On iPad" icon (8) to show the local files stored on your iPad. Note that the copied file appears in the local Documents folder (9). You can now edit this file even if you do not have any internet connection.
5. After editing your file don't forget to upload it again to your switchdrive account. Of course you need to have internet connection to do so. We recommend to move the file bakc to the switchdrive account so there is no confusion which version of the file is the most recent one.