How do I configure, install and start an Instance of a Virtual Machine
To run your (first) virtual machine, please check that you have already completed the following prerequisites:
Prerequisites
- created your user in SWITCHengines
- added your (public) SSH-Key in Security Options
- added or created a Security Group
- (optional) created/verified a private network to use
- (optional) uploaded/verified an install-image to use
Now login to the SWITCHengines Dashboard (if you haven't already done), move to the Instances Tab and click Launch Instance.

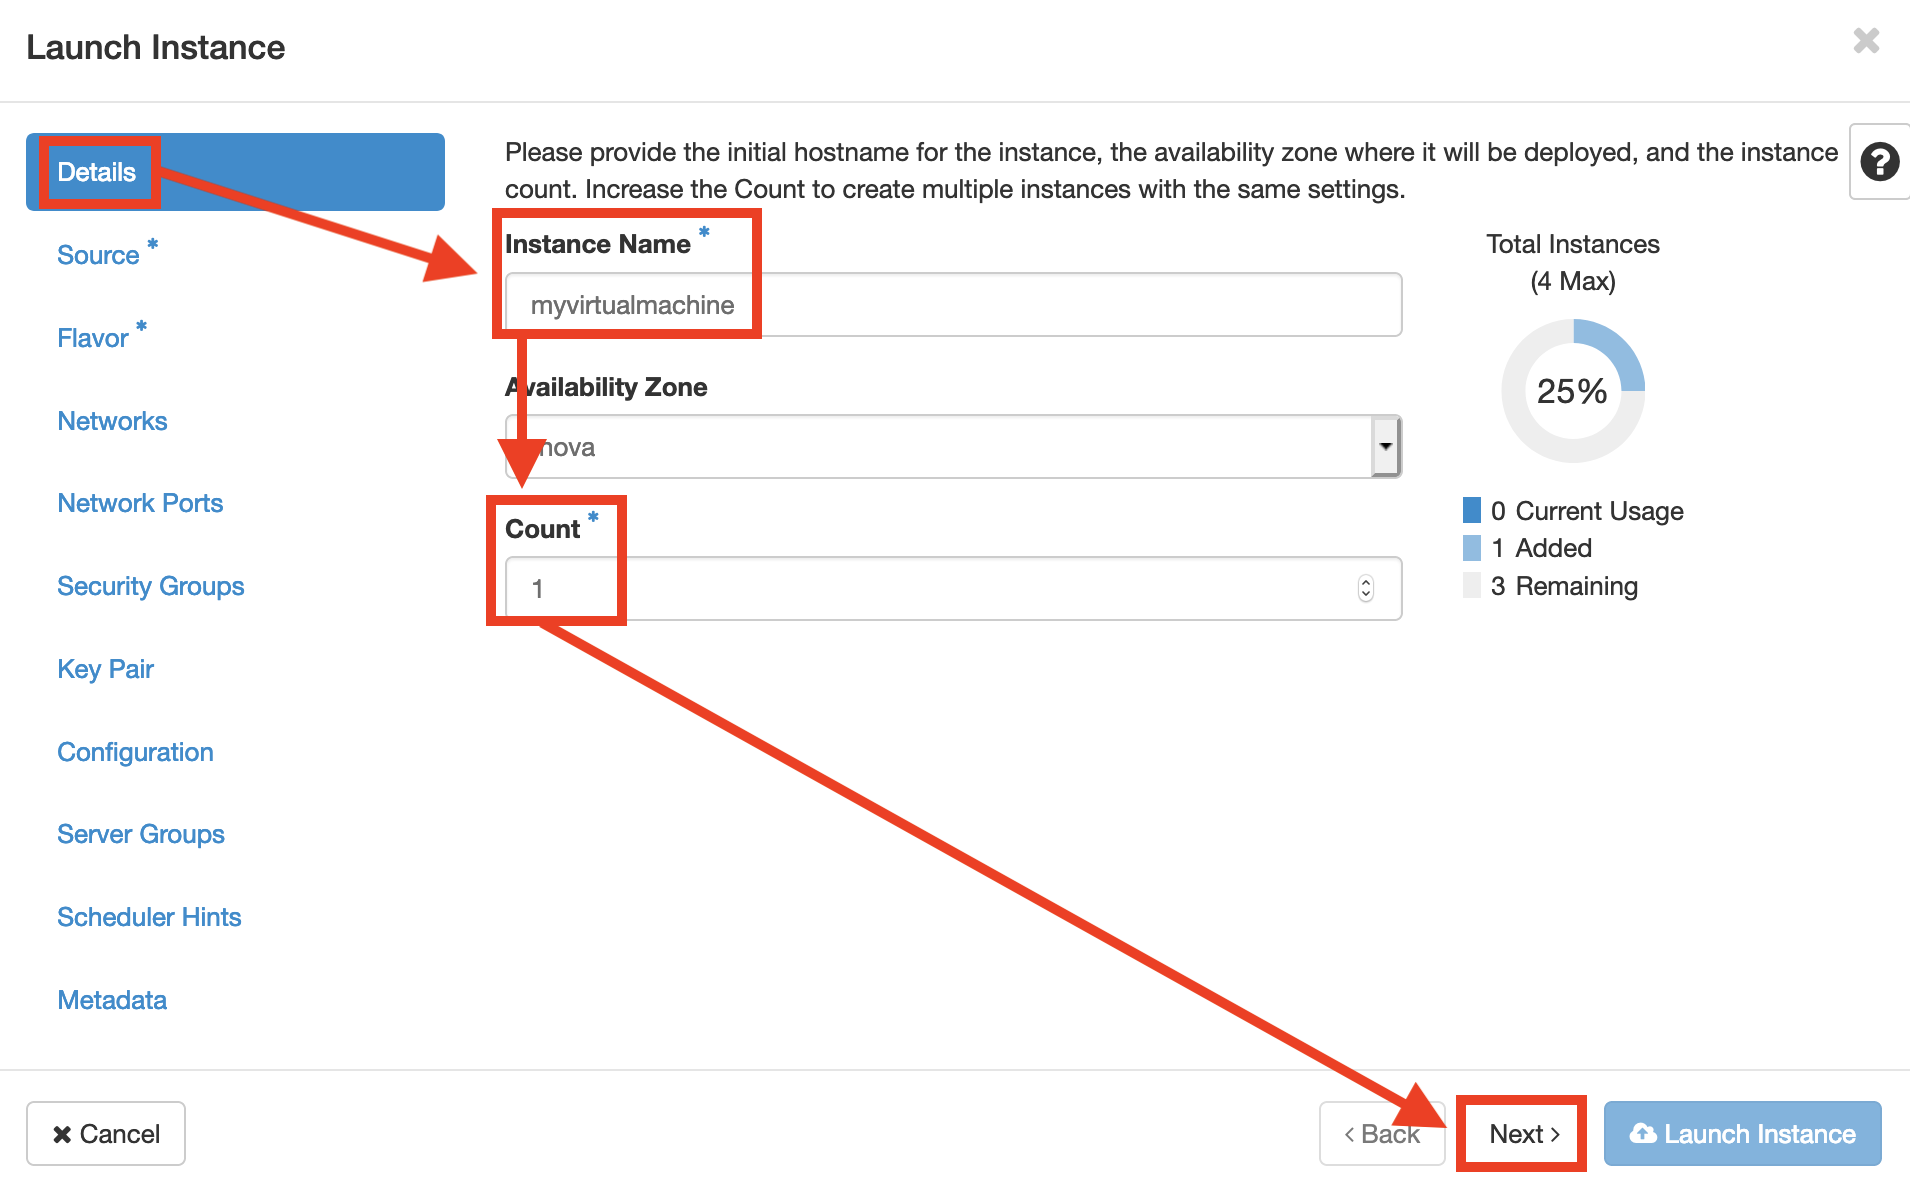
The next step is to name your instance and set a count.
- Instance Name -> Name of your choice. This is a mandatory field
- Availability Zone -> default:nova
- Count -> How many VMs do you want to launch?
Select the Instance Count if you want to have more than one instance. Depending on your Quota (or Project Limits) you might not be able to start all the machines you want. If you need a higher quota, please contact your lecturer, the administrator of your institution or the responsible person who gave you access to the project.
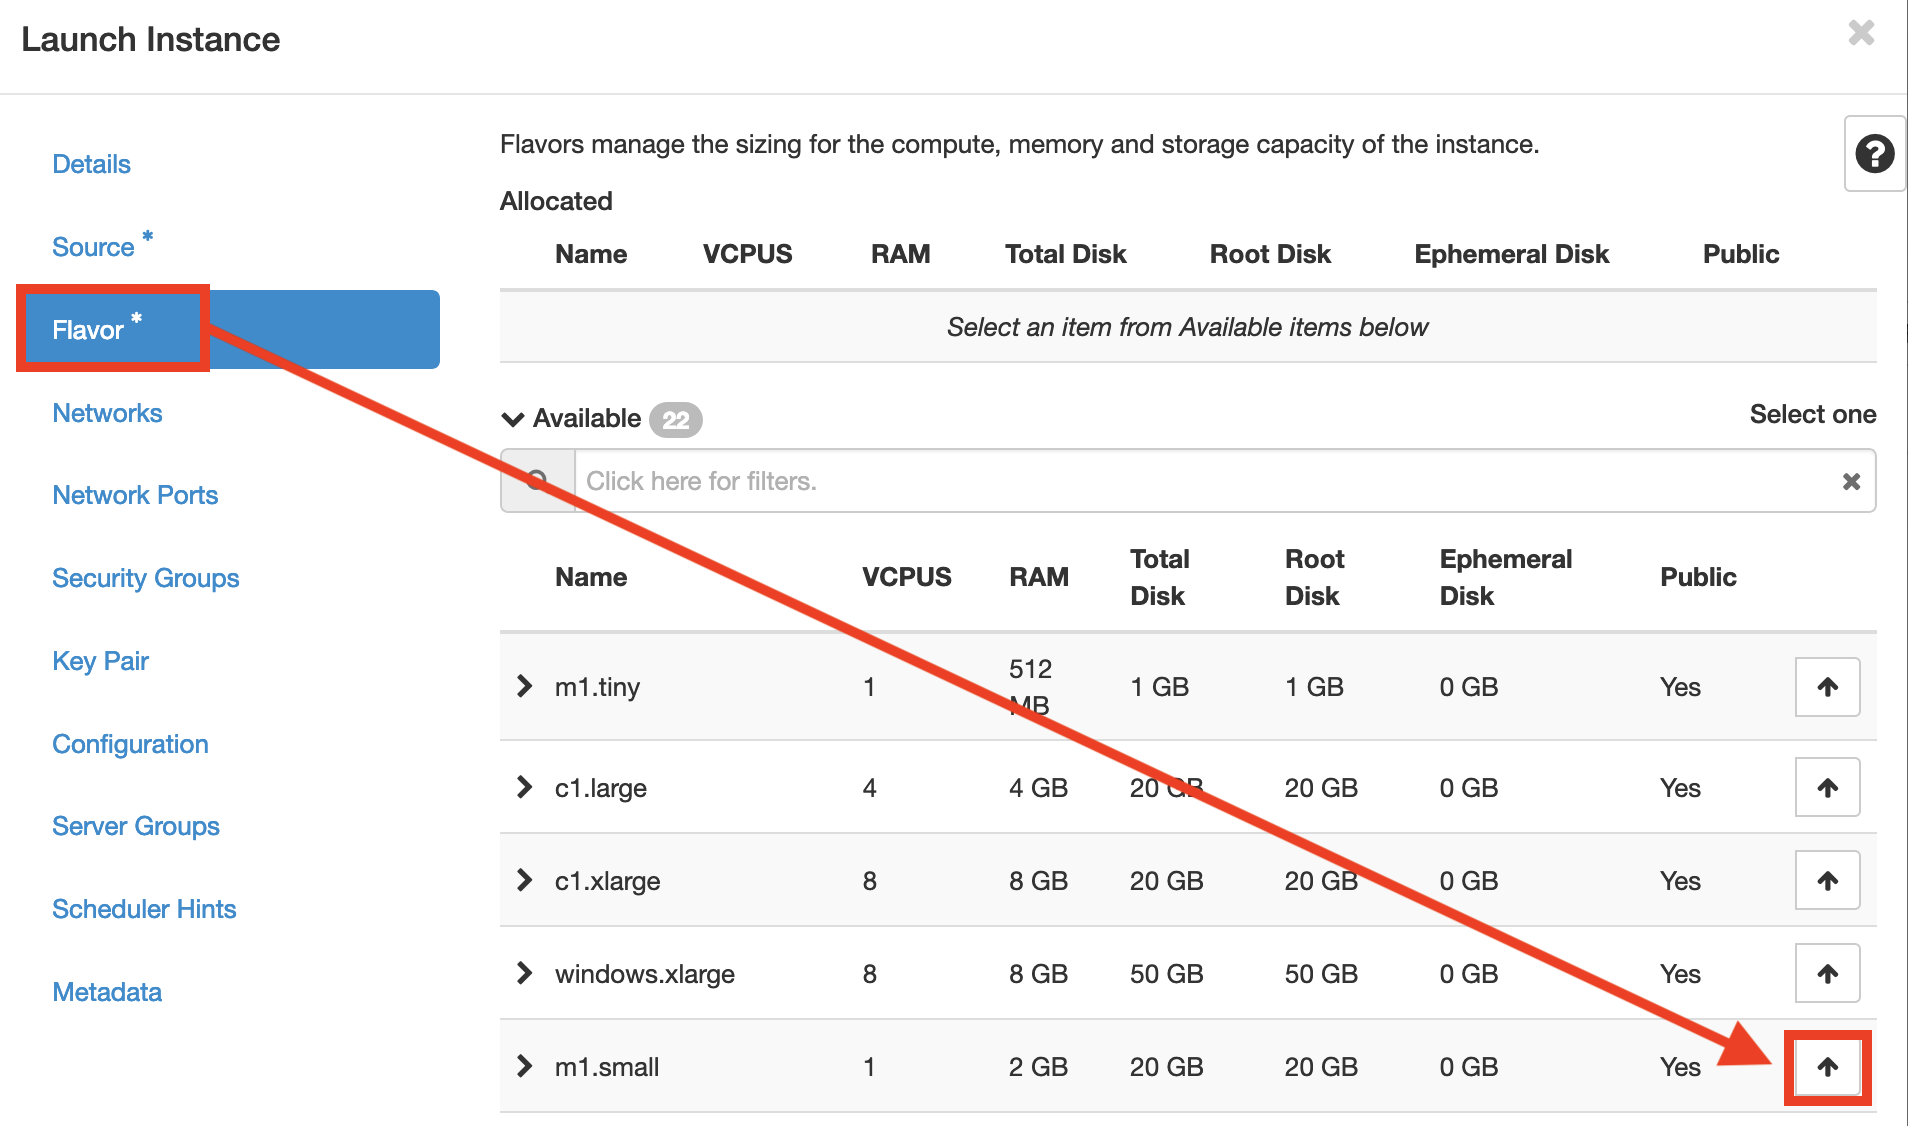
Select Boot Source and Flavor (which determine how many virtual CPUs (VCPU) the machine has, how big the Root and Ephemeral Disks are, and how much RAM the machine will get). You can always resize a running virtual machine, even after it has been created.
Instance Boot Source
Next, you will need to decide the Instance Boot Source. There are multiple options:
- Boot from Image (Creates new Volume) <= Recommended
- Boot from Instance Snapshot
- Boot from Volume
- Boot from Volume Snapshot (Creates new Volume)
Chosing whether or not to create a new volume affects whether the instance's disk survives deletion of the instance.
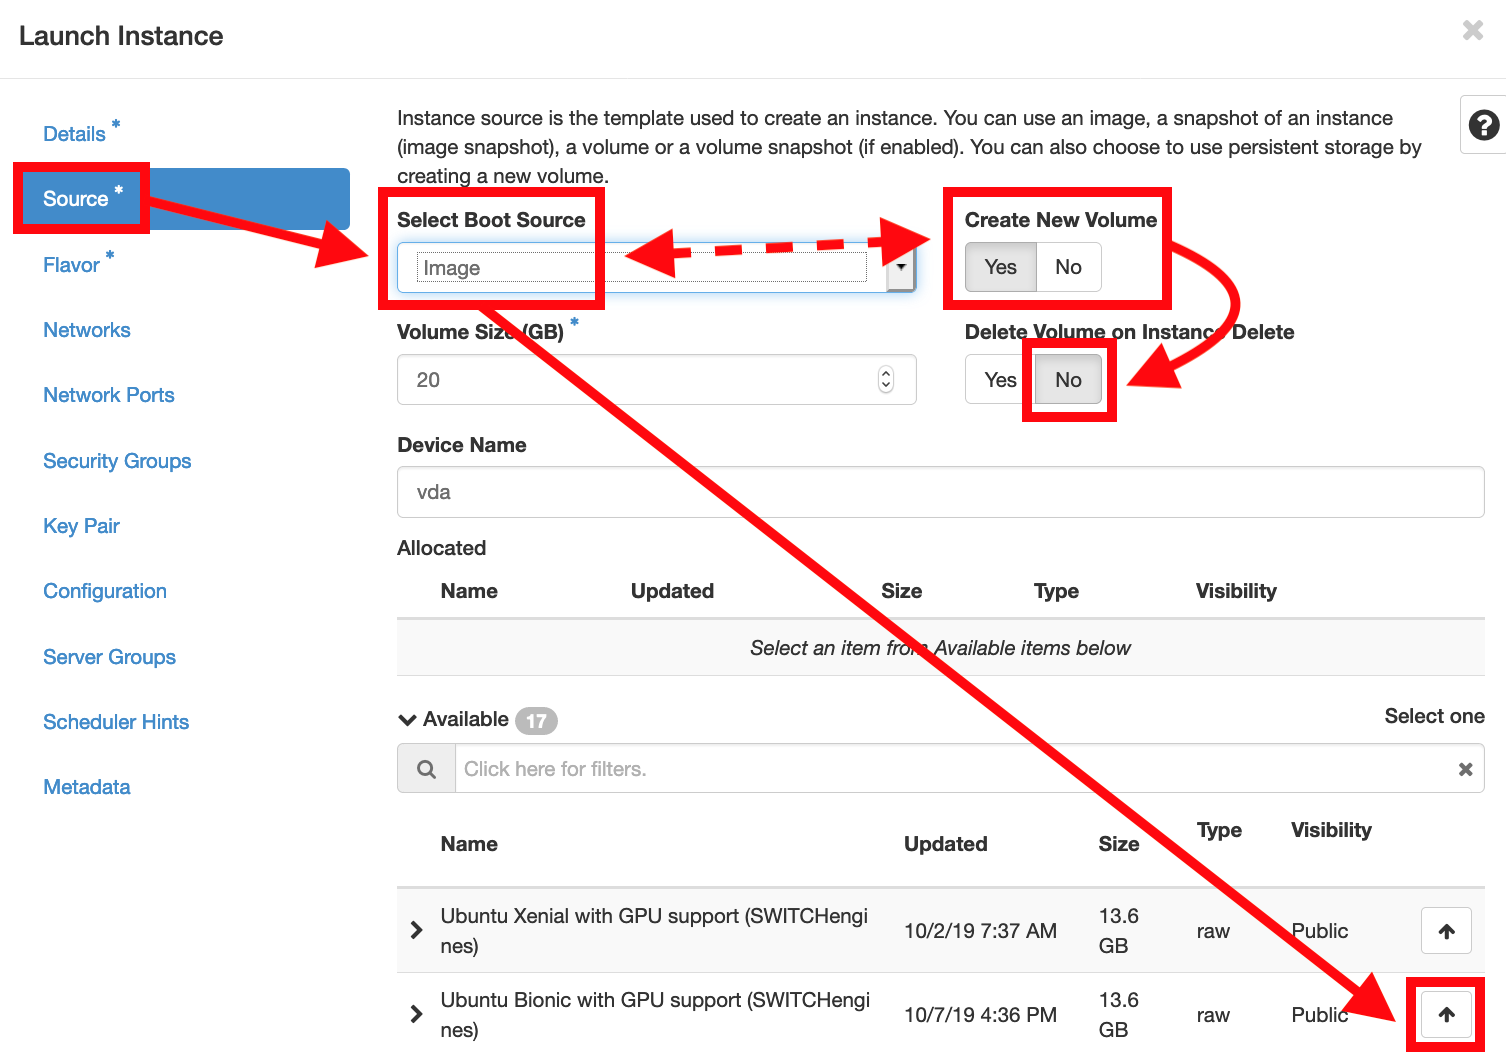
Boot from Image (Creates new Volume)
This option is a combination of Boot from Image and Boot from Volume - it boots the VM from the image you specify, but creates a volume at the same time. This volume will persist even after the VM has been terminated (deleted)
Boot from Image (without new Volume)
This will create a new, non persistent (or ephemeral) disk and boot the VM from the image you specify. This is the common case. The VM boots, and the image usually installs a base operating system on the disk. Be aware, that this disk is deleted once you terminate (delete) the running instance - all data on that disk will be lost. SWITCH provides a number of common Operating System images. If you need a different image, you can upload one.
Boot from Snapshot
You can create a snapshot from a running VM (for example one that you booted from an Image) - for example after you have installed additional software. You can then create a new VM that boots from that snapshot. Imagine that you clone the harddisk of the old running machine, and install the harddisk in a new machine - it will boot to the same state as the old machine.
Boot from Volume
A volume is a "persistent" virtual hard disk. It will not be destroyed (unless you explicitly do so yourself). You can create a volume from a snapshot (in the Project -> Compute -> Volumes (or Snapshots) tab you will find a list of all your snapshots, and through the context menu, you can create a volume from an existing snapshot). This is similar to Boot from Snapshot, but you can use this method to create multiple volumes from the same snapshot and then run multiple virtual machines from the same base template.
Boot from Volume Snapshot (Creates new Volume)
This option is a combination of Boot from Snapshot and Boot from Volume - it copies an existing snapshot to a new volume and then boots from that volume.
Which flavor is the right one for me?
Please size your VM according to your needs. It is possible to resize your VM at a later stage if needed.
You can select your flavor from a variety of prefixed flavors which are often used. However, please remember that you only pay for what you use.
Simply click on the arrow from the flavor you wish and confirm it by clicking on Next.
Networks
The Network tab allows you to attach the virtual machine to an existing (virtual) network you created earlier. If you haven't created your own network, then select the private network. The "public" network is used internally by the system, if you use it, your virtual machine will not start!
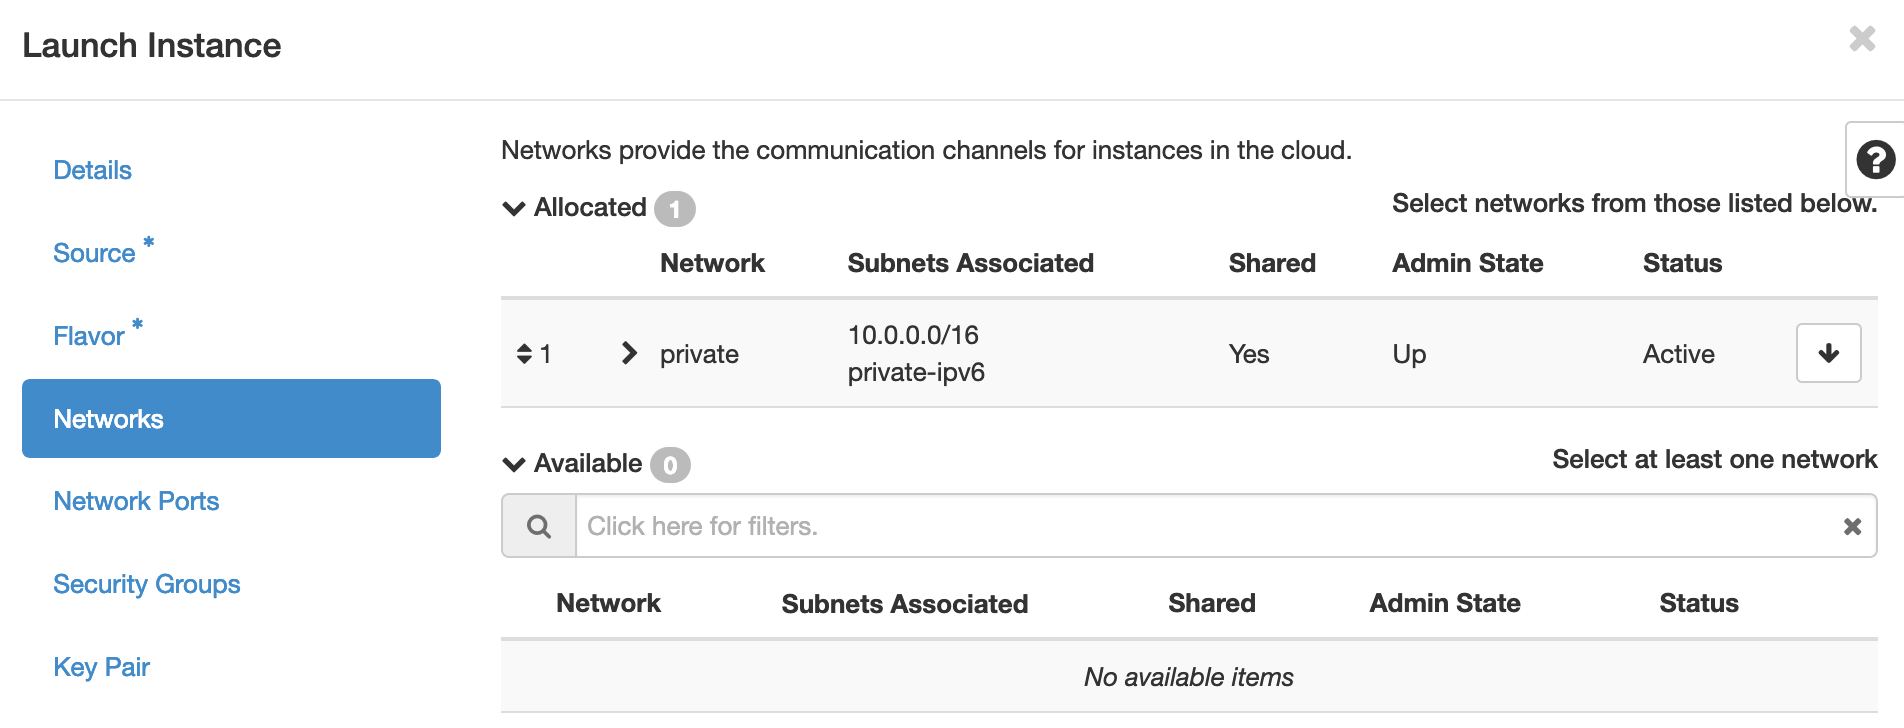
Do not use the 'public' network! You have to choose either your own network or the 'private' network for your virtual machine, using 'public' won't work.
Editing network ports is for advanced users. If you would like to know more, please click here.
Security Groups
Click on the arrow next to the Security Group of your liking and click on Next to confirm your selection.
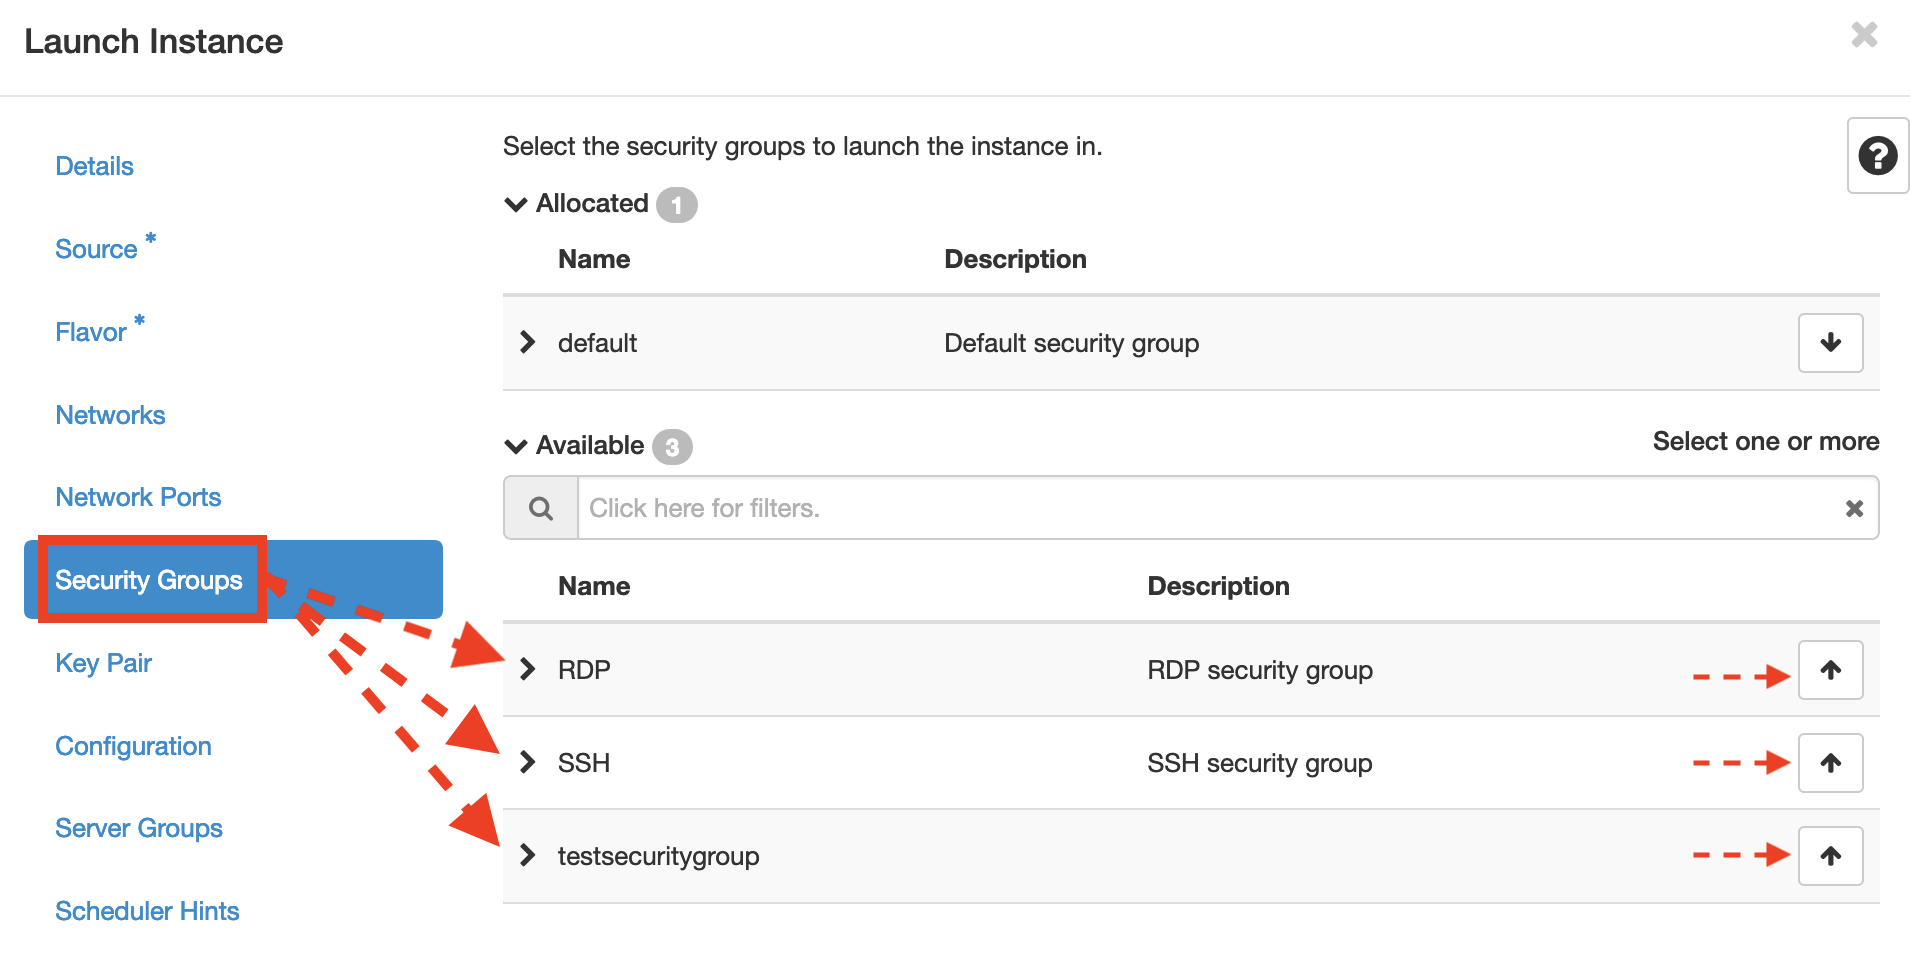
To access your instance you will have to configure network access via Security Groups. For Linux you will have to allow SSH access, for Windows RDP. Please Click here to find a guide on how to set up Security Groups.
Security Groups could be changed later, but it's recommended to add "ssh" for Linux VMs to connect to them after they are launched.
E.g. in this case the user has previously created a security group “testsecuritygroup” so this appears on the selection and is available.
Key Pair
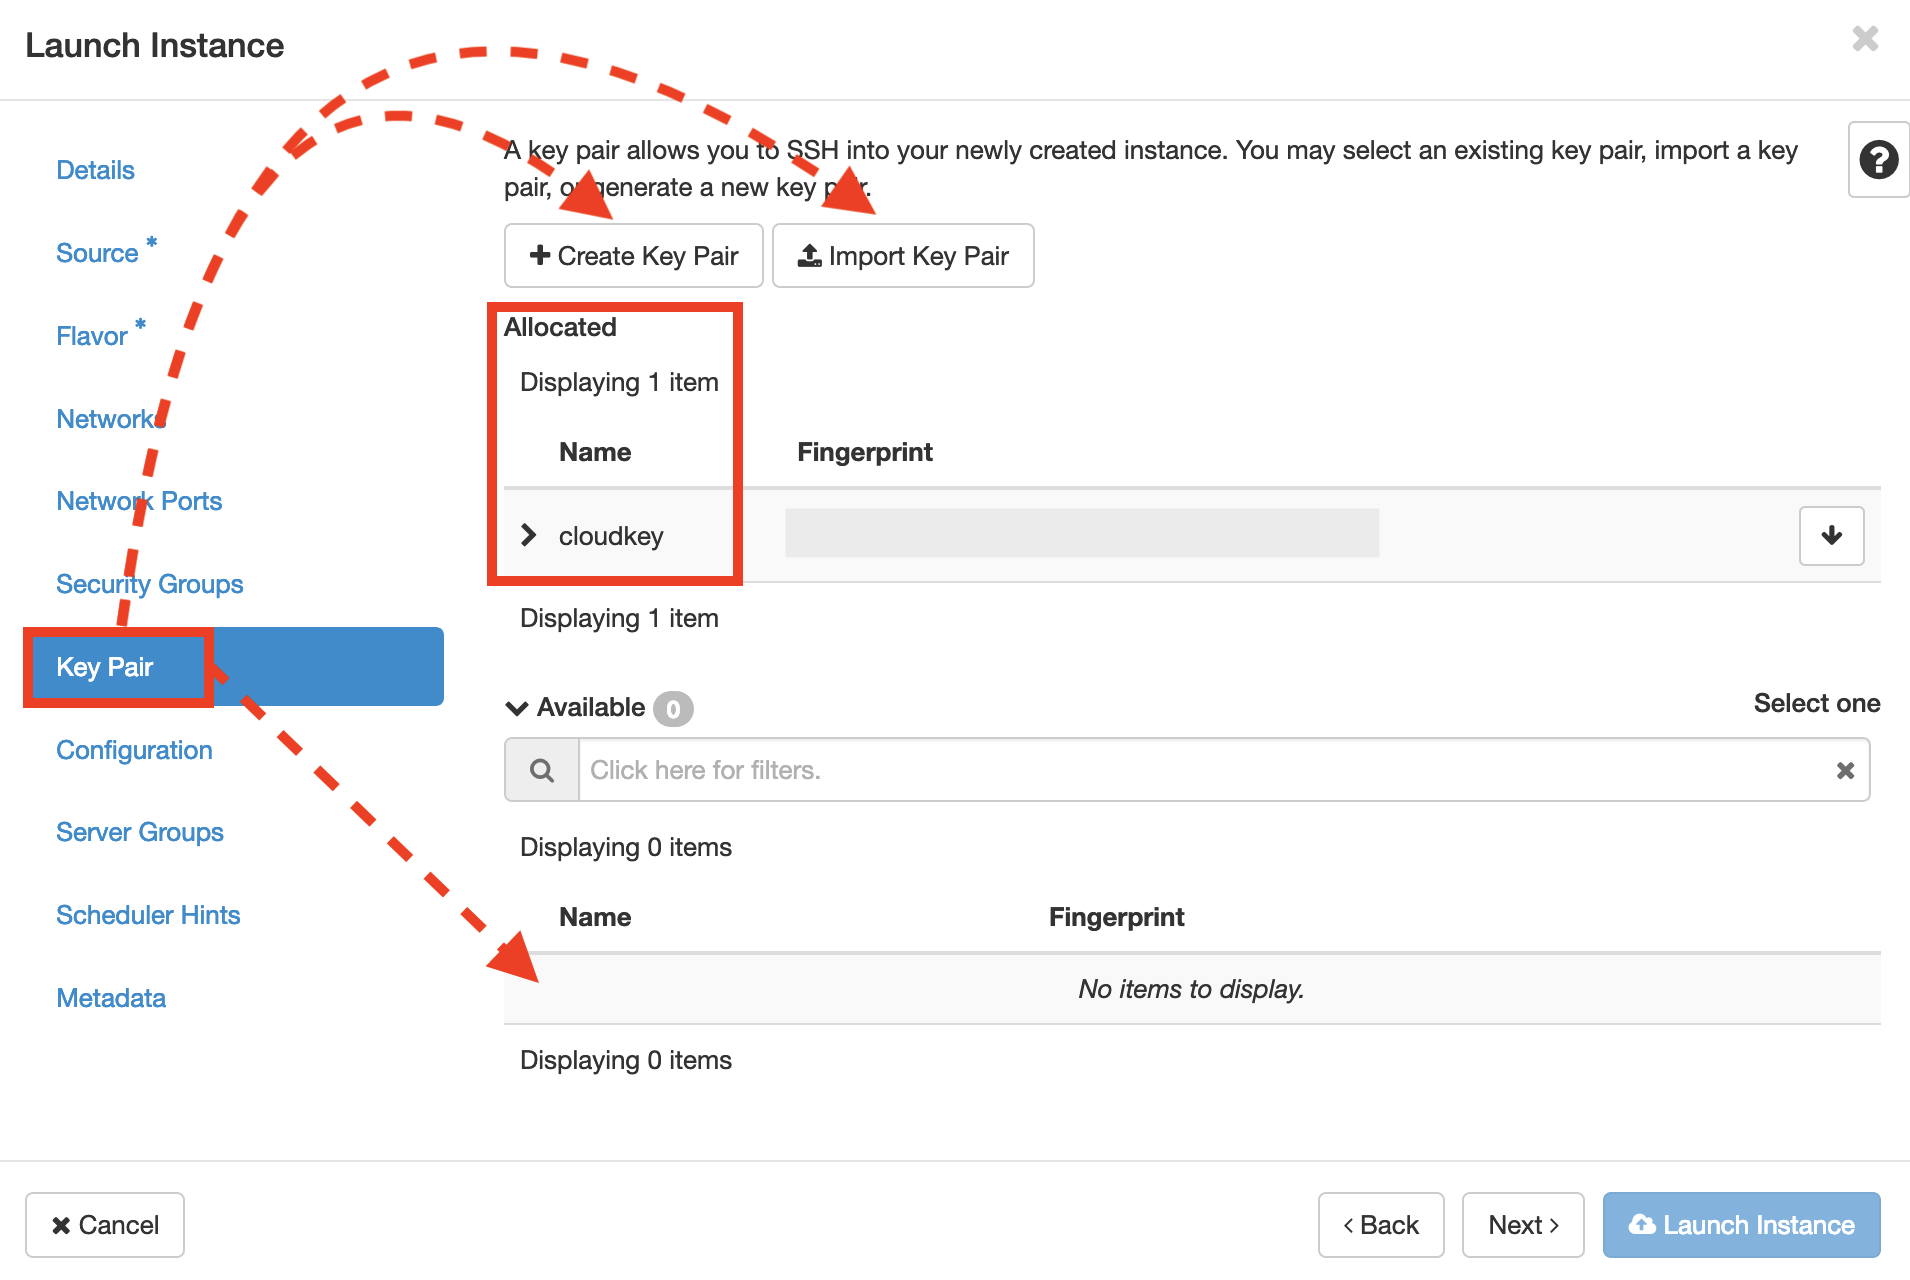
Your already created or imported Key Pair should be selected automatically as shown in the picture below.
If you use a Linux-based VM please add an SSH key. There is no need to set up an SSH key pair for Windows VM because you will access the VM via password. Here you will find a guide on how to start a Windows VM.
If you don't see your SSH key listed, you will need to import or create one. For further information about SSH keys please refer to this link.
Configuration
The Configuration tab allows you to define a script that runs after the instance has been created (maybe to setup the partitioning of the default disk.) Use it to do an initial installation or setup of software. This is a purely optional step.
Launch Instance
Now 
In order to gain access to your instance, you will need to assign a public IP address to it.
To access your instance, SSH to it from your computer (Be sure to have assigned a public IP address and allowed SSH access). Depending on the image you started with, you will need to use the correct user:
- Ubuntu Trusty 14.04 (Cloud) user: ubuntu
- Debian Wheezy 7.2 (Cloud) user: debian
- Fedora 20 (Cloud) user: fedora
You can Copy the ssh link " ssh OSName@IP" and paste it in the Terminal to SSH to your Instance after you clicked on Finish. For example: your associated floating (public) IP is 86.119.1.159 and you selected an Ubuntu Image, you would have to enter the following in the Terminal: ssh ubuntu@86.119.1.159
If you have set up a Windows VM this link will guide you through the process of how to start a Windows VM.
You have now created an Instance of a Virtual Machine.