CoreOS Image
CoreOS is a small, lightweight operating system, that is used to run Docker containers efficently. For more general information about CoreOS and Docker, follow the relevant links.
When you use CoreOS, you will usually start more than one instance and create a cluster of multiple virtual machines. CoreOS can manage these instances automatically.
The following steps are a quick walkthrough on how to setup a CoreOS cluster. It is based on the "Running CoreOS on OpenStack" article.
Preparation
Note: We assume that you have at least basic Unix knowledge to follow this tutorial.
Nova Commandline Tools
Optional, but really helpful: Install the Nova Commandline tools for your local machine, so you can interact with SWITCHengines on the command line. Download the openrc configuration file (that contains all the necessary variables to run the command line tools by going to Access & Security - API Access and clicking on the Download OpenStack RC File button. Save the file.
SSH Public Key
Have your public SSH key ready. On a Linux system, you can execute the following command to see it:
cat ~/.ssh/id_rsa.pub
Neutron Network ID
You need to know which network your CoreOS machines will be on. You can either use the "private" network that is shared among all projects on our infrastructure, or you can create a new network for yourself only.
You will need the UUID of the network:
nova network-list
+--------------------------------------+---------+------+
| ID                                   | Label   | Cidr |
+--------------------------------------+---------+------+
| xxxxxa81-4b26-4ec2-bff4-ff07f8737689 | private |   -  |
| yyyyy73a-a105-4575-ad37-f14da007bedb | coreos  |   -  |
| zzzzzabd-8286-4064-a836-d7837d214693 | public  |   -  |
| wwwww5a5-375d-4f70-bc20-a5314522c602 | canary  |   -  |
| vvvvv902-86b4-4650-8479-173b27a1910a | pub     |   -  |
+--------------------------------------+---------+------+
Here, we have defined a "coreos" network. Take a note of that UUID.
Core OS Image ID
There are two possibilities to find out the image ID.
A) Use the following command on the command line:
openstack image list
You will see a table like this:
+--------------------------------------+------------------------------------------+--------+
| ID                                   | Name                                     | Status |
+--------------------------------------+------------------------------------------+--------+
...                                    |                                          |        |
| fffffff-a254-431b-806d-ffffffffffff  | CoreOS (SWITCHengines)                   | active |
+--------------------------------------+------------------------------------------+--------+
B) Find the ID of the CoreOS image in the Region (ZH or LS) that you are going to use. Go to Images and select the Public images

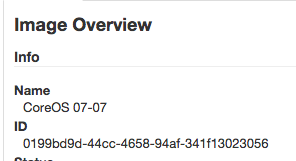
Then click on the CoreOS entry and note the ID of this image (In the example below: 0199bd9d-44cc-4658-94af-341f13023056 ):

Discovery Token
Get a discovery token by visiting https://discovery.etcd.io/new?size=3 (where the number after 'size=' is the size of your planned cluster). You will see a URL of the following form:
https://discovery.etcd.io/yyyyddb78cf658cdfa13de9ba8f5xxxx
Make a note of it. In the next step a value like yyyyddb78cf658cdfa13de9ba8f5xxxx will be used as a token in the cloud-init.yaml file.
Cloud-init Configuration
Create a Cloud Init file with the following content. Call it "cloud-init.yaml":
#cloud-config

coreos:
  etcd2:
    # generate a new token for each unique cluster from https://discovery.etcd.io/new?size=3
    # specify the initial size of your cluster with ?size=X
    discovery: https://discovery.etcd.io/<token>
    # multi-region and multi-cloud deployments need to use $public_ipv4
    advertise-client-urls: http://$private_ipv4:2379,http://$private_ipv4:4001
    initial-advertise-peer-urls: http://$private_ipv4:2380
    # listen on both the official ports and the legacy ports
    # legacy ports can be omitted if your application doesn't depend on them
    listen-client-urls: http://0.0.0.0:2379,http://0.0.0.0:4001
    listen-peer-urls: http://$private_ipv4:2380
  units:
    - name: etcd2.service
      command: start
    - name: fleet.service
      command: start
ssh_authorized_keys:
  # include one or more SSH public keys
  - ssh-rsa AAAAB3NzaC1yc2EAAAADAQABAAABAQC0g+ZTxC7weoIJLUafOgrm+h...
Be sure to insert the token you got from the discoveryd.etcd.io service and your SSH public key.
Start Cluster Script
The final step is to create a script to actually launch the CoreOS cluster. You could call it "core-start.sh":
#!/bin/sh
# core-start.sh
nova boot \
 --user-data ./cloud-init.yaml \
 --image yyyyyyd-44cc-4658-94af-341f13023056 \
 --flavor c1.small \
 --num-instances 3 \
 --security-groups default \
 --nic net-id=xxxxxxx3a-a105-4575-ad37-f14da007bedb \
 coreos
You will need to enter the image id and the network id that you noted down before. Select a flavor name (that determines the size of your virtual machines).
Save the file, make it executable and run it. After a minute or two, you should have a running cluster of 3 machines, each running CoreOS and being visible to each other.
Starting the CoreOS cluster
Run the script you created:
$ ./start-core.sh
+--------------------------------------+-----------------------------------------------------+
| Property                             | Value                                               |
+--------------------------------------+-----------------------------------------------------+
| OS-DCF:diskConfig                    | MANUAL                                              |
| OS-EXT-AZ:availability_zone          | nova                                                |
| OS-EXT-SRV-ATTR:instance_name        | instance-00000028                                   |
...
| created                              | 2015-07-10T14:58:56Z                                |
| flavor                               | c1.small (623dfef9-5f26-4d7a-8336-4296bbb76b23)     |
...
| name                                 | coreos-a10b99a1-8e3d-4802-a300-d9717ec3b770         |
...
+--------------------------------------+-----------------------------------------------------+
In the Engines user interface you will see the three instances running:

You can assign a public IP address to one of the machines, allow SSH traffic to go to the machine and SSH into it:
$ ssh core@86.119.1.xxx
Last login: Fri Jul 10 15:10:21 2015 from 130.59.17.140
CoreOS stable (681.2.0)
core@coreos-9a7e9dda-2b36-4b78-8e44-b704303c4d38 ~ $