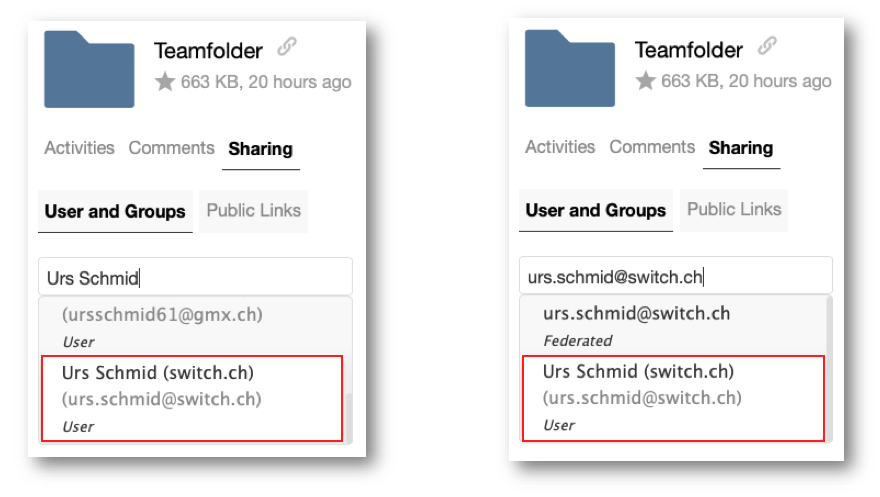
In the Switch Drive Web-Client, locate the file or folder that you want to share and click on the ![]() icon. In the sharing section enter the first name and the last name of the person (or the name of the custom group). Wait a moment until Switch Drive displays a list of matching users, then pick the correct person or custom group from the list. The list of matching users also shows the email address of the user in gray in case you need to distinguish users with the same name.
icon. In the sharing section enter the first name and the last name of the person (or the name of the custom group). Wait a moment until Switch Drive displays a list of matching users, then pick the correct person or custom group from the list. The list of matching users also shows the email address of the user in gray in case you need to distinguish users with the same name.
Just type the name of person as you know it, with lower or uppercase letters, with ö,ä,ü,é,è etc. If you cannot find the correct person, type only the last name of the person and then scroll through the list of names.
Please note:
You can also search a person by email address, see screenshot above on the right. However pay attention to always select the "User" entry from the list of users. If you select the "Federated" entry then Switch Drive expects that this user is on another ownCloud instance (for example on Polybox at ETHZ). If no such instance or user can be found, an error message will be displayed.
Once you have selected the user or group, you can adjust the sharing permissions by clicking on the tiny cogwheel icon (1) to display the sharing options.
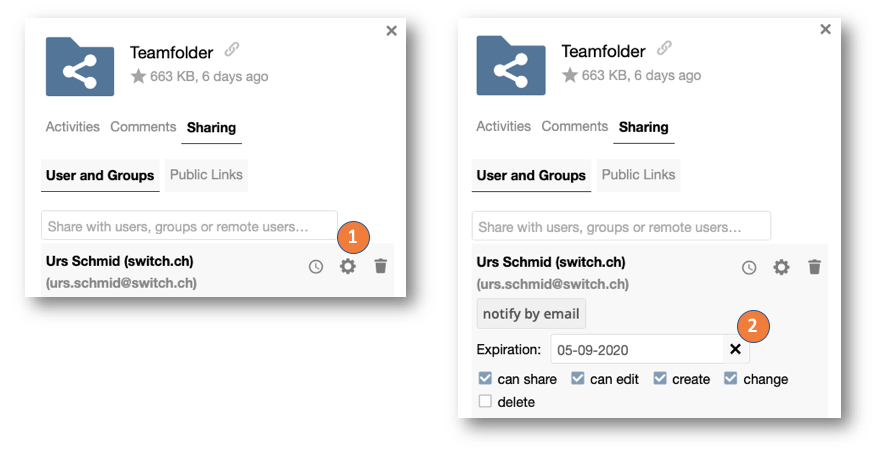
If you want to inform the user about your new share click on the button "notify by email". Switch Drive will immediately send an email to the user about the shared data, including a link to quickly view the shared data in a web-browser. After the email was sent, the "notify by email" disappears, so you can only inform the user one time by email.
You can also add an expiration date to your share. When the expiration date is reached the share to the user will automatically be removed without any notice to the user who has received the share. To set an expiration date just add (or change) the expiration date (2). Note that a share with an expiration data gets a small clock indicator next to the cogwheel icon (1).
In the Switch Drive sync client, locate the file or folder you want to share and right-click on your mouse to show the context menu. Select "SWITCHdrive" and then "Share..." to open the sharing dialog window.

Enter the first name and the last name of the person or the custom group name and wait a moment until SWITCHdrive shows you a selection of names. Then pick the correct person or custom group from the list, even if there is only one single entry displayed. In the sample blow, the custom group name "Toolbox" was entered and also found, and you have to pick the entry "Toolbox (group)" to share the Project A folder with this group.
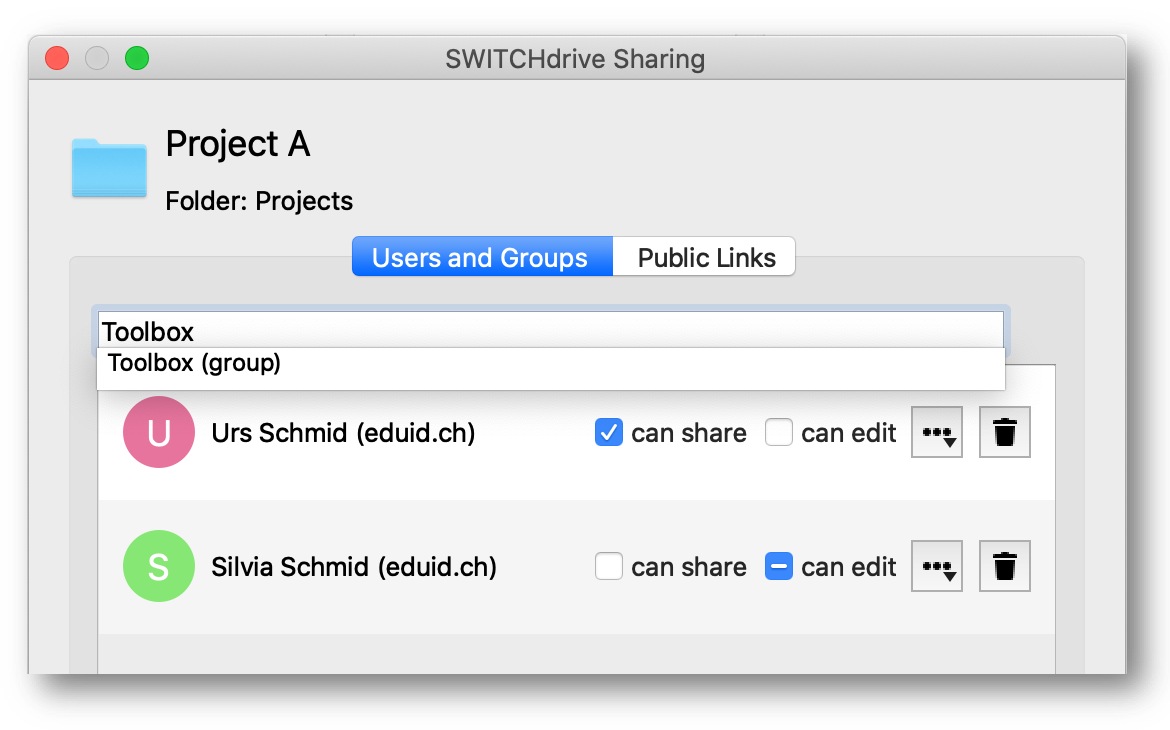
Note that users who have already received a share of your folder are listed in this sharing dialog. Open this shareing dialog to quickly check who has received your data and which permissions were granted.
You can share some data with a so called public link to any person. This person does not need to have a Switch Drive account and can access the data anonymously via web browser.
A public link to a folder looks like this: https://drive.switch.ch/index.php/s/juS8wAB6PPykCWJ
Note: If sharing via public links is not an option for you, then you can also provide a Switch Drive Voucher to the external partner so this partner can create his or her own Switch Drive account.
To create a public link, you can use the Switch Drive web client or the Switch Drive sync client to do so.
In the Switch Drive web client, locate the file or folder that you want to share. In this example below, lets assume that you want to share the folder "Project-Files":
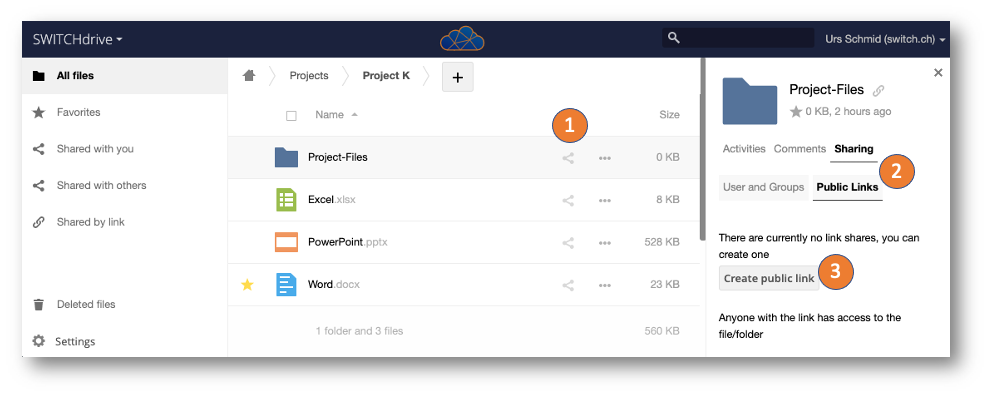 Click on the share-icon (1) behind the file or folder name. In the appearing right pane click on Sharing and then on Public Links (2). You can now create a new public link by clicking on the button "Create public link" (3)
---
In the Switch Drive sync client, go to your local switchdrive folder and locate the file or folder that you want to share.
Right click with the mouse on the file or folder and select SWITCHdrive from the pop up menu then select Copy public link to clipboard. Paste the link from the clipboard to an email and send it to your external partner.
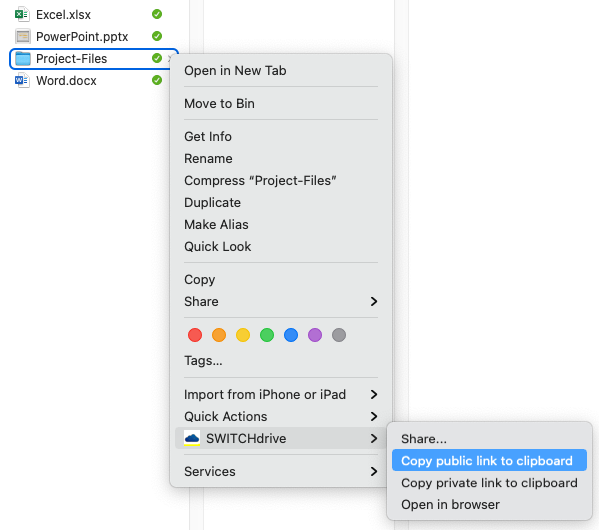
You can also open the sharing section by selecting Share... and then select the option to create a Public Link. Note that you can create more than one public link for the same file or folder, with certain permissions, with or without password protection and/or expiration date.
At any time you can also edit a public link and change the permission, add or remove a password and set or delete an exipration date without re-creating the public link.
If a person cannot be found, try again by just entering the user's lastname:
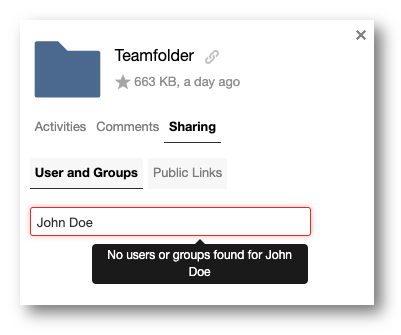
You can also try to search for the user's email address. Just type in the email address of the user in the search box:
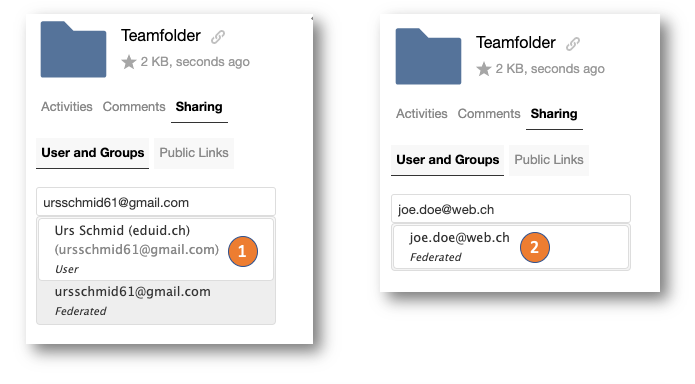
If a Switch Drive user with such an email address exists, then select the "User" search entry (1). If there is only a "Federated" search entry (2), Switch Drive could not find an entry in the database and assumes that this user is maybe located on another cloud instance and tries to create a share via the Federated cloud-ID. Unless the user runs indeed another ownCloud instance, you will get an error message telling you that the other (cloud-) server cannot be reached:
 If you cannot find the user by last name nor by email-address, then there is a good chance that the user has not created a Switch Drive account yet or has never logged into his or her Switch Drive account. Note that creating a Switch edu-ID does not mean that a user has also created a Switch Drive account (see here for more details)!
If a user has confirmed that he or she has a Switch Drive account please ask this person to share something with you (eg. an empty test folder), because the user definitly has to login to the Switch Drive account to do that.
Once you have shared something with another person or group, you can adjust the permissions of the user or group. Note that the default permission of a shared folder is "can share" and "can edit", but this does not include deleting or moving any data. This permission has to be set explicitly by the owner of the data to avoid deletion of data by accident.
To adjust the permissions with the Switch Drive web client:
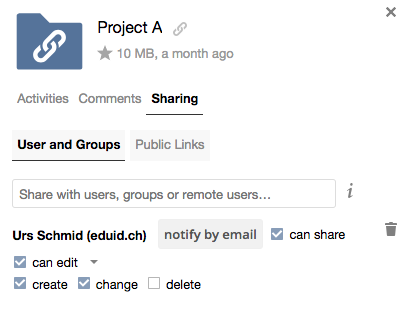
Click on the small cogwheel icon (1) to open or close the sharing options for a certain user or group. By default all the options except "delete" are set. If you want that the users can also move or delete data, then you have to also set the "delete" permission.
Click on the option "notify by email" to inform the user that data was shared with him or her. You can also add an expirated date to the share. When an expiration date of a shares is reached the share will automatically be removed without any notice to the user who has received the share.
To set an expiration date click into the date box and add (or change) the expiration date (2). Note that a share with an expiration data gets a small clock indicator next to the cogwheel icon. If you do not want to share the data with the person or group, click on the small trashbin icon on the right side of the cogwheel icon (1).

To adjust the permission with the Switch Drive sync client:
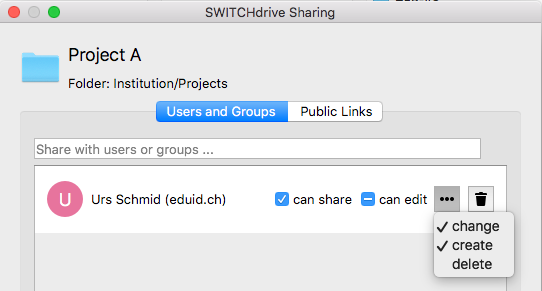
Click on the 3-dot menu behind "can edit" to display the drop down menu with the additional edit permissions.
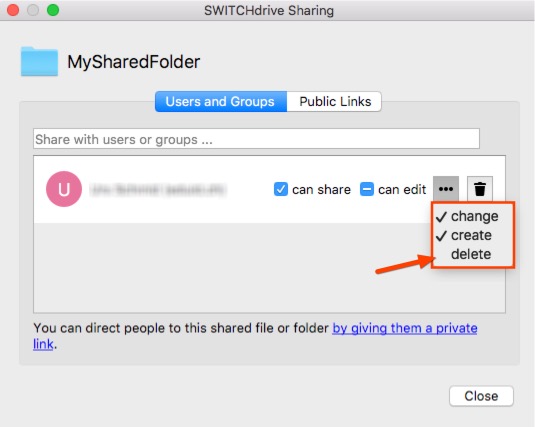
Do delete a share click on the small trashbin icon.
You need to create a public link of your folder and send this link by email to other users, see
see FAQ: How do I share a file or folder with someone who hasn't Switch Drive?
When you create the link, you can set the appropriate permissions. You can even edit an existing public link and change the permission or add a password or an expiration date without modifying the public link itself.
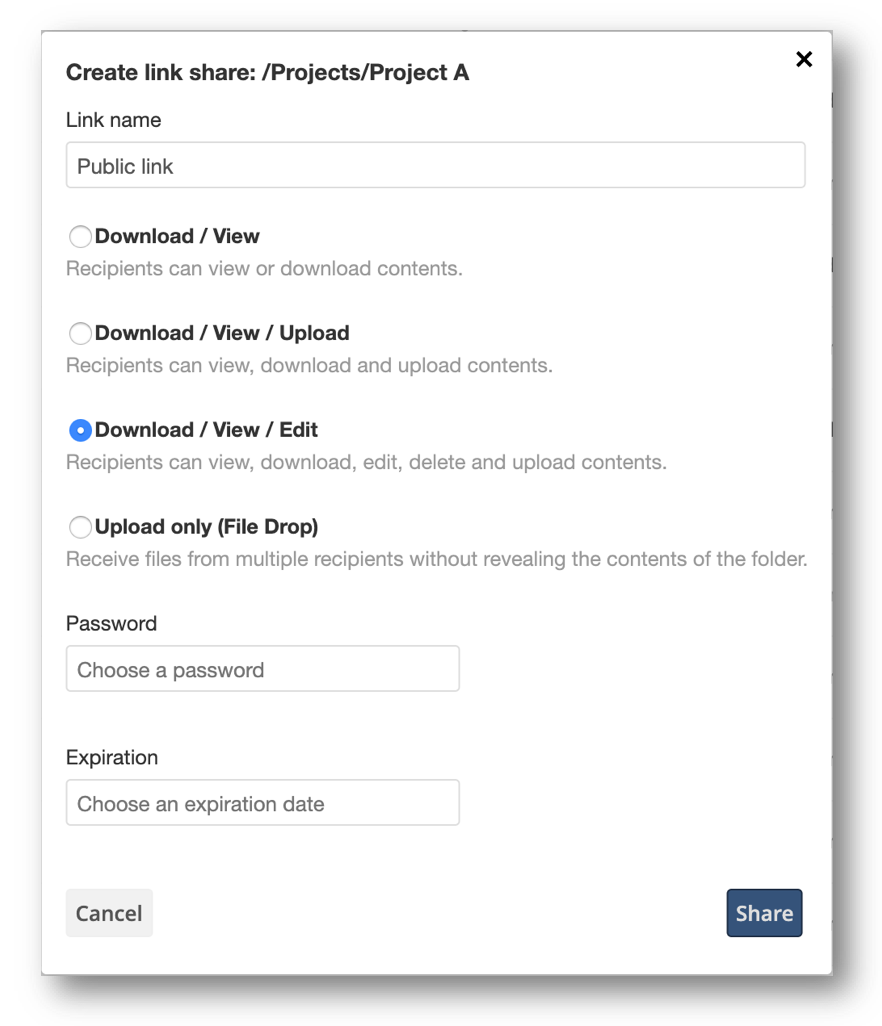 The "highest" permissions has the option "Download/View/Edit" which also includes uploading additonal data and deleting any data in the shared folder. Be very careful when selecting this option, as all users who have received the link can also modify any existing data and upload new data into your shared folder.
The "lowest" permission has the option "Upload only (File Drop)". Select this permission when you want users to only add new data to your shared folder. These users cannot see or download any other data, and once the have uploaded their data, cannot access it any more.
This for example is a FileDrop link: https://drive.switch.ch/index.php/s/AiUNaJFTtCtwkmI
The option "Download/View/Upload" is similar to the file drop folder, but in contrast to the option "Upload only (File Drop)", recipients can also view and download existing data from the shared folder, even such data that was previously uploaded by other users.
If you just want to share some data without the possibility of changing or adding new data (for example to share a script of a lecture), select the first option "Download/View".
If you have sensitive data that you share with a public link, you should protect the access of your data by issuing a Password and/or an Expiration date.
You can easily share files or folders with somebody at the ETH in Zurich who is using Polybox (or with another person who is using a cloud service which is based on ownCloud or Nextcloud).
However, in oder to directly share data with such persons, you have to inform each other about the so called Federated Cloud-ID, because you cannot search for the required person in the Switch Drive address book.

Go to your Switch Drive web client and open your personal switchdrive settings. Then scroll down until you see the entry "Federated Cloud ID": Copy the bold text and send it to the person at the ETHZ. Ask also to send their federated Cloud ID to you. It shoud have the form xxyyyyy@polybox.ethz.ch. Create an (empty) test folder and share it with the other person at ETHZ by entering this address to the "User and Groups" search box. Wait a moment until the "(federated)" is displayed behind the address, then select it.
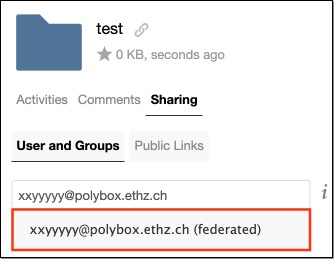
If the address does not exists, or if Federated Sharing is not allowed at the other cloud service, an error message will be displayed:

If sharing works fine in both directions, then you can continue to use Federated Cloud IDs to share your data via Switch Drive or Polybox. Note that you can always hover with the mouse over the sharing icon to see the complete Federated Cloud-ID of your collaborator at the other Cloud.

You can easily see which files or folders have been shared by you in the Switch Drive Web Client.
(If the Switch Drive Sync Client is running, then you could also go to a shared folder and open the sharing dialog box in your file-explorer. There you can also see who has already received a share of your file or folder. Click here to read more details how to do this)
In the Web-Client click on the link All files to see an overview of your files. Those files and folders which only show the word "Shared" behind their names are shared with other users. In the sample below, the last three items are shared with other users. The folder without a name ("Project C") is not shared with anyone.
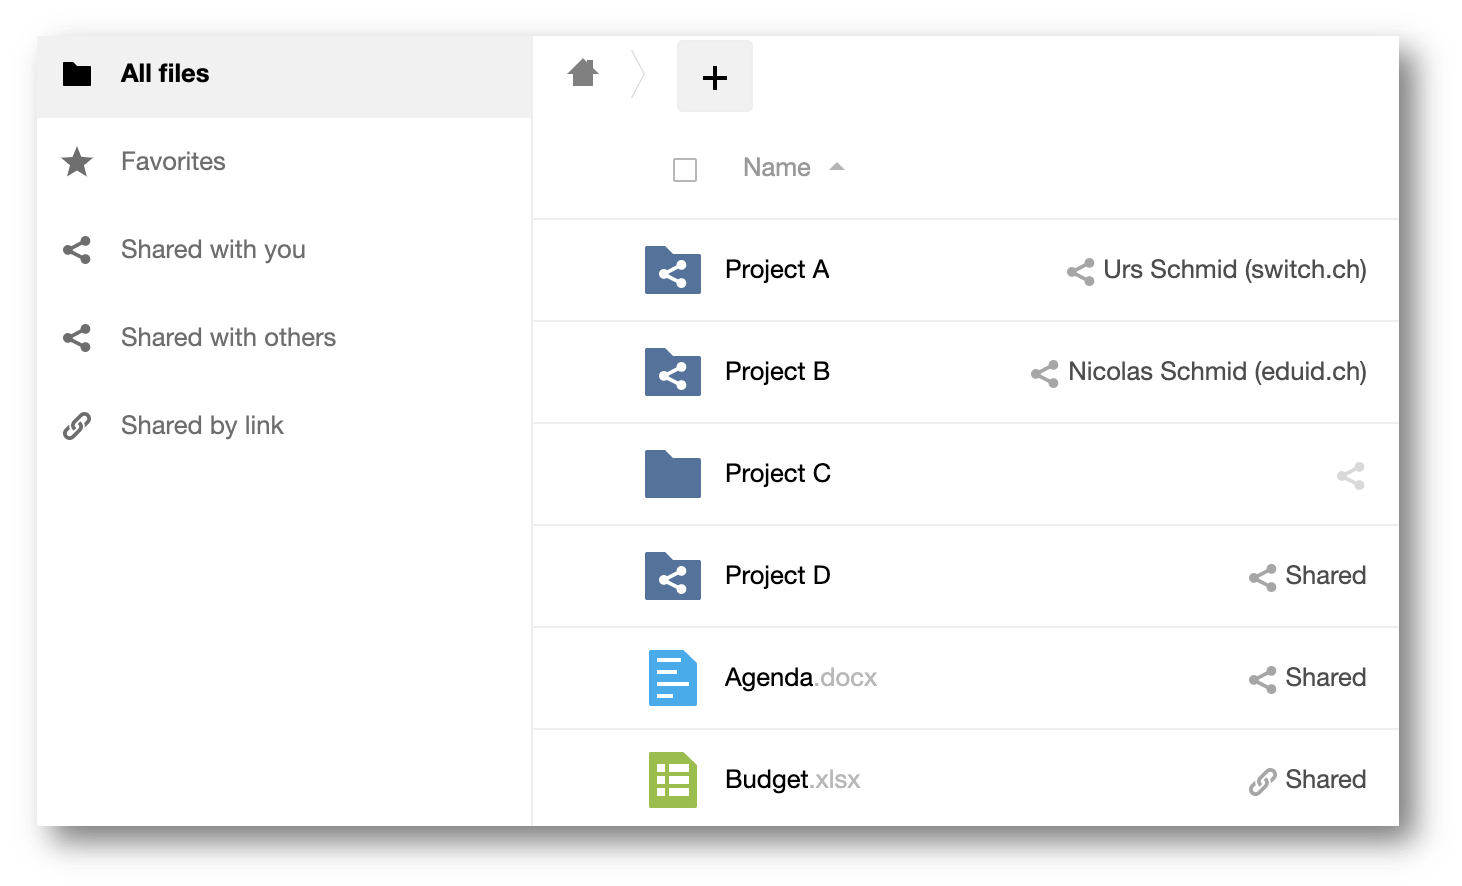 Note: the files and folders which show a user's name or a project-folder's name have been shared with you.
To see to whom you have shared your files and folders, click on the link Shared with others on the left. On the right the names of users or custom groups to which you have shared your data are listed. The file "Agenda" for example was shared with the custom group "Toolbox", the folder "Project D" was shared with the (external) project member called "Nicolas Schmid".
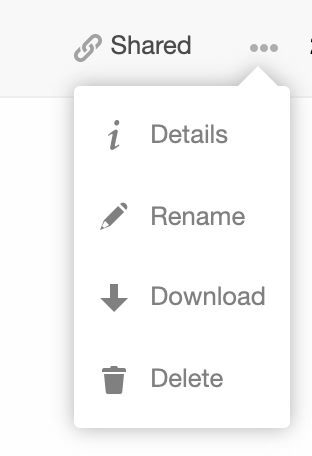
 If there is no name shown behind a file's or folder's name but only the word "Shared" then this data was shared by public link. Note also the small keychain icon in front of "Shared" to indicate this type of sharing. Click on the link Shared by link or click on the 3-dots-icon and then on "Details" to see more information about this public link.
You can only see which files or folders are shared with you when you login to your Switch Drive account with the Web Client. Unfortunately there is no way you can get this information in the Switch Drive Sync-Client.
Open the Web-Client and click on the link All files on the left, then navigate to the subfolder of your interest. The owner of a shared folder is listed behind the folder's name. In the example below, the owner of shared folder "Project A" is user "Urs Schmid" at Switch, the owner of folder "Project B" is the external project member "Nicolas Schmid" and the owner of the Project B is the user itself, that means this folder was not shared and has therefore also no sharing icon inside the folder's icon.
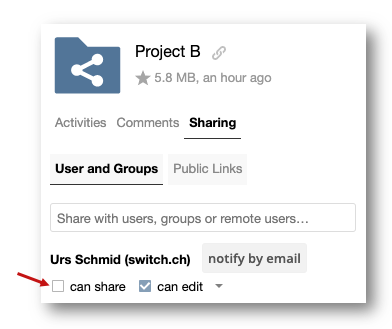
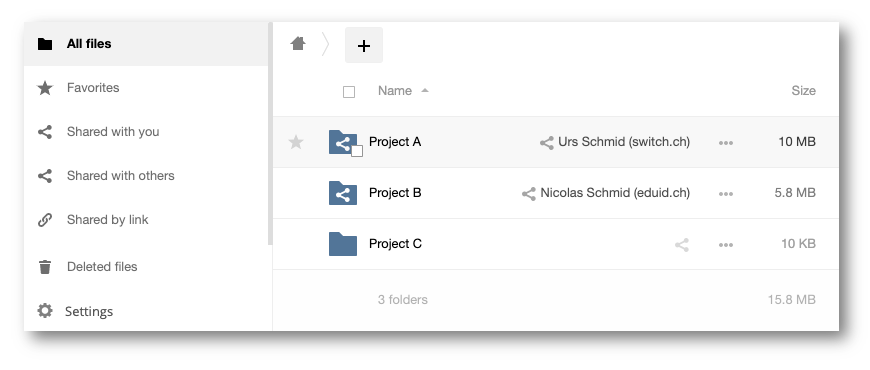 Please note that the owner of a folder and the person who shared something with you is not always the same! To see who shared something with you click on the link Shared with you on the left hand side. Please have some patience as this request to the database of Switch Drive could take some time, from a few seconds up to a minute or two depending on the number of shares you have received. In the sample above, you can see that Project B has was not shared by the owner of the folder (Nicolas Schmid), but by another project member (Urs Schmid).
 Such type of sharing can happen when users allow to reshare their shared folders. If you do not want that a shared folder can be reshared to other persons, you have to uncheck the "can share" option.
No, the shared data still belongs to the person who shared the data with you.
At any time, the owner of the data can remove the share to you and the data will be removed from the Web- and from the Sync-Client. There won't be any copy in your trashbin so you would neeed to contact the owner of the data again and request to share the data with you.
You can also decline the share from the other person - and accept it any time later again if you still like to access this data. As an example, the folder "Project B" was declined and is not accessible while the folder "Project A" is still shared and accessible. Simply click on the link "Accept Share" to access the data in "Project B" again.
 Please be aware that shared data could disappear from one moment to the other, for example if the person who shared the data leaves the institution and his or her Switch Drive account gets deactivated. All shares to you and other Switch Drive users would then be removed.
When working in a shared folder (eg. uploading files, viewing and editing documents, etc) make sure that the owner of the share is an active Switch Drive user who is also in contact with you by other media (eg. phone, chat, email, etc). You could also propose that you would like to take ownership of the shared data and that you would like to share it with other users.
At any time you could always create a local copy of the shared data by simply copying the shared data from the local switchdrive folder e.g. to the desktop of your computer. Then decline the share of the user, wait a moment until the shared folder disappears and finally move the copied folder from the desktop back to your switchdrive folder. You are now the owner of this folder and can share it to other users.
To transfer your data to somebody else, you cannot just share this data to that person, because the shared data still belongs to you. Of course the other person could create a copy of the shared data, but this would not copy the existing shares to other users that you and maybe others have created in the past.
In order to really transfer the ownership of your data - including existing direct shares - you need to ask the other person to share an (empty) folder with edit permission with you. Then move your data that you want to transfer into this shared folder.
Caution:
When you transfer your data with this method, all direct shares to other users remain valid, so the new owner of your data does not need to recreate them. However public links are not transferred and the new owner has to create them again.
Let's do an example:
Suppose that I want to transfer all data which is stored in the Projects folder to my successor (Nicolas Schmid). I have asked him to create an empty folder "TransferToMe" and share it to me. This folder is now visible in the main directory of my Switch Drive account:
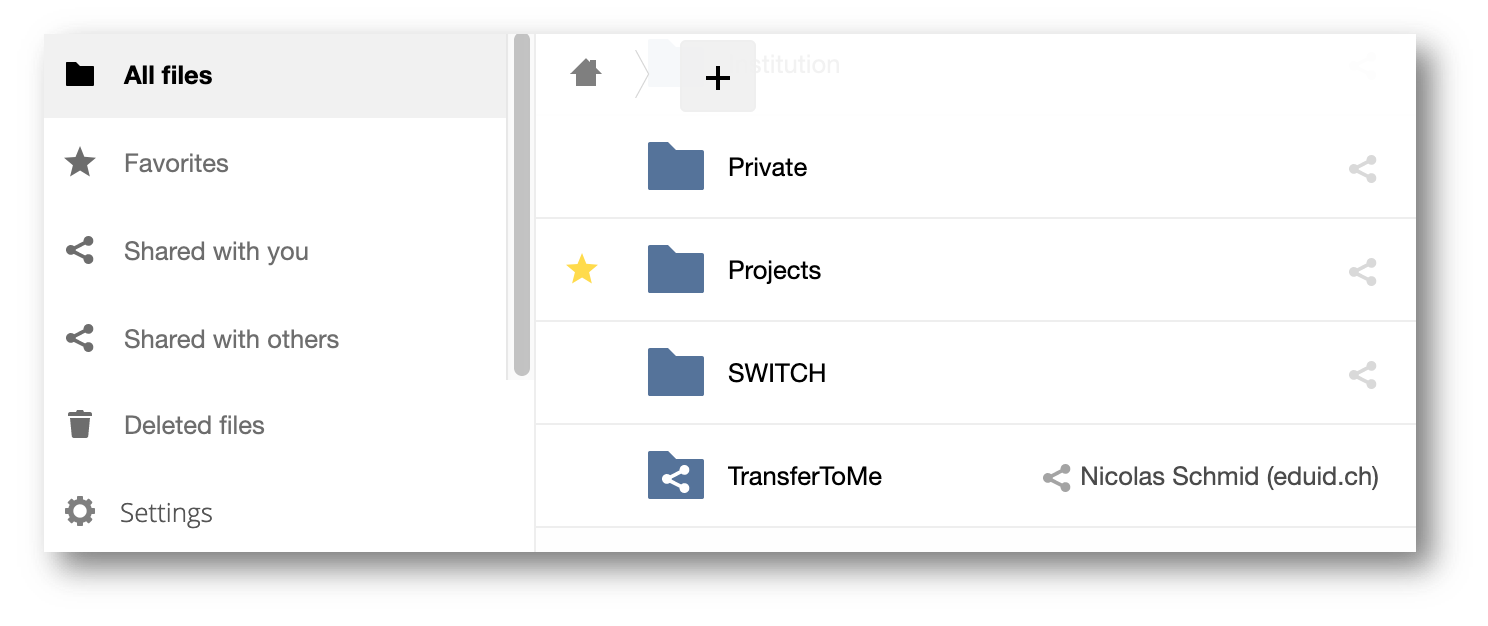 Now I just need to left-click with the mouse on the Projects folder and drag it onto the TransferToMe folder. When you do this make sure that the destination folder gets highlighted in yellow. Then release the mouse button.
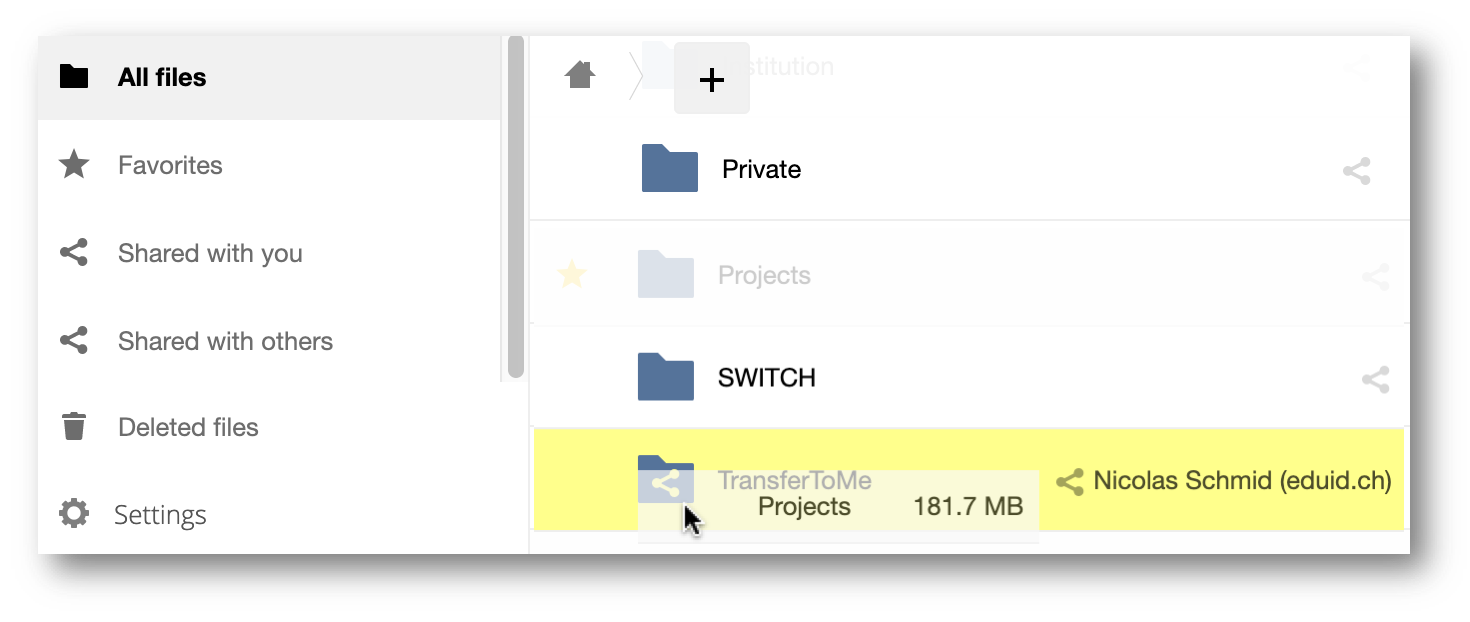 That's it! Switch Drive is now moving all the data from my account to the other account. Once the Projects folder has disappeared from the main directory, additonal folders can be dragged onto the TransferToMe folder. Move only one folder after the other and wait until the folder appears in the desination folder. When the transfer is done, you can unshare the TransferToMe folder as all the files belong now to the other user (Nicolas Schmid). He can then decide if the transferred data should be shared with you again or not.
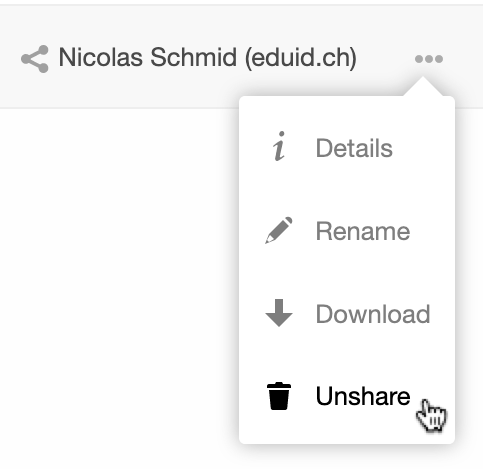
The successor (Nicolas Schmid) could also unshare the folder "TransferToMe" and move the content inside this folder to some other location inside his Switch Drive account. If you still need access to your transferred folder, ask the successor to share this folder with you again.
Note: You could also do this move in the File-Explorer or Finder within the local switchdrive folder. Because the ownership of files is only visible in the Web-Client, this transfer is easier to do in the Web-Client where you can always see who is the owner of the source and destination folder.
This is very easy, but before you continue, beware of the following situation:
If you take ownership of some shared data, it could happen that two identical sets of data will exist on Switch Drive which could be confusing to you and to others. If possible, we recommend that you ask the existing owner of the data if she or he could transfer the shared data to you, which is very simple step for the existing owner, see this FAQ.
Only if you cannot contact the existing owner any more or you have some other reasons to go ahead and take ownership of the shared data without asking the previous owner, you should follow this procedure:
1. If you work with the Switch Drive Sync Client, copy the shared folder from the local switchdrive folder to some place outside of the switchdrive folder, eg. to the Desktop of your computer. Make sure you do not move, but copy the folder. If you work with the Switch Drive Web Client, locate the shared folder and download it.
2. Go to the Web-Client and decline the shared folder of the existing user. If you have the Sync Client installed wait for a complete synchronisation which will remove the shared folder from you local switchdrive folder.
3. Finally move the copied folder (eg. from the Desktop or from your Downloads folder) into your local switchdrive folder. If applicable you can share this folder again with other users. When you do so make sure that these users do not have an existing share from the previous owner or instruct them to always work with your shared data, not with the shared data of the previous owner.
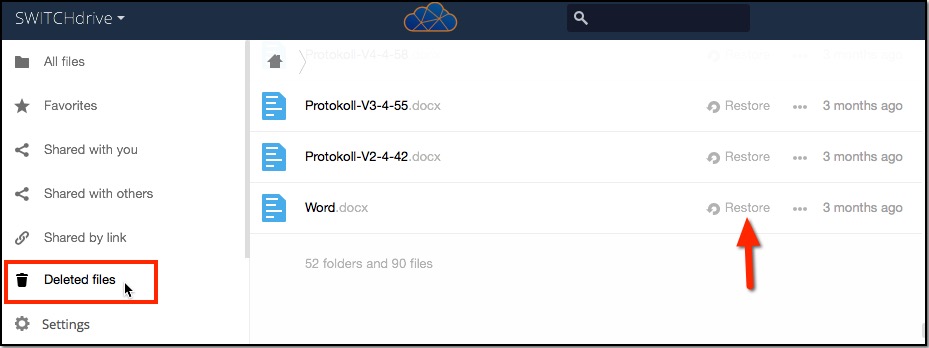
Files in your Switch Drive folder that you have deleted (or that your collaborators have deleted if they have the permission to do so!) are not removed immediately. They are moved to the folder "Deleted-files" (=trashbin) of your Switch Drive account and can be easily restored from there if needed.
You can check the content of your trashbin when you open your switchdrive account in a browser, then click on the trash bin icon in the lower left corner.
Deleted files remain in the trashbin for 90 days or 3 months. After that the files in the trashbin will be permanently deleted. It is then not possible to restore a deleted file or folder any more.
If you wish to restore a file or folder from the trashbin, locate the data to be restored and click on the "Restore" icon. You can also mark several entries to be restored.
If the original folder still exists then the restored data will be placed into its original location, otherwise it will be placed in the root of your switchdrive folder. You can then move it to a new location.
By default other Switch Drive users cannot delete (or move!) your data, unless you have explicitly given them the delete permission when you share data with them.
Normally shared users can only create new data or change existing data in your shared folder. Deleting or moving data is not allowed to protect you from accidental deletion of your own data by users, who maybe just want to unshare the data but are deleting it instead.
If you want your shared users to also delete and move your data, activate the delete permission by clicking on the 3 dots icon when sharing data with the desktop client:
In the web client activate the delete permission by adding a checkmark to the delete option when sharing data:
Note: If a user is deleting your shared data, this data will be moved to the trashbin in your switchdrive account, but also to the trashbin of the user who has deleted the data. See here how you can restore the deleted data.
If you miss some data in your switchdrive folder and cannot find it in your trashbin then go to the activity settings and see who has actually deleted the data. Please ask this user or the owner of the shared data to restore it.
Switch Drive supports all characters in file and folder names except for: * \ / < > : " | ?
If you create a file- or foldername that contains one of the characters above - because some operating systems do allow that - Switch Drive will not synchronize these files or folders.
Please pay attention not to add any invisible blanc spaces (" ") or dots (".") at the end of a file- or foldername. Some operating systems (eg. MacOS, Linux) accept such characters at the end of a file- or foldername while other operating systems do not (Windows).
Usually you can upload such data to the Switch Drive servers and work with them on a Mac, but cannot download or synchronise them on a Windows PC.
When the Switch Drive Sync Client is running, all entries in your local switchdrive folder will get tiny overlay icons, for example:
 Overlay icons can have different forms and colors:
- Green (as in Project A): the shared folder was successfully synchronised
- Green (as in Project B): the not shared folder was successfully synchronised
- Blue (as in Project C) : synchronising of data ongoing
- Red (as in Project D) : synchronisation has failed. See the Switch Drive settings for more details
- Yellow (as in Project E): some minor problem has occured (in most cases a conflict-file was detected)
When the overlay icons are missing, do the following to get them back again:
On Mac-Computers:
1. Restart the Switch Drive Sync-Client - in most cases this will get the overlay icons back. If not, continue with the following steps until the overlay icon appear again
2. Go to your System-Preferences and open the Extensions

3. Activate the SWITCHdrive Extensions (and deactivate the others if needed)
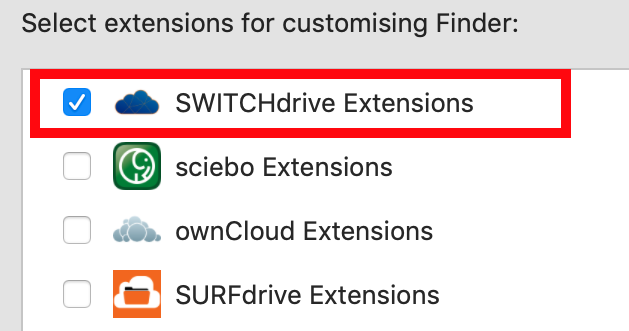
4. Quit Switch Drive Sync Client, then open the Activity Monitor and search for processes with name "switch". If there are still some old Switch Drive Extensions processes running, terminate them.

On Windows-Computers:
Start cmd.exe (right click, "Run as Administrator") and type regsvr32 "C:\Program Files (x86)\ownCloud\shellext_x64\OCOverlays.dll" (on 64 bit Windows)
see also https://github.com/owncloud/client/wiki/Debugging-Overlay-Icons
If you have several software products installed which use overlay icons, you might be running into the issue that Windows is using only the first 15 entries. Here is a description how to change the order and fix this issue: https://www.garethjmsaunders.co.uk/2015/03/22/managing-overlay-icons-for-dropbox-and-tortoisesvn-and-tortoisegit/
Versions of a file are created whenever you save a file in your switchdrive folder. However, the number of versions of a file will be reduced over time, because Switch Drive automatically expires files older than 30 days.
In order to see the versions of a file you have to open the Switch Drive web-client and locate the specific file. Then click on the 3-dot-menu behind the filename.
![]()
The details of the stored file are displayed. Go to the section "Versions" in order to see the available versions of a file. Hover with the mouse of the download link to see the exact date and time of a specific version.
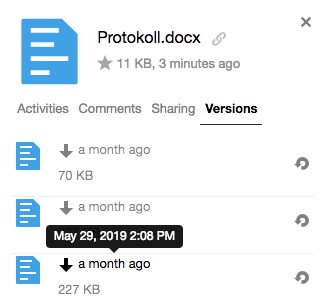
You can download or restore a previous version of a file. Click either the download icon (on the left) or the restore icon (on the right). When you restore a previous version, the current version of a file will be moved to the top of the list of versions, so you can get back to the current version if you have restored the wrong version.
If you want to keep versions of your files longer than 30 days, you need to add a version prefix or appendix yourself, eg. Protokoll-v1.doc, Protokoll-v2.doc, etc
You can see a summary of all the activities in your Switch Drive account, for example who shared, created, changed or deleted a file or who wrote some comments. To see this overview, go to the Web Client and click in the top left corner to show the drop down menu with the Files, Activity and Gallery icons.
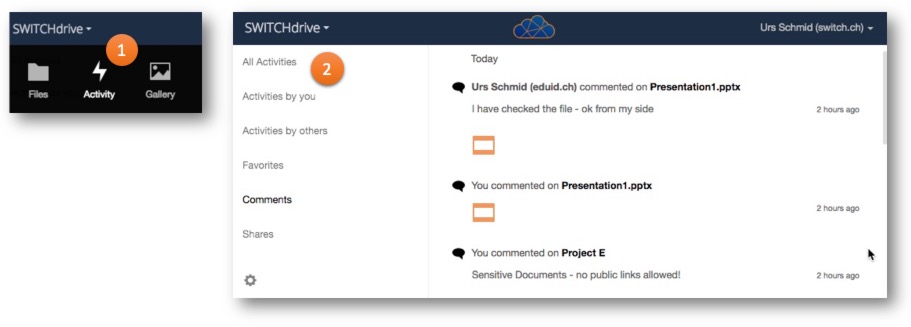 Click on the activity icon (1) to display an overview of activities in your Switch Drive account up to 10 days in the past. Select a option on the left (2) to filter certain activities or click the top entry "All Activities" to see an overview of all activities. Depending on the amount of shares and the number of collaborators in your Switch Drive account the number of activities can become quite high, so you might want to show the activites of you favorites folders only, or show the activities of other persons in your account only.