Please make sure that you have the latest SWITCHdrive client installed! If not, download and install it. Then try again.
Confirm that you are connected with the Internet and that you are logged in with the right username and password.
Quit the SWITCHdrive client by right-clicking the small cloud-logo in the task- or status-bar and choose 'Quit SWITCHdrive'. Then start it again.
Please have some patience - sometimes it just takes some time until the synchronization process starts.
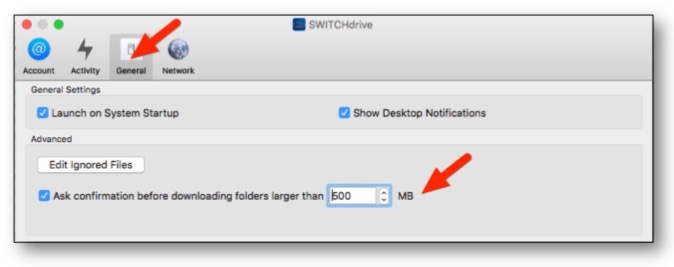
Maybe you have just disabled the synchronisatoion of large folders? Check this settings of the SWITCHdrive client in the general tab of your SWITCHdrive client. Adjust the folder size or uncheck this settings if it is ok for you to sync also large folders.
If this does not solve the sync problem please send a mail to drive-support@switch.ch and describe your issue as detailed as possible and with the error message you'll recieve if any.
You need to download and install the SWITCHdrive Sync Client to your computer. This application runs in the background and keeps all your files up to date without any interaction from your side.
Please note that only users who have an own SWITCHdrive account can do this. See here how to download and install the SWITCHdrive Sync Client.
The SWITCHdrive Sync Client checks every few seconds if a change happened in your local switchdrive folder or in your SWITCHdrive account and automatically uploads / downloads the changes so both the data on the "cloud" and in your local switchdrive folder is identical (except if you excluded some files or folders from synchronisation).
You can check if a sychronisation is ongoing when you watch the small SWITCHdrive icon in the menu or status bar of your computer. If it shows a blue icon ( ![]() ) then an upload or download of data occurs.
) then an upload or download of data occurs.
You can also check how long the synchronisation takes by opening the SWITCHdrive settings. A progressbar is displayed with number of files and remaining waiting time is displayed. Move the mouse cursor onto the progress bar to see more details about the current upload / download speed and which file is being processed.

The synchronization of your data depends on the number and size of the files to synchronize. Also the speed of your internet connection and the load of the SWITCHdrive-Servers are factors that can slow down synchronization.
In most cases, this problem occurs in folders that belong to somebody else. The owner of the shared folder has not given you the permission to delete any data in his or her shared folder.
Without the delete permission, you are also not allowed to move any data, eg. a file to a subdirectory or a file out of a subdirectory, because the move operation contains a copy and a delete operation.
If you try to move a file without the required permission, an error message will be displayed ("403 Forbidden" with the file or folder location that you tried to move). Undo the move or get in touch with the owner of the shared folder and ask this person to also grant you the delete permission.
Please note:
When a folder is directly shared to another SWTICHdrive user, the delete permission is not granted by default (but all other permissions are). You need to explicitly give the delete permission to a shared folder!
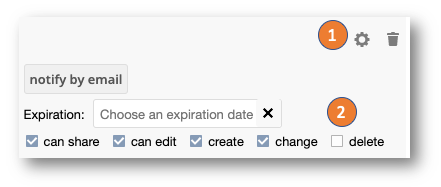 If you want to include the delete permission, locate the share and click on the cogwheel (1) to show the options of the share, then click the check box in front of "delete" permission (2).
Please be aware that users who have the delete permission can also accidentally trash some important data or rearrange the content of your shared folder. Because this happened many times in the past and caused restore requests, we decided to exclude the delete permission from the default sharing settings.
By some rare occasion you may get to see the following message:
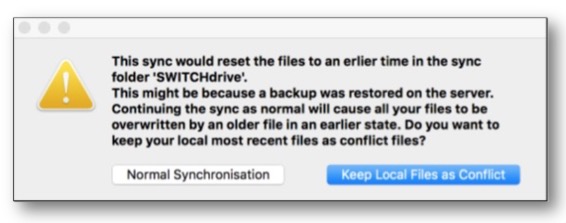
SWITCHdrive detected, that the some of your local files have a wrong timestamp, which could be caused by a user who has restored a local folder or by a restore operation inside a SWITCHdrive data center. Don't worry, you still have your most recent version of the files stored locally on your computer!
However, if SWITCHdrive would continue normally, some of your files could be replaced by an older version, which would be wrong in nearly all cases. That is why we recommend to click on the default option "Keep Local Files as Conflict".
If you've deleted a file you can retrieve it through the webclient of SWITCHdrive. Click "Deleted files" in the lower left corner (1). Select the files or folders you would like to restore and press "Restore" (2). If you want to permanently delete the files or folders click on the trash bin (3).
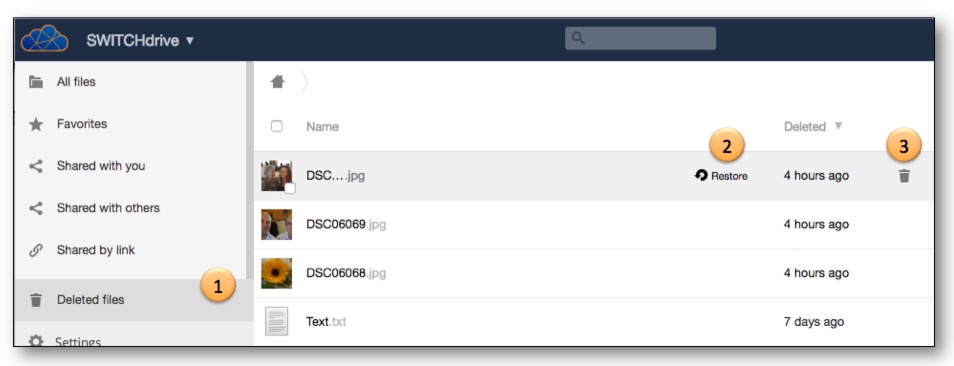
All files and folders you delete are saved for a certain amount of time, so you are able to restore them if required. If you would like to permanently delete a file or folder, go to the webclient of SWITCHdrive. Click on the "Deleted files" in the lower left corner. Select the file or folder you would like to permanently remove and click on the trash bin icon. Please note: permanently deleted files or folder cannot be restored, so be very cautious when you decide to permanently delete a file or folder.
This might come in handy if you have folders with a lot of (large) files, such as "Movies" or "Backup". You might not want to sync these files to every computer you have. To prevent SWITCHdrive from doing this, go to your SWITCHdrive settings (right-click on the SWICHdrive symbol  ) and select "Settings" from the pop up menu.
In the main-tab "Account" you can uncheck those folders that should not be synced to your computer. The files are NOT deleted, they are just not synchronized to your computer.
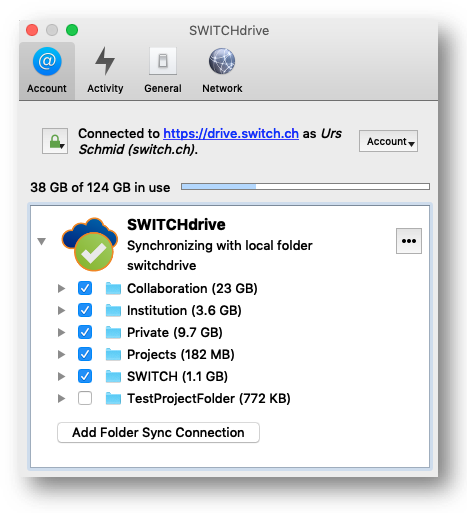
For example, the TestProjectFolder is not synchronised locally because it is unchecked. Add the checkmark again to synchronise this folder again to your local switchdrive folder.
Sharing data in SWITCHdrive is a matter of trust and fairness. If you have received a share of data from somebody you do not know decline the share and contact the user who has shared the data with you. Inform the other user that the share to you was probably wrong and maybe somebody else should have received the share.
You can also configure your switchdrive in such a way that incoming local shares are NOT automatically accepted any more. Remove the corresponding checkmark in your personal settings, section Sharing:

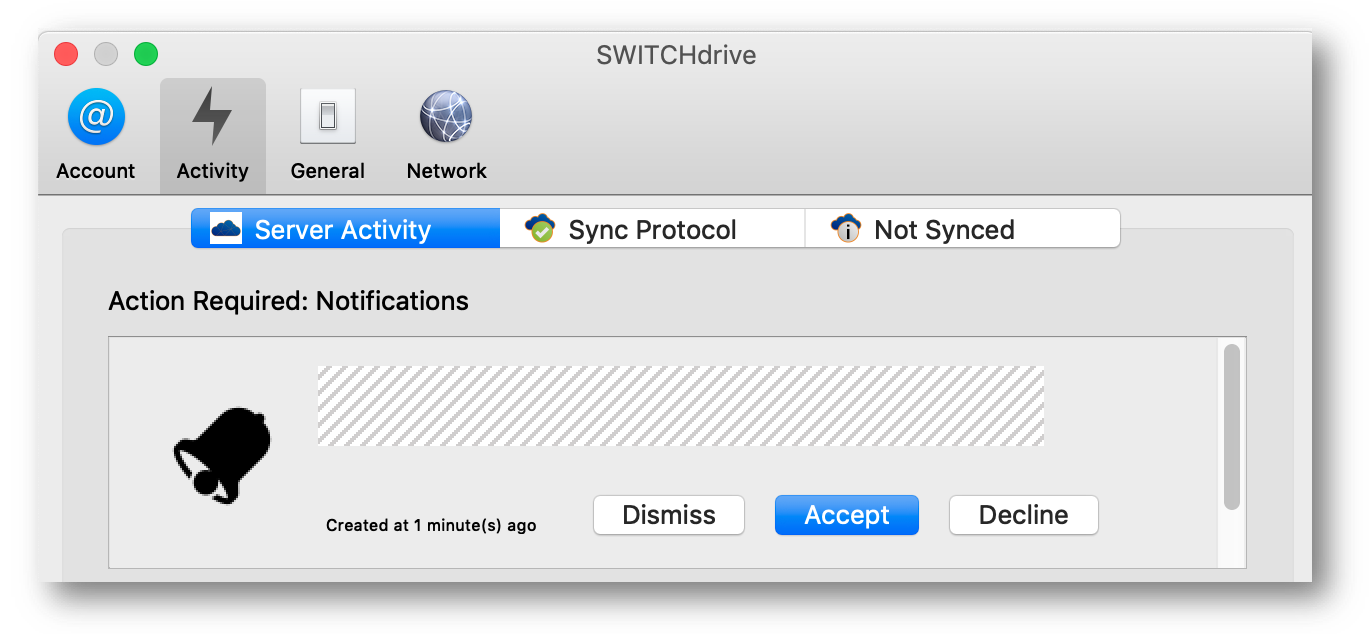
If you have configured your switchdrive settings this way, a notification is briefly displayed on your screen whenever a local user share arrives. To accept the user share, go to your web-client and click on the small bell with the red dot ( ![]() ) on the left of your name. Read who has shared data with you and click on the accept or on the decline button.
) on the left of your name. Read who has shared data with you and click on the accept or on the decline button.
If you are using the sync-client, go to your switchdrive settings and open the Activity panel, section "Server Activity" in order to accept or decline the share.
Conflict files are created when SWITCHdrive is unable to detect which file contains the most recent changes, the file that is stored on the SWITCHdrive server or the file that is stored locally on your harddisk. You need to solve such a conflicts yourself, because SWITCHdrive is unable to do this for you.
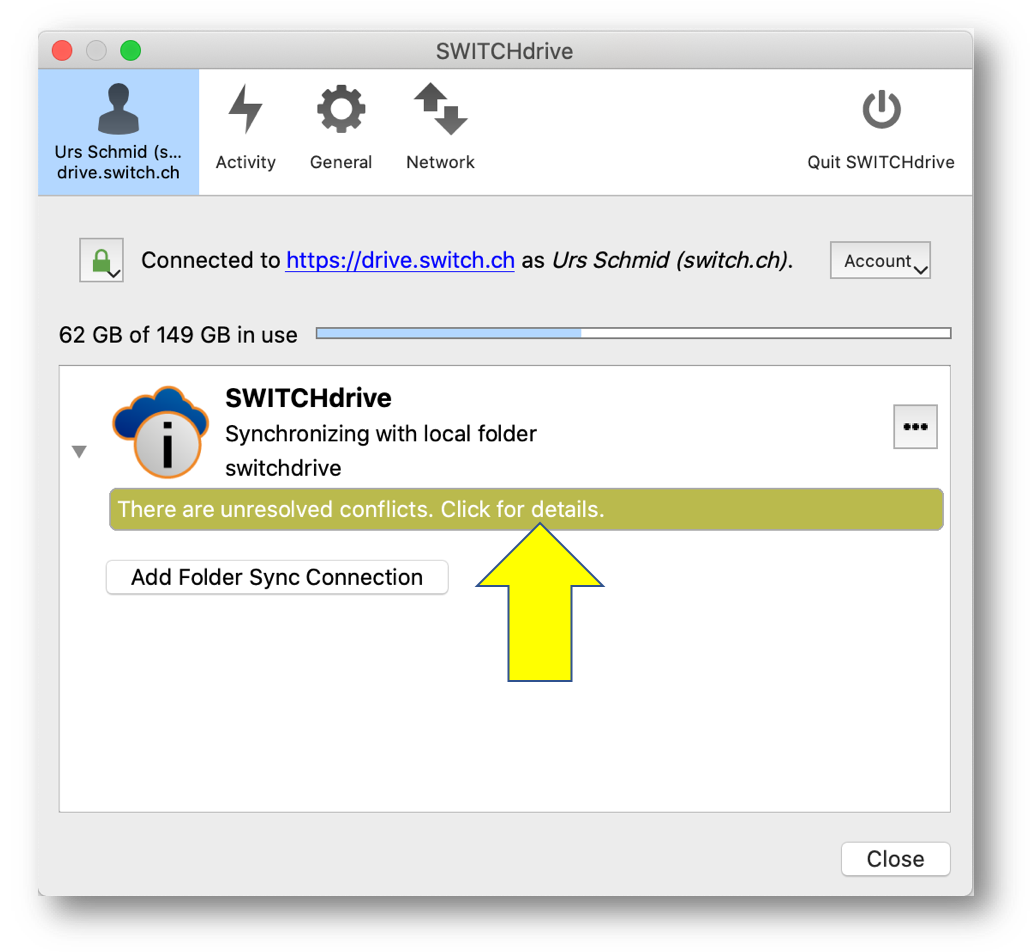
In order to solve this conflict situation click on the yellow-green line in the SWITCHdrive setting which will display more details about the conflict file in your switchdrive folder. Enlarge the setting window if necessary to see the name and the location of the conflict file. You can also hover with the mouse over an entry to see the path of the conflict file
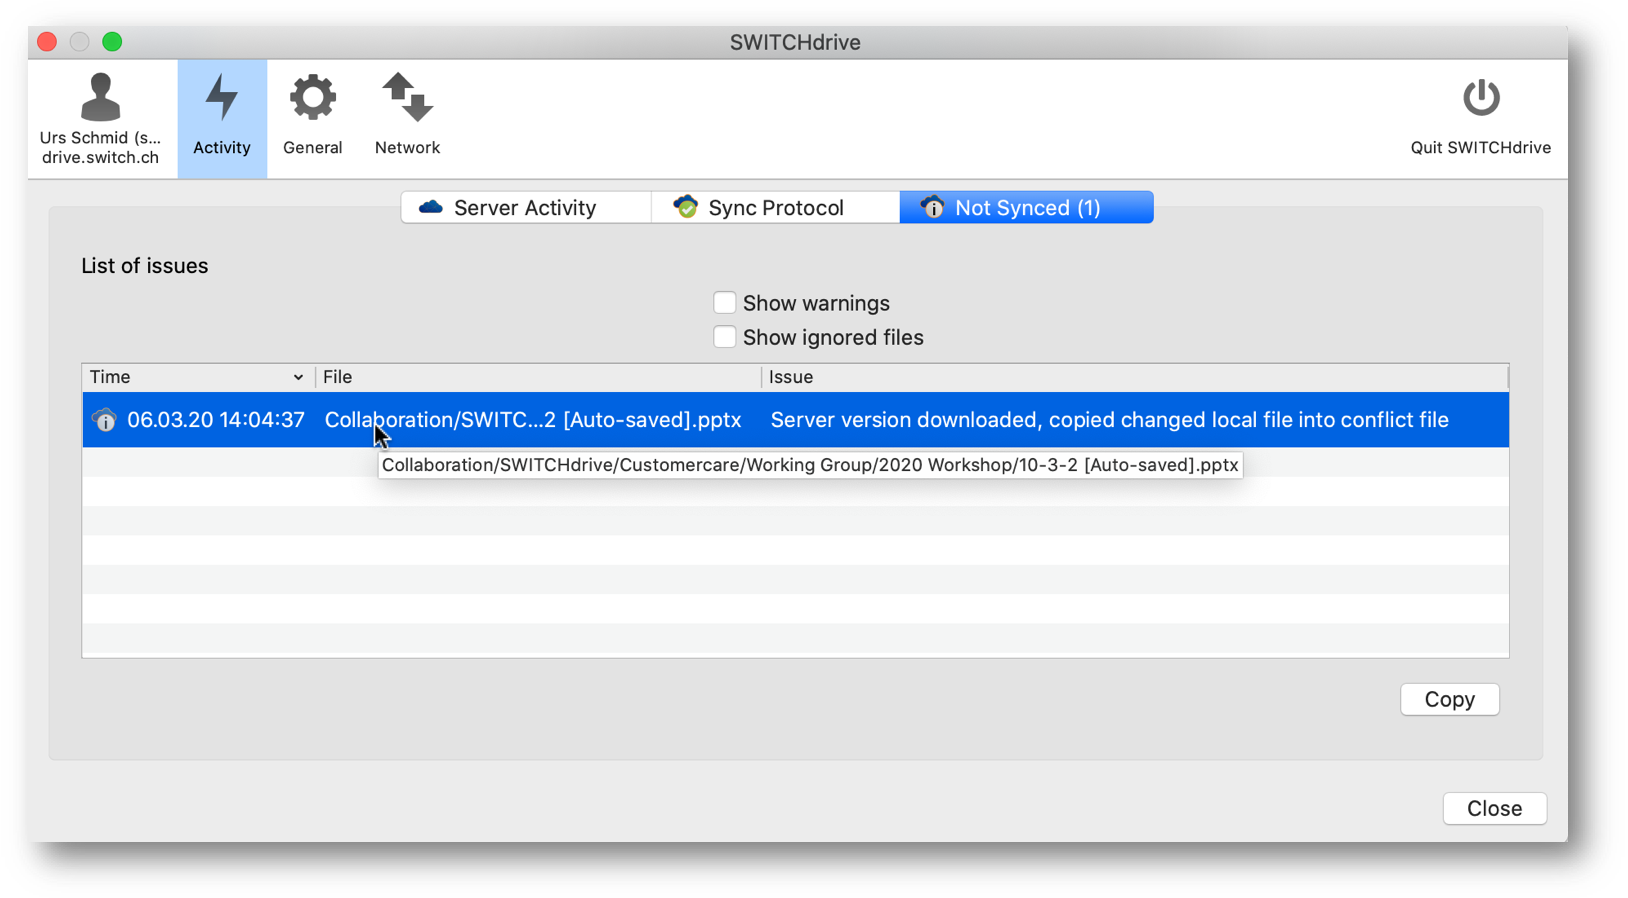
Double click on the file entry to open the folder in which the conflict file is stored. Locate the original file and the conflicted copy of the file, which are displayed next to each other. Usually you can easily detect by the size or date of the files which one is the more recent version.
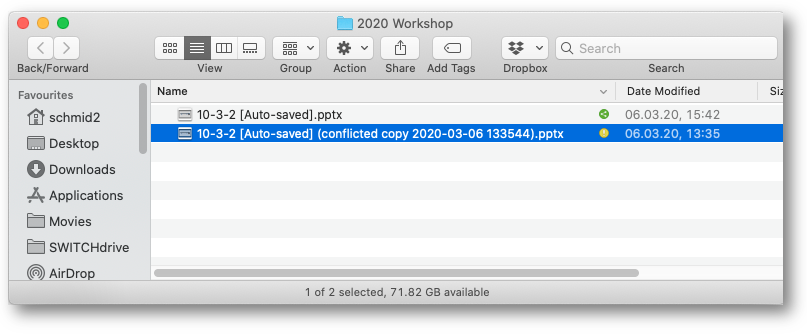
If you can not spot this, then you need to open both files side by side and scroll down to detect the differences between the two files. When in doubt, just rename the conflicted copy of the file and replace "conflicted" by "old" or by a space, so you can always go back to the two file versions. Once renamed the conflict is solved and the exclamation mark disappears.
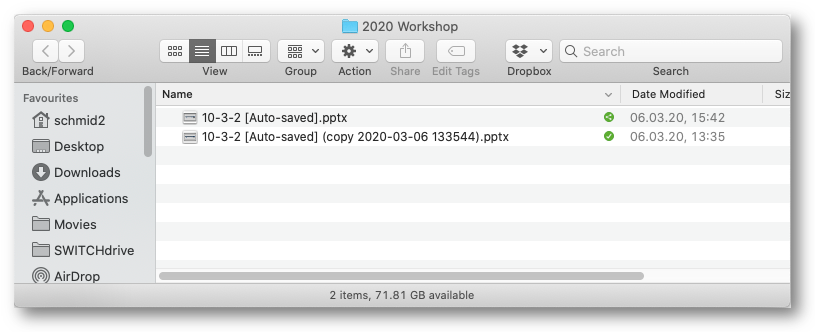
Note: Conflict files are always stored locally inside the switchdrive folder. They are never synchronised to other clients or to the SWITCHdrive servers as the file conflict is a local problem in your switchdrive folder. The conflict message will only disappear when you delete or rename the conflict file.
On some rare occasion the sync connection to the local switchdrive folder can get broken.
This could also happen when you rename your local switchdrive sync folder or move it to someplace else by accident. When the sync connection is broken, the following error message will be displayed.
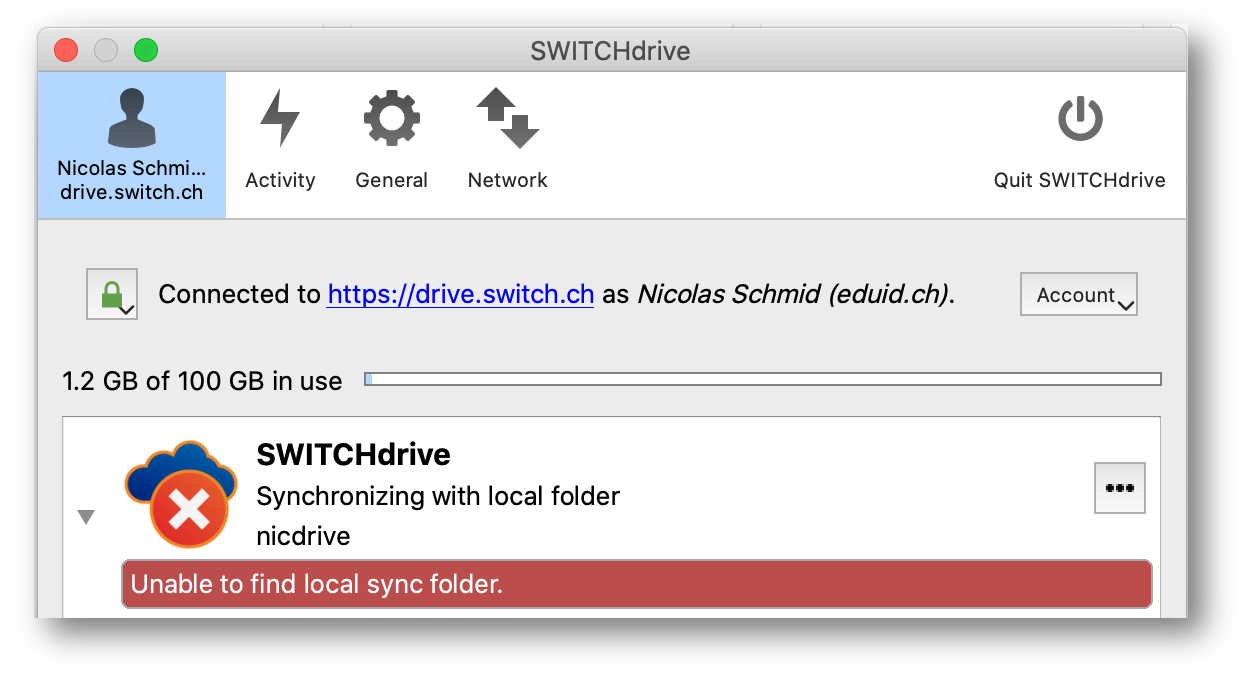
To connect the SWITCHdrive Sync Client to the local switchdrive sync folder please follow the steps 1 to 5:
1. Open the SWITCHdrive Settings and locate the Account Button on the right side. To be on the safe side, click it and select Logout to logout of your switchdrive account.
2. Click the Account Button again and select Remove to delete the broken sync connection.
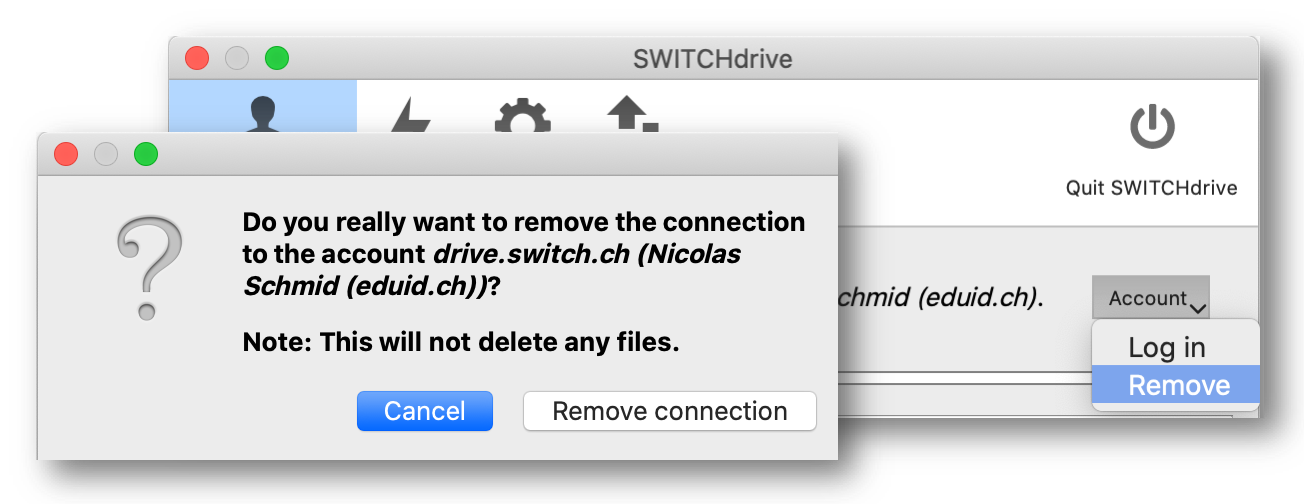
3. A confirmation box will be displayed and asks you if you really want to remove the sync connection. Don't worry, no data will be deleted by this action. Click on the button Remove connection.
4. If not already running, restart the SWITCHdrive Sync Client and login to your switchdrive account:
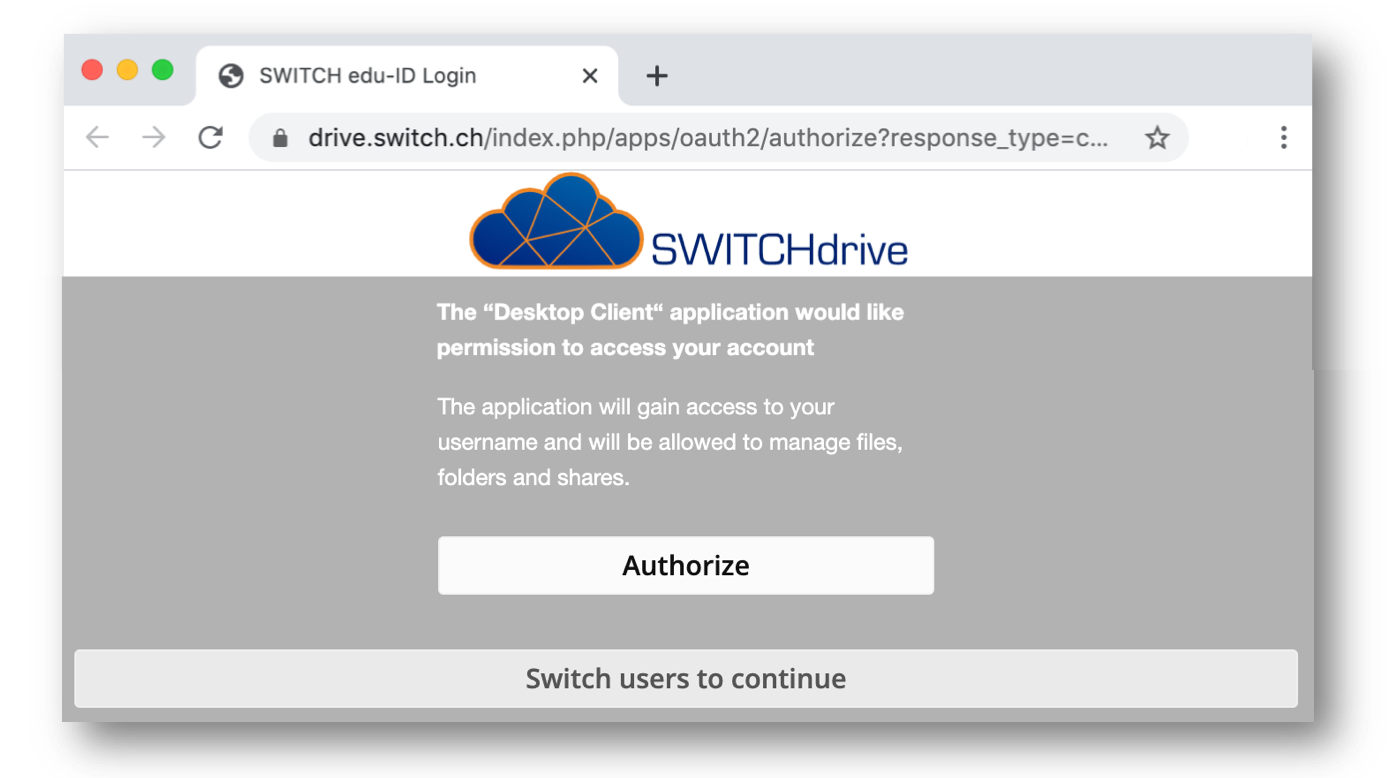
 5. Because of OAuth2 you have to authorize that this SWITCHdrive Sync Client can access your switchdrive account. Click on the Authorize button.
 6. Finally, configure the new sync connection.
- In the upper part, synchronize everything from the server (first option). You can always decide later if you do not want some folders synchronised to you local folder.
- In the lower part, click on the button with the path to the switchdrive folder and select from the directory tree your existing (or new!) local folder for synchronisation. If a switchdrive folder already exists, locate and select it. Please keep the name "switchdrive" as the default name for your local sync folder because this will ease the trouble shooting in case you need to contact the switchdrive support one day.
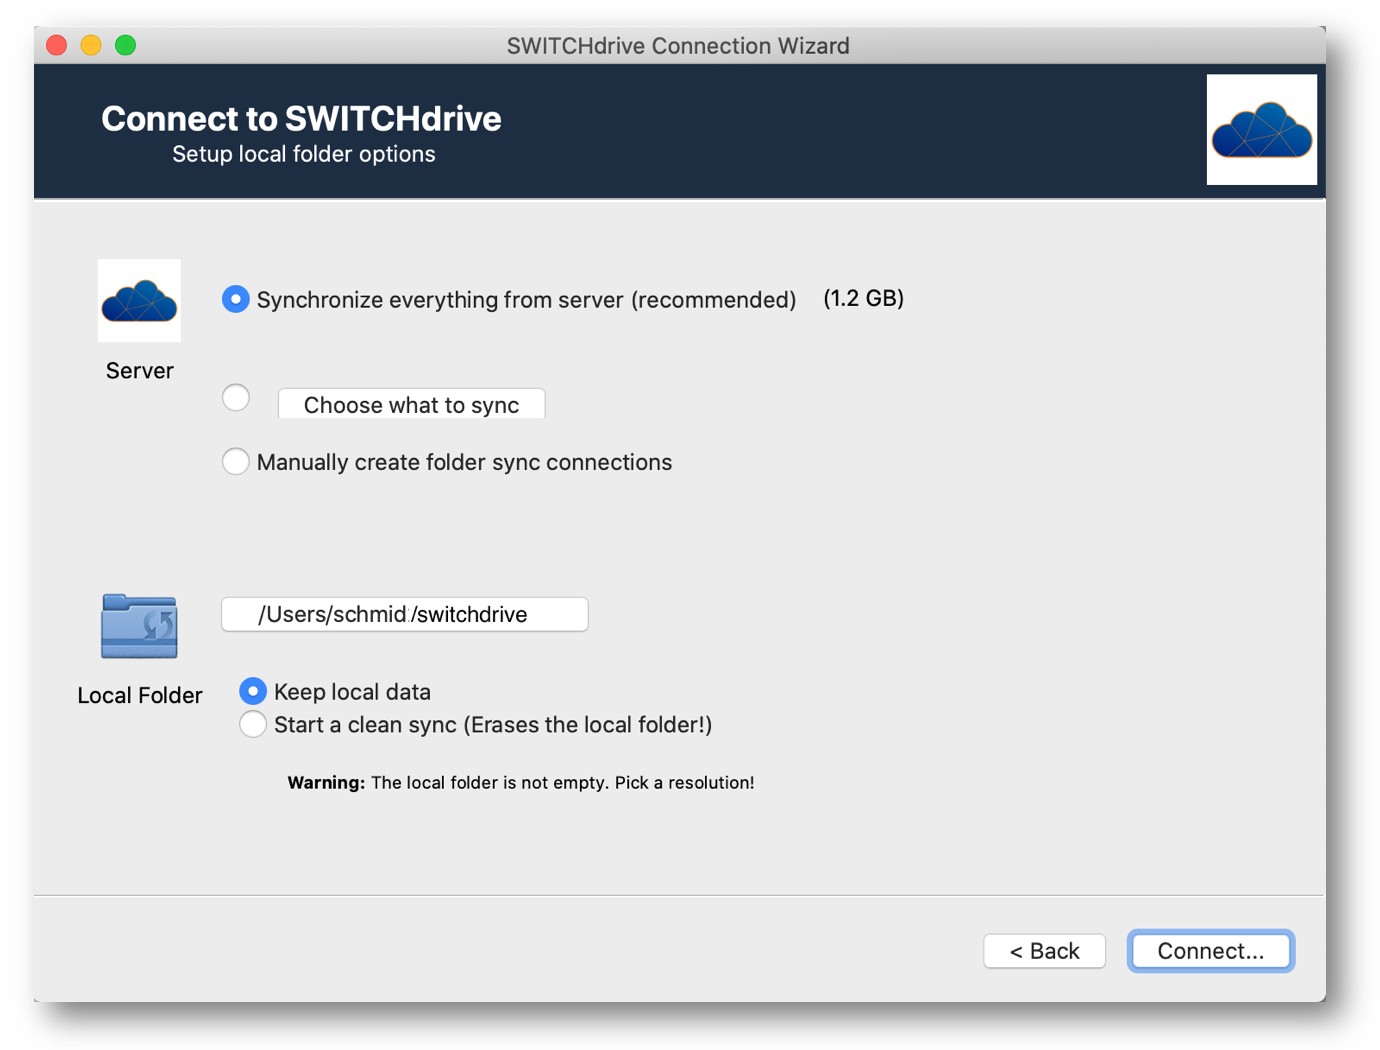
7. Click on the Connect button to start the synchronisation again.
Sometimes there are good reasons to stop the background synchronisation process of your SWTICHdrive Sync Client for a while, for example when you have a video-conference and you want to use all of your bandwidth of your internet connection for your video conference application.
In such cases, right click on the switchdrive icon (![]() ) and then select from the pop-up menu the entry "Pause synchronisation")
) and then select from the pop-up menu the entry "Pause synchronisation")
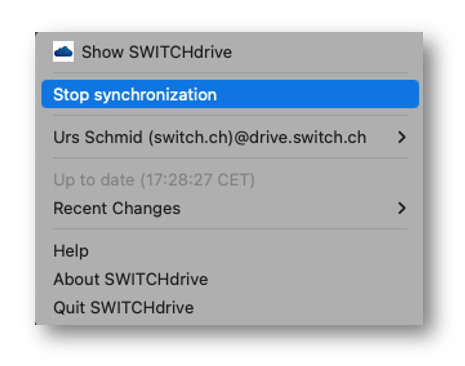
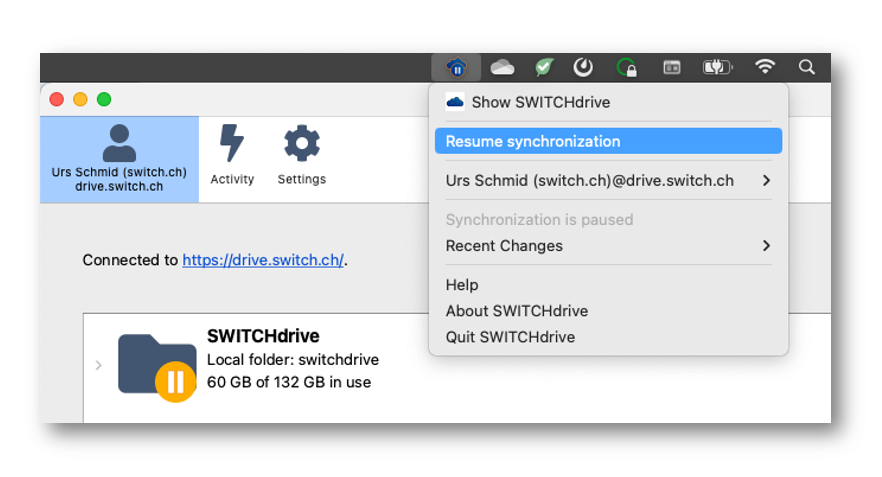
While the synchronisaton is paused, the switchdrive icon will show a pause symbol (![]() ). To resume the synchronisation, simply open the pop up menu again and select "Resume synchronistaion")
). To resume the synchronisation, simply open the pop up menu again and select "Resume synchronistaion")
You can easily upload or link your files from your SWITCHdrive account directly into your Moodle course. However, to use this feature, your Moodle / SWITCHdrive admin needs to correctly setup the linking of the two software tools. Please get in touch with your Moodle help desk if this is not the case.
1. Go to your File picker in Moodle and locate the SWITCHdrive entry on the left side.
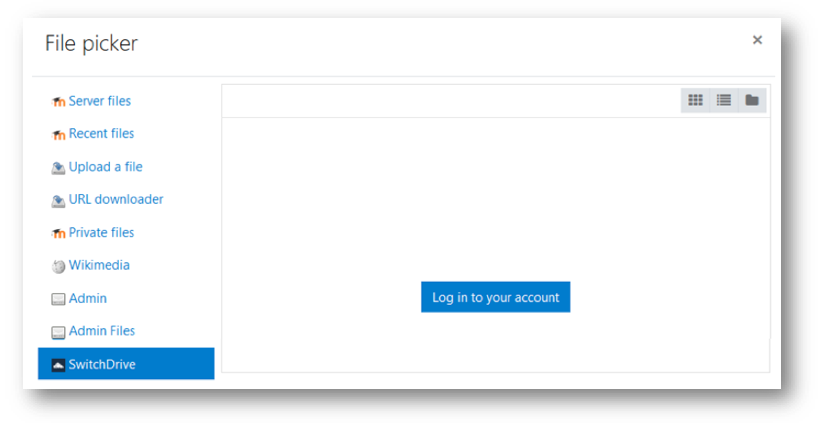
2. Click on SWITCHdrive and login to your SWITCHdrive account.
3. Select a file in your SWITCHdrive account which you would like to link to your Moodle course. The following selection box will appear:
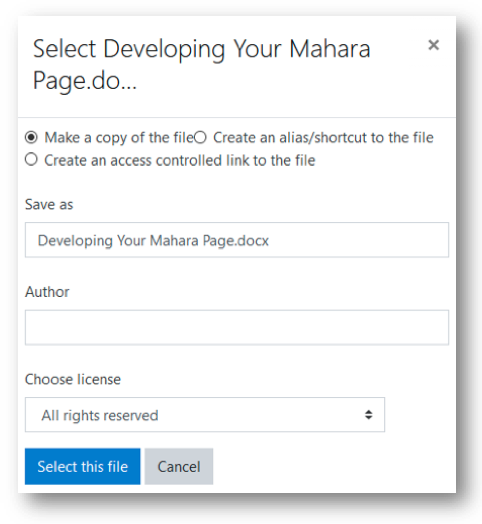 4. Choose how you want to link the file to your Moodle course:
- Make a copy of the file: this will copy the file into Moodle. Any updates that you perform on Switchdrive are NOT updated in Moodle.
- Create an alias/shortcut to the file: this will create a shortcut to the file such that the file effectively remains on SWITCHdrive thus when you update the file, it ismagically updated in Moodle too.
- Create an access controlled link to the file: this option is extremely useful should you wish students to submit files since once submitted, the file is effectively locked and cannot be changed until you release it.
5. Click on the Button "Select this file"
If you are the Moodle admin at your institution follow these steps to setup the SWITCHdrive-Moodle integration:
Preparation:
- Find out your Moodle's OAuth2 callback URL (it should look like https://yourmoodle/admin/oauth2callback.php)
- Send a request to drive-support@switch.ch that you want to do the SWITCHdrive-Moodle integration. Attach the callback URL to this request.
- SWITCH will create a Client-ID and a secret key and will share a file containing this information with you.
Configuration:
- Using the Owncloud repository plugin which you have installed from Moodle, set this repository as "Enabled and visible"
- In Site administration > Server > OAuth2 services, click "Create a new custom service" :
- Chose a name for the service (will not be displayed to users)
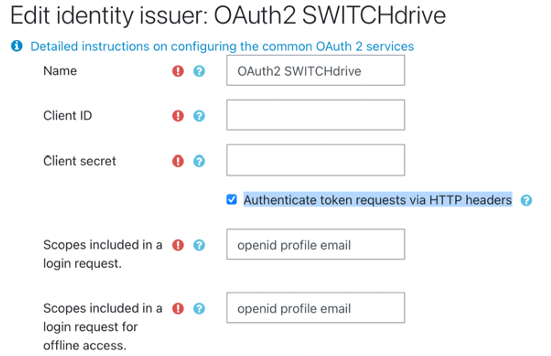
- Enter the Client ID and Client secret key which has been provided by SWITCH and activate the option "Authenticate token requestss via HTTP headers":
- Set the Service base URL as "https://drive.switch.ch/"
- Save the newly created service
- Back in the Owncloud repository configuration page, click "Create a repository instance"
- Chose a name for the Repository (this will be displayed to the users), select the service you configured in step 2 in the Issuer drop-down list
- Click on the configuration icon

- Enter the following mappings:

- Then click on the user configuration icon:

- Ensure the following are set:

- Test the new SWITCHdrive-Moodle integration inside a Moodle course.
Important Note:
Due to a bug in Moodle, you need to add the following code at line 830 of lib/webdavlib.php - just before the line
if (preg_match('#(application|text)/xml;\s?charset=[\'\"]?utf-8[\'\"]?#i', $response['header']['Content-Type'])) {
Add these 3 lines:
if (isset($response['header']['content-type'])){
      $response['header']['Content-Type'] = $response['header']['content-type'];
}
Your code with the 3 lines should then look like this:
Of course, Moodle should patch this bug at some point and ignore how "Content-Type" is spelled, but until then, this hotfix will solve a SWITCHdrive problem in some installations.
A shared folder always comes with certain permissions. By default, a folder is shared with all permissions except the delete-permission.

This default-permission was set on purpose to protect the shared data from accidental deletion. If you want to also delete and move (!) files and folders in your shared folder then you have to ask the owner to grant you also the delete permission. You can easily detect if you have the delete permission inside a shared folder when you open the Web-Client and click on the 3-dots icon behind a file or folder inside the shared folder. 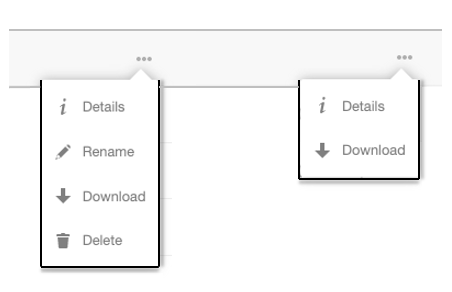 If you see a pop up menu with the Rename and Delete option, then you have the delete-permission so you can delete files or folders and also move them. If you only see the Details and Download permission, then you don't have the delete permission. Note that you cannot see the delete permission if you are working with the SWITCHdrive Sync-Client, eg. in the FileExplorer or the Finder.
If you have received a shared folder from somebody else, in most cases you can also rename it if the user who has shared the folder with you has given you at least the change-permission. Without the change-permission, you cannot rename the shared folder. If you rename the shared folder then this name is not synchronised back to the owner of the shared folder or to other users who have also received the shared folder.
You are also allowed to move a shared folder to some other folder that you own in order to keep the list of main folders in your SWITCHdrive account short and clean. For example you could move the shared folder to a folder called "Shared with me" so all shared subfolders are collected in a single main folder.
Pay attention to move a shared folder only to a folder that you own and not to another shared folder (because you would then also give access to that data to somebody else).
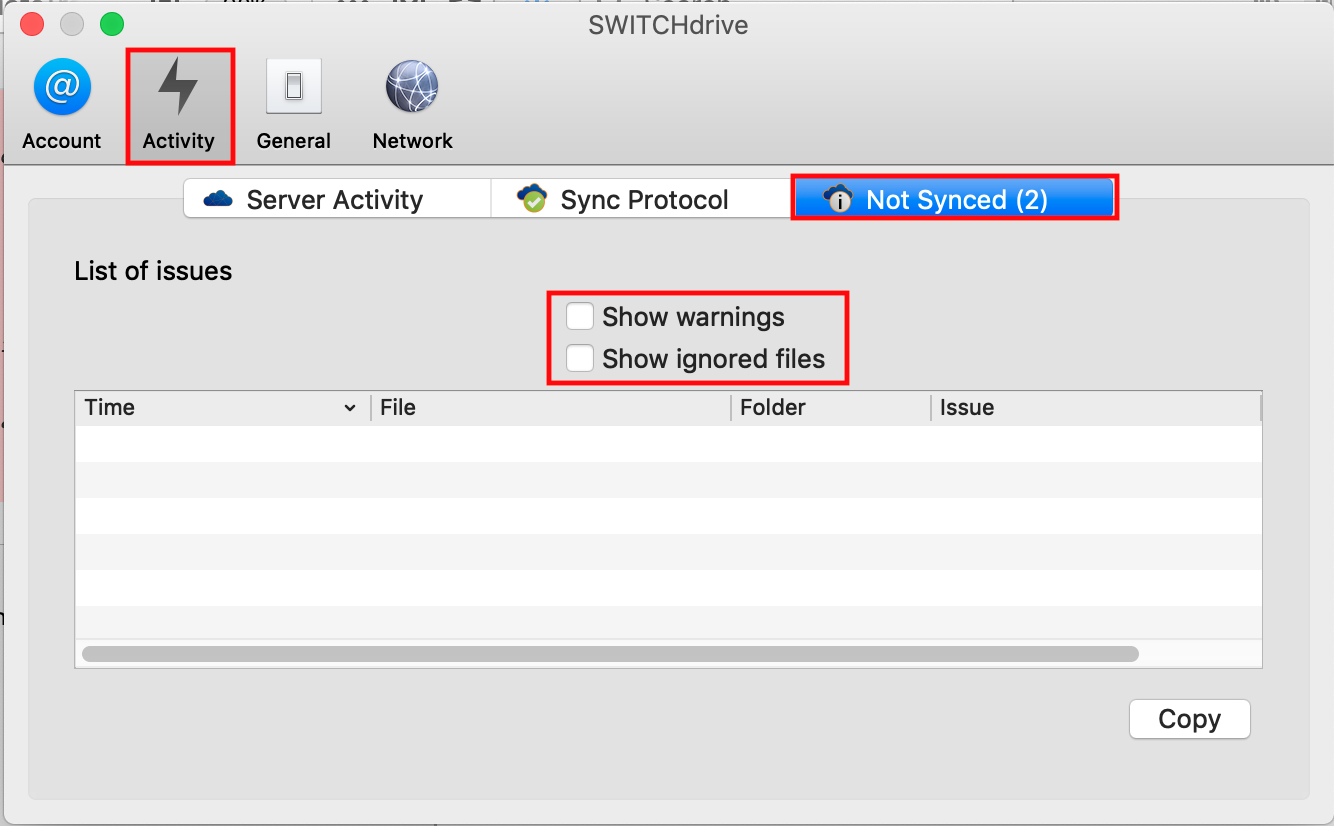
You have to inspect this list of "Not Synced items" in your SWITCHdrive Sync Client Settings to find out if there is a sync problem or not. Do do so, open the Sync Client settings, click on the Activity icon and then on the "Not Synced" button (which turns blue when clicked).
If you have a Sync Client V2.8.2 or older, deactivate the checkboxes "Show warnings" and "Show ignored files". If the list of issues is empty, then everything is fine. In most cases, you have some ignored files which do not need to be synchronised. To check if this is the case, simply activate the "Show ignored files" and inspect the filenames of the listed files.
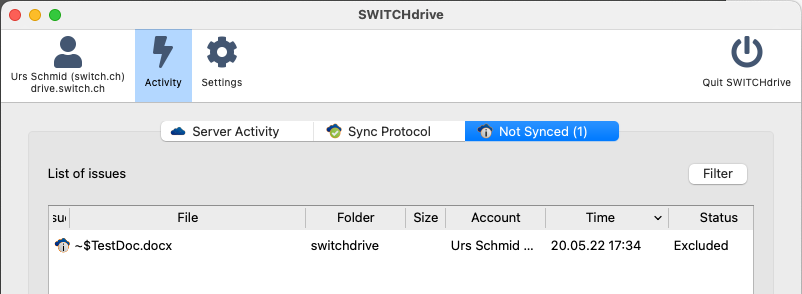
If you have a SWITCHdrive Sync Client V.2.10.0 or higher, you do not have checkboxes, but a Filter button on the right.
Click the Filter button to display which type of messages should be displayed. We recommend to only activate the Error and the Conflict entries and to deactivate the other entries. At any time you can reactivate all the entries by selecting the last entry "Reset Filters".
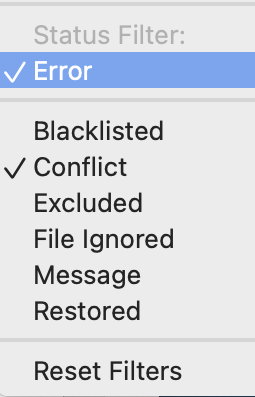
- Blacklisted: Files that may harm the SWITCHdriver environment like a foreign .htaccess file. Blacklisting prevents anyone from uploading blacklisted files to the SWITCHdrive server.
- Conflict: Files that are in conflict with existing files on the SWITCHdrive Servers, often caused when multiple users edit the same file at the same time and SWITCHdrive is unable to detect which file contains the latest edits. To avoid data loss, the local file is renamed and the word "conflict" is attached to the filename.
- Excluded: Files that are ignored and not synchronised to the SWITCHdrive server because the file type is listed under "Ignored Files" in the General Settings. You can also add additional file types to this list, for example to avoid the upload of binary files which can be recreated any time by compiling the source files again, you can add "*.exe" or "*.bin" to this list of ignored files.
- File Ignored: Files that are ignored because of they contain names with more than 256 characters or files containing characters that do not work on typical Windows filesystems (\, /, :, ?, *, ", >, <, |).
- Message: some important messages from the SWITCHdrive servers
- Restored: Files that have been restored because you do not have delete permission in a shared folder. You also get such restored messages when you try to move files or folders inside a shared folder for which you do not have the delete permission. Please get in touch with the owner of the shared folder and request the delete permission if you truly need to delete or move some files. Right-click with your mouse on such an entry to show you the restored file in the Finder / File Explorer or in the web browser

The list of ignored files usually contains several hidden system files which only make sense locally on the specific computer. Synchronising such files to other computers or to the cloud is not needed and are therefore not synchronised.
Maybe you find several ~$-files in your list of ignored files. These are document/template lock files. Every time a document is opened or a template accessed a (normally hidden) lock file is created in the same folder as the document/template. They should be removed whenever the document is closed, but they can remain if the application closes abnormally.
For more information about (hidden) temporary files created by Microsoft Office application see
https://support.microsoft.com/en-us/help/211632/description-of-how-word-creates-temporary-files
You will get such error messages in your SWITCHdrive Sync Client if you have moved some files or folders in a shared folder from another SWITCHdrive user, but this user did not grant you the delete permission. Please note that you need the delete permission not only for deleting some files, but also if you want to move them, because inside the move operation is also a delete operation.

There are several solutions to this problem:
1. The easiest solution is if you could ask the owner of the shared folder to give you the delete permission. Then wait until the permission is granted. The SWITCHdrive Sync Client will update the changes to the shared folder and removes the error messages.
2. If you have moved some files by accident inside a shared folder, you could also return to the previous file and folder structure by just deleting the accidentally moved files. Right click on the error message to show the location of the moved file in the Finder (Mac) or in the FileExplorer (Windows).

Delete the file (which usually has a red overlay icon). This will move the file to the trashbin on your local computer.

As soon as the file is deleted, the SWITCHdrive Sync Client will immediately restore the file at its previous location and a restore message will be displayed in the Sync Client Settings under Activity, Not Synced section. If there are just a few error messages, do this on all listed files that have a "403 Forbidden to MOVE" error message.

3. If you have accidentally moved a huge amount of files or if you have intentionally moved the files to one of your own folders and want to keep them there, you can also decline the share in the Web-Client. Locate the shared folder and click on the 3-dot-icon, then select "Decline Share"

By declining the share, the shared folder will be removed from your local switchdrive folder, but the moved files and folders inside your own folder will remain. Once the synchronisation is complete, all error messages will disappear. Finally go to "Shared with you" and click on "Accept Share" to synchronise the shared folder again.
![]()
A new copy of the shared folder will be added to your SWITCHdrive account with all the files in their original location.