Migrating resources
This document describes how to migrate volumes from project A to project B within one region. The words instance, image, snapshot and volume have specific meanings within Openstack, and will be written in Italic.
Several steps must be done in order to enable migration of volumes and accept them.
Step 1: Login to SWITCHengines
• click left on "Compute"
• click on "Instances"
Step 2: Create a snapshot
• click at the far right on "Create Snapshot"

• wait until the snapshot is complete (status: queued → saving → active)
Step 3: Create a volume
• click on "Images" in the "Compute" section (or rather stay there since you'll be automatically forwarded)
• on the right side click on the black dart and choose "Create Volume"

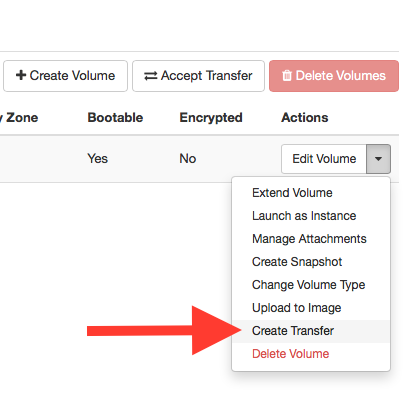
Step 4: Volume transfer
• staying in the "Compute" section click on "Volumes"
• on the right side click on the black dart and choose "Create Transfer"
• set a Transfer Name and click on “Create Volume Transfer”
![]()
• COPY the Transfer ID and the Authorization Key!

Step 5: Accept transfer
• go to the project B where you want to accept the volume
• click on the section "Compute" and on "Volumes"
• click right up on "Accept Transfer"
![]()
• fill in the Transfer ID and the Authorization Key you copied before
![]()
• Accept volume transfer
Step 6: Launch Instance
• go to the "Compute" section and click on "Instances"
• click on "Launch Instance" and set the properties
• at "Instance Boot Source" choose "Boot from volume"
• at "Volume" choose the transfered volume

• click on "Launch"