Frequently Asked Questions
Find the answers to common questions and problems with the SWITCHengines service.
If your specific question isn't answered, feel free to contact us by email at engines-support@switch.ch
General
Create SWITCHengines API Credentials
To use the SWITCHengines API, the OpenStack command line interface (CLI), OpenShift, Ansible, or other tools requiring API access (Rancher, ...), you need to create a SWITCHengines API Credentials.
The SWITCHengines API Credentials is a secret token, you can use to authenticate with the SWITCHengines API. This secret token is not the same as your SWITCH edu-ID password.
SWITCHengines API Credentials
The SWITCHengines Admin Interface allow you to create/update your API Credentials.
First, you need to login to https://engines.admin.switch.ch/users/profile

Then, select Information on the dropdown menu
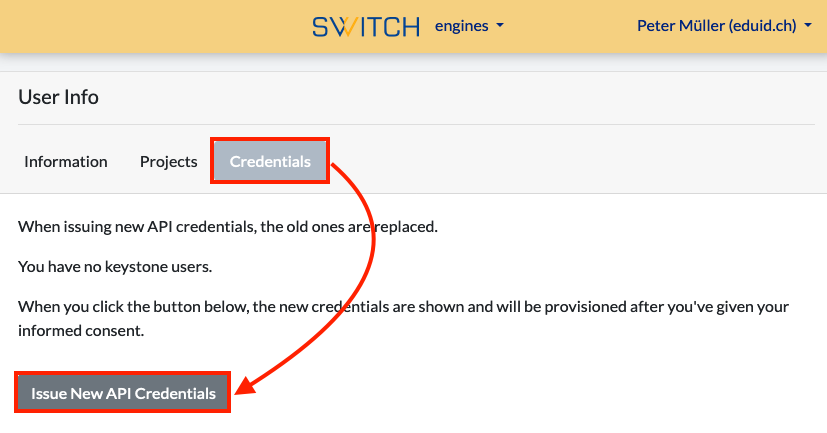
After that, select the Credentials tab on the User Info view as shown below. Then click on Issue New API Credentials

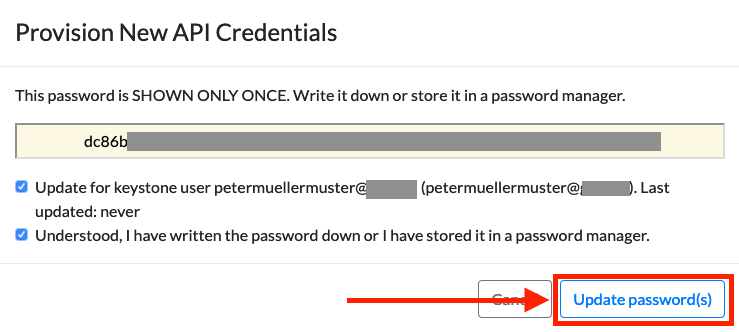
Check the two boxes which allows you to update the password.
IMPORTANT: You will be given a password which will be shown only ONCE. Write it down or store it in a password manager.

Use the SWITCHengines API Credentials
Once you have created the SWITCHengines API credentials, you can use the secret token as a password for your OpenStack credentials (openrc file):
export OS_AUTH_URL=https://keystone.cloud.switch.ch:5000/v3
export OS_IDENTITY_API_VERSION=3
export OS_USERNAME=petermuellermuster@example.ch
export OS_PASSWORD=dc86b********************************************************************
export OS_PROJECT_NAME=petermuellermuster@example.ch
export OS_REGION_NAME=ZH
export OS_PROJECT_DOMAIN_NAME=Default
export OS_USER_DOMAIN_NAME=Default
Yes, you can use the OpenStack Command Line tools.
Reasons to use the CLI:
- Not all CLI commands and options are implemented in the GUI.
- Some commands (e.g. image upload) work better using the CLI. When using the GUI, by going through a web server, there is an additional intermediate step involved where things can slow down or go wrong.
See the OpenStack CLI documentation for details on how to install and work with the CLI.
The credentials are found on the Access & Security section in the API Access tab. But first, you need to create a SWITCHengines API Credentials password in order to use the API. The password (e.g. OS_PASSWORD) is NOT your SWITCH edu-ID password, but the secret token you create in the API Credentials.
Be sure to also set a OS_REGION_NAME environment variable with either ZH (for Zurich) or LS (for Lausanne) as a value.
You can change your SWITCH edu-ID password directly at the SWITCH edu-ID page: https://eduid.ch
To use the SWITCHengines API (CLI, OpenShift, Ansible, ...) you need to create a SWITCHengines API credentials.
IPv4 addresses are not automatically returned to the pool once the VM or router it belongs to is removed. This makes sure the same IP address can be used later on by the same user for a different VM or router. If an IPv4 address is no longer used it should be manually returned to the pool.
Most likely, you forgot to create the necessary firewall rule for SSH access
Here is how to inject multiple ssh public keys into a VM
It is possible to create a OpenStack key pair file, containing multiple public keys.
It is NOT possible to import it with Horizon 'Import Key Pair' feature. Horizon will strip the EOL at the import, resulting in only 1 key.
You have to use the command line to import it in your project!
Create a file containing the multiple public keys
One public key per line.
Example: multiple-keys.pub
ssh-rsa AAAAB3NzaC1yc2EAAAADAQABAAABAQDvSspAfazEYYq3pQps6ROKkyg/gp2KbqOxgLcdq/ywac3huHicF4ji9Hg9jChQRWbu8PgtVp35ciW75j7HQXDZqnY+OGQUiOiLBxNkt+SMjiRh3XFwTwPXAmlsnzoCmOQdebNfYDGvgvojBvPh69IVOngcji7r8jzd3/nCM6pajXWf2g4wdCWRveGpIuNkXZSfAKob7ubk0BBHDEXQ+MDMVNUpmv3w4YUXfrEiTqCHCYE3sN2xrxlRLwVll5ahhWNW+CgZuMwHeVXBD9I/drFiN7CQntTPHeR8iVjZ5/RakAI4JpimWKGq/mrTaF4pBEGWcZBUzWrVveVAypv0ueSD user1@example.ch
ssh-rsa AAAAB3NzaC1yc2EAAAADAQABAAABAQC17Mx5i02F+dt0C0nUfibc1LHL+YQ9xdAq061komsVfbCffhjN0f6AtX0R0dc6CAc/N0FDRJYI34o+U75GwhvNPB2k0u0kucqPMdNXAlg4MbE8zN/pOA47fbpqMMejOj+tM9GhuvQbLek0y+kH3CW9tcqjJ+tvh5Pxii9hmTGFTD5cewGyBUs/Y2XOBCB5Aj4B8ZI4O0cnKn78Oo3IR0kFRggIDWBnHzaC1cM6+x7+hW9a3CE0plGzPlsJrC3UcaG5neZaBihb44Q3N4zeH4+6SrtMbaHnzE7d8fgC0RezlCRFxCrK5dMIUOUUBd/DJ6/gnKhjLE3aAN+Blg7S94sZ user2@example.ch
ssh-rsa AAAAB3NzaC1yc2EAAAADAQABAAABAQDZxj7PHMu/VM7QF/dxobAPLGCFRNAEafIH/UGfr9KvlUAE6o+ptUnDYIjYT/6XbGy2O6NfK4BrdVNKVCuIs6LIIl/4qFUVcYwNa7yswvALDlSTOZnvqKyuPzouk3XNZrvqq6XuriQVHyERx16bMl9w9RTZMfomzy2G8iQoUHNZfRVkrPY0zPJRarIT/Ed3XuOuK9bnZkFfbgY4fGLsltuU2EAKzsAZr/0Is0md36X+mZR1Qh0mWyRGekh00zDzn7RTrvQPKOcg793wpE+yAC9M1NHob16H8d6fJJ2f1hIBP1a49OWCJzjBWhn22hkdD7bIQRUpitidENktTcdNotvR user3@example.ch
Import the keypair
Import the multiple keys file:
source .openrc
openstack keypair create --public-key multiple-keys.pub multiple-keys
And check that the keys were correctly imported:
$ openstack keypair show --public-key multiple-keys
ssh-rsa AAAAB3NzaC1yc2EAAAADAQABAAABAQDvSspAfazEYYq3pQps6ROKkyg/gp2KbqOxgLcdq/ywac3huHicF4ji9Hg9jChQRWbu8PgtVp35ciW75j7HQXDZqnY+OGQUiOiLBxNkt+SMjiRh3XFwTwPXAmlsnzoCmOQdebNfYDGvgvojBvPh69IVOngcji7r8jzd3/nCM6pajXWf2g4wdCWRveGpIuNkXZSfAKob7ubk0BBHDEXQ+MDMVNUpmv3w4YUXfrEiTqCHCYE3sN2xrxlRLwVll5ahhWNW+CgZuMwHeVXBD9I/drFiN7CQntTPHeR8iVjZ5/RakAI4JpimWKGq/mrTaF4pBEGWcZBUzWrVveVAypv0ueSD user1@example.ch
ssh-rsa AAAAB3NzaC1yc2EAAAADAQABAAABAQC17Mx5i02F+dt0C0nUfibc1LHL+YQ9xdAq061komsVfbCffhjN0f6AtX0R0dc6CAc/N0FDRJYI34o+U75GwhvNPB2k0u0kucqPMdNXAlg4MbE8zN/pOA47fbpqMMejOj+tM9GhuvQbLek0y+kH3CW9tcqjJ+tvh5Pxii9hmTGFTD5cewGyBUs/Y2XOBCB5Aj4B8ZI4O0cnKn78Oo3IR0kFRggIDWBnHzaC1cM6+x7+hW9a3CE0plGzPlsJrC3UcaG5neZaBihb44Q3N4zeH4+6SrtMbaHnzE7d8fgC0RezlCRFxCrK5dMIUOUUBd/DJ6/gnKhjLE3aAN+Blg7S94sZ user2@example.ch
ssh-rsa AAAAB3NzaC1yc2EAAAADAQABAAABAQDZxj7PHMu/VM7QF/dxobAPLGCFRNAEafIH/UGfr9KvlUAE6o+ptUnDYIjYT/6XbGy2O6NfK4BrdVNKVCuIs6LIIl/4qFUVcYwNa7yswvALDlSTOZnvqKyuPzouk3XNZrvqq6XuriQVHyERx16bMl9w9RTZMfomzy2G8iQoUHNZfRVkrPY0zPJRarIT/Ed3XuOuK9bnZkFfbgY4fGLsltuU2EAKzsAZr/0Is0md36X+mZR1Qh0mWyRGekh00zDzn7RTrvQPKOcg793wpE+yAC9M1NHob16H8d6fJJ2f1hIBP1a49OWCJzjBWhn22hkdD7bIQRUpitidENktTcdNotvR user3@example.ch
Launch a new VM
Start a VM with the 'multiple-keys' key pair and check the console log.
Instance Console Log:
Cloud-init v. 0.7.5 running 'modules:final' at Tue, 26 Sep 2017 08:55:35 +0000. Up 52.90 seconds.
ci-info: ++++++++++++++Authorized keys from /home/ubuntu/.ssh/authorized_keys for user ubuntu++++++++++++++
ci-info: +---------+-------------------------------------------------+---------+--------------------------+
ci-info: | Keytype | Fingerprint (md5) | Options | Comment |
ci-info: +---------+-------------------------------------------------+---------+--------------------------+
ci-info: | ssh-rsa | b0:2c:de:86:d5:8f:f9:eb:66:12:c3:91:47:ec:44:76 | - | user1@example.ch |
ci-info: | ssh-rsa | ec:4b:27:c8:76:60:2e:d8:ae:00:1a:d0:5d:a1:72:c3 | - | user2@example.ch |
ci-info: | ssh-rsa | c2:17:75:8a:14:ed:42:07:b6:11:c4:ad:87:b8:ac:d0 | - | user3@example.ch |
ci-info: +---------+-------------------------------------------------+---------+--------------------------+
You haven't configured the SSH keys
- Ubuntu: ubuntu
- Debian: debian
- Rocky Linux: rocky
- Centos: centos
- Flatcar: core
- Fedora: fedora
Very similar to a Linux virtual machine, but you will need to login via RDP.
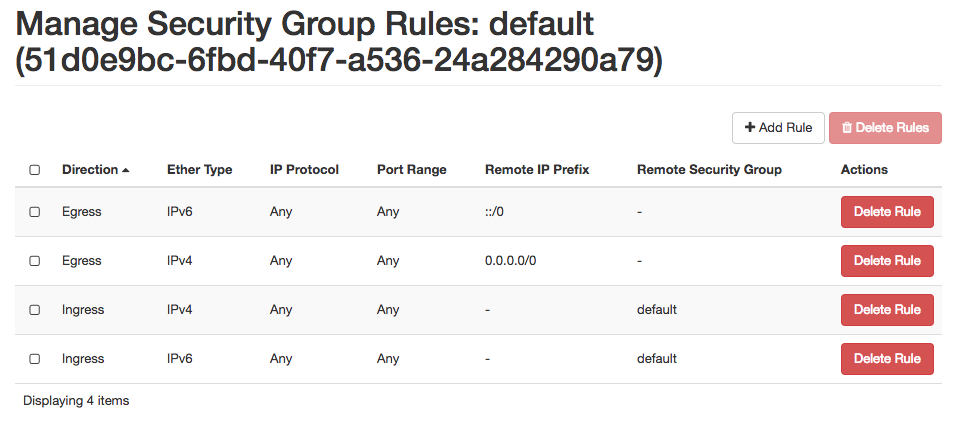
Under each of your OpenStack Projects, you will find a Security Group called default. Initially it will contain four rules that look like this:

What do these rules mean? Note that the rules come in pairs, one for IPv4 and one for IPv6—you generally want both.
The first pair are "egress" rules. They allow traffic from your instance to anywhere on the Internet. This makes it possible for your instance to initiate connections to the outside. This is necessary for things such as:
- Accessing operation system package distributions for regular software updates
- DNS requests for converting hostnames to IP addresses (for example to find the servers mentioned above)
- Querying Network Time Protocol (NTP) servers to discipline the system clock
- Accessing the OpenStack Metadata Service during system boot.
The second pair are "ingress" rules that allow all incoming traffic from other members of the same security group. Thus, when you create several instances sharing this Security Group, they will have unlimited connectivity between each other—you won't need any specific rules to allow those internal communications.
Note that no other traffic is allowed by default. In particular, external hosts will not be able to connect to your instances unless you explicitly allow that by adding your own Security Groups/rules.
You may be tempted to remove these four default rules in order to improve security, but there are important caveats:
If you delete the egress rules altogether, your instances will take a long time to start up, because they won't be able to access the Metadata Service. They will also miss the information from that service. In particular, they won't be able to provision the trusted SSH public key for the default account. So unless you have configured SSH authorization in some other way, you won't be able to log in.
We mentioned a few other uses of the egress rules: Our standard images are configured to periodically check for and download software updates, which is considered a best practice for security reasons. They will also synchronize their system clocks using remote NTP servers. Without the egress rules that won't work.
The ingress-from-same-security-group rules are less critical. If you remove them, you will simply have to explicitly allow traffic from your other instances, in the same way as you have to allow traffic from external hosts.
Technical tips for SWITCHengines
Working with Virtual Machines
Use WebDAV
Take a Snapshot
Snapshot the VM via the Web Interface
With the command line tools. List the snapshots and get the ID of the snapshot you just created
openstack snapshot listCreate a Volume
openstack volume create --bootable --snapshot [snapshot id] [volume Name]List the volumes and get the volume id of the [volume Name] you just created
openstack volume listCreate an Image out of the Volume
openstack image create --volume [volume id] [Image Name]Wait for image to become active, this takes some time, check with the command:
openstack image show [Image ID]Download the Image
openstack image list
openstack image save --file IMAGE_FILE IMAGE_ID
Because that information is reset on every reboot by default.
Create a Snapshot of the VM. Using this new volume, create a new VM with the desired hardware flavour. Remove the floating IP address from the old VM and give it to the new one.
When using Tomcat, it may happen that it's starting very slowly. Tomcat internally uses the „SecureRandom“ random number generator.
Solutions:
- Use the option "-Djava.security.egd=file:/dev/./urandom". Tomcat will still be starting slowly, but reliably.
- Use the package "haveged" (available on Ubuntu). This will install a random number generator based on the so called HAVEGE algorithm. Further information: http://www.issihosts.com/haveged/
Method using download and upload:
- Prerequisite: prepare CLI access.
- Download Image of a virtual machine
- Upload image , section "Uploading an Image Using CLI"
Method with new VM and selective copy:
- Create a new VM in the new region, similar to the old one.
- Make sure that the direct ssh connection works. Normally you will have the same public key on both the source and the destination VM. It may be necessary to make the first login using "ssh -A" to establish the connection to your private key on your workstation.
- On source VM call:
-
cd [parent directory]; sudo tar cf - --one-file-system [directory] | ssh [destination vm] "cd [parent directory]; sudo tar xpf -"
-
Working with Microsoft Windows VMs
The Microsoft Windows Server 2012 template has per default some security settings enabled/disabled. These are:
- Firewall enabled
- No Print- and Filesharing Protocols are enabled
- No remote administration protocols are enabled at the public (default) interface
There's a detailed description on how to start a Windows VM in the FAQ.
Here is a short description how to share a folder on your VM. It has to be mentioned that this is not recommended. It will open ports to your VM and allow hackers to attack your vm. So, if you open ports on the public interface, restrict these openings only to a few IP's, which are safe.
First open your security group rules of your vm (Horizon/SWITCHengines dashboard):
- add rule tcp Port 445, remote: IP-of-remote-computer
- add rule tcp Port 139, remote: IP-of-remote-computer
- add rule udp Port-Range 137-138, remote: IP-of-remote-computer
In your windows server vm:
Open network and sharing center:
Network -> ethernet connection -> Install -> Service -> add -> File and Printer Service for MS Network
Windows Firewall -> Allow an app or feature through Windows Firewall -> Enable both File and Printer Sharing on the public network
Open Windows Explorer and change to your folder, which you want to share:
Properties of folder -> advanced sharing -> share this folder -> permissions -> set permissions of user to this share -> OK
Be sure that the security settings of the folder allow all users to access this folder with the right permissions.
That's it. :)
Hints how to access this share from outside:
Windows computer: Map network drive -> Folder: \\IP-of-Windows-Server\sharename -> connect using different credentials -> Username: [SERVERNAME|DOMAINNAME\]USERNAME -> Password: PASSWORD
Mac: Finder -> connect to server -> Serveraddress: smb://USERNAME:PASSWORD@IP-of-Windows-Server/SHARENAME